Hey Guys and Girls
I’m new here - first post woohoo. Anyways, I’ve been getting my feet wet a bit with the ESP-01 and with the Blynk app. Just exploring at this stage and what I’ve gotten up to so far is to get a DHT22 linked up to the ESP-01 and to get the data through the Blynk app and to trend it using the Blynk app.
I was inspired by This Project so I decided that I wanted to try my hand at getting an internet connected relay module also using the Blynk app. So first off, what am I doing and what am I using:
Processor: ESP-01 Module
Breadboard Power Supply Module
Relay Module - http://www.dx.com/p/5v-10a-2-channel-relay-module-w-optical-coupling-protection-expansion-board-for-arduino-black-355060#.V4hgLnUrKYR
The relay module activates the relay when a low input is given to the trigger so I had to write my code a bit in reverse.
For my push button input I followed the same wiring in the mentioned project except that I utilized a 12k resistor instead of a 1k resistor. I also initially tried to us GPIO 0 as my button input and GPIO 2 as my relay trigger output. Unfortunately I couldn’t get any response using GPIO 0 as my button input so I switched it around so that GPIO 2 is my button input and GPIO 0 is my relay trigger output. The button input works fine now.
When I use only the switch to switch the relay then it works fine. When I switch the relay to the off position and start using the virtual button on the Blynk app then everything works fine.
My problem starts when I activate the relay from the Blynk app and I switch it off using the switch. When I then want to reactivate it, then I have to switch the virtual switch from the off position to on, back to off and then when I switch it on again only then does the relay trigger and also switch on?
The same holds true but in reverse if I activate the relay from the switch and then try and deactivate it using the app.
My code as follows:
    #include <ESP8266WiFi.h>
    #include <BlynkSimpleEsp8266.h>

    //******************************************************************************************************************************************************************************************************************************************

    char auth[] = "AUTH Token";

    //******************************************************************************************************************************************************************************************************************************************

    int         Output_1                  = 0;
    int         Input_1                   = 2;
    WidgetLED   Virtual_LED_1             = 1;

    int         Button_State              = 0;
    int         Prev_Button_State         = 1;

    int         Relay_State               = 0;
    int         Virtual_LED_State         = 0;
    int         Virtual_Button_State      = 0;
    int         Prev_Virtual_Button_State = 0;

    int          Time_Interval            = 500;
    int          Previous_Millis          = 0;
    unsigned int Second_Counter           = 1;

    //******************************************************************************************************************************************************************************************************************************************

    void setup()
    {
      Blynk.begin(auth, "SSID", "PASS");

      while (Blynk.connect() == false)            //  Go into a while program until Blynk has connected to prevent wrongly reported switch values
      {
        yield();                                  //  Do (almost) nothing -- yield to allow ESP8266 background functions
      }

      pinMode(Output_1, OUTPUT);
      pinMode(Input_1, INPUT);
      digitalWrite(Input_1, HIGH);                //  Have to write this pin high before entering the void loop otherwise this pin will be grounded
    }

    //******************************************************************************************************************************************************************************************************************************************

    void loop()
    {
      Blynk.run(); // Initiates Blynk
      Button_State = digitalRead(Input_1);

      if(Button_State == LOW && Prev_Button_State == HIGH && millis() - Previous_Millis > Time_Interval)
      {
        if(Relay_State == 1)                      //  Check if the relay state was previously set to high
        {
          Relay_State = 0;                        //  If so then set the relay state to low
        }

        else                                      //  If the relay state was not previously set to high then we follow this function
        {
          Relay_State = 1;                        //  If so then set the relay state to high
        }

        Previous_Millis = millis();
        Blynk.virtualWrite(0, Relay_State);     //  Write the relay state to the virtual button to replicate the setting in the app as well.
        Prev_Virtual_Button_State = Virtual_Button_State; //  Working - sort off
      }

      Prev_Button_State = Button_State;

      //*******************************************************************************************************

        if(Virtual_Button_State == HIGH && Virtual_Button_State != Prev_Virtual_Button_State)
        {
          Relay_State = 1;
          Prev_Virtual_Button_State = Virtual_Button_State;
        }

        if(Virtual_Button_State == LOW && Virtual_Button_State != Prev_Virtual_Button_State)
        {
          Relay_State = 0;
          Prev_Virtual_Button_State = Virtual_Button_State;
        }

      //*******************************************************************************************************

      if(Relay_State == 1)
      {
        digitalWrite(Output_1, LOW);      //  Relay module triggers high with a LOW input
      }

      if(Relay_State == 0)
      {
        digitalWrite(Output_1, HIGH);
      }

      //*******************************************************************************************************

      Virtual_LED_State = digitalRead(Output_1);

      if(Virtual_LED_State == LOW)
      {
        Virtual_LED_1.on();
      }

      else
      {
        Virtual_LED_1.off();
      }
    }

    //******************************************************************************************************************************************************************************************************************************************

    BLYNK_WRITE(V0)
    {
      Virtual_Button_State = param.asInt();         // Get the state of the VButton
    }

    //******************************************************************************************************************************************************************************************************************************************
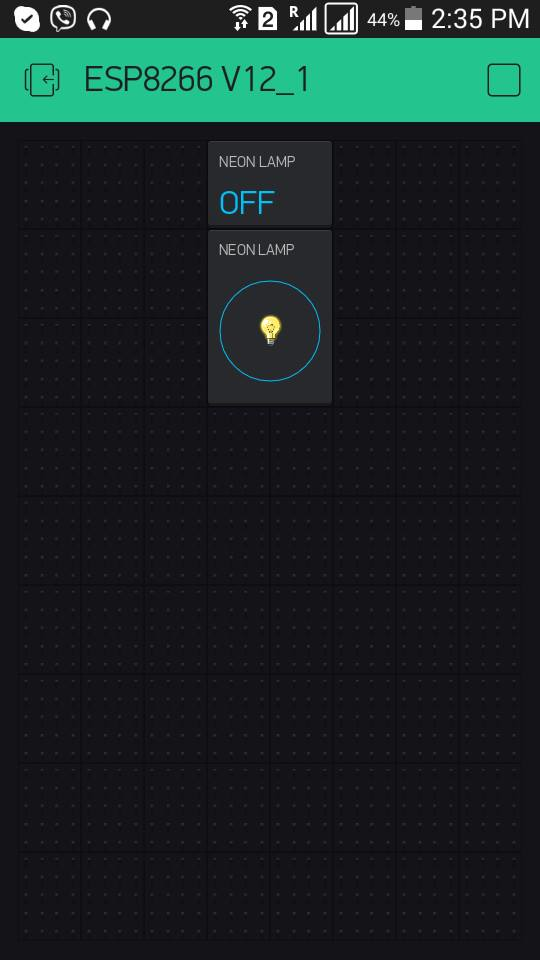
Blynk app setup:
Button:
Output: V0
Mode: Switch
LED:
Input: V1
I’m hoping someone will be able to provide some insight so that I don’t have to do a 3 push switch before the relay responds. Thank you in advance and wishing you a wonderful day ahead.
Regards
Dirk