Hello Blynk Community!
I was reading about Virtual Pins and how it works, I could understand the concept, but I could not find some example to use to make Blynk App to read when a simple button is pressed or not in the Raspberry Pi (RPi).
There’s a lot of information from Arduino but from Raspberry Pi I could not find it, I saw that another partners from the Community made this question but without a solid answer to clear the issue that I want to clear.
I hope to get an answer 
Best regards
Really helpfull your topic Gunner
Here is the code that you used but without the local server that you made, just a copy-paste  :
:
var Gpio = require('onoff').Gpio;  // links variable 'Gpio' to the all important onoff GPIO control library

var Blynk = require('blynk-library');  // Links variable 'Blynk' to the Blynk Library

var AUTH = 'xxxxxxx';  // My top secret auth code... useless to anyone on the cloud ;P

var blynk = new Blynk.Blynk(AUTH);

var v1 = new blynk.VirtualPin(1);  // Setup Button Widget on V1 with variable 'v1'
var v9 = new blynk.VirtualPin(9);  // Setup Display Widget on V9 with variable 'v9'
var v10 = new blynk.VirtualPin(10);  // Setup LED Widget on V10 with variable 'v10'


v1.on('write', function(param) {  // Watches for V1 Button
  console.log('V1:', param[0]);  // prints value to CLI
if (param == 0) {
        blynk.virtualWrite(10, 0);  // V10 Widget LED on
    } else if (param == 1) {
                blynk.virtualWrite(10, 1023);  // V10 Widget LED off
        }
});

v9.on('read', function() {   // I don't understand why this says read??
  v9.write(new Date().getSeconds());  // but this sends the seconds 0-60 to the Display Widget
});

  led = new Gpio(10, 'out'),  // Sets up the BCM pin 10 as an output for the LED and assigns it variable 'led'
  button = new Gpio(9, 'in', 'both');  // Sets up the BCM pin 9 as an input registering both rising and falling for the variable 'button'

button.watch(function (err, value) {  // Watches for button press and assigns 0/1 to value
  if (err) {
    throw err;
  }
led.writeSync(value);  // Sends value (0/1) to Physical LED
if (value  == 0) {
        blynk.virtualWrite(2, 0);  // V2 Widget LED on
    } else if (value == 1) {
                blynk.virtualWrite(2, 1023);  // V2 Widget LED off
        }
});

process.on('SIGINT', function () {  // This is apparently a cleaner exit upon CTRL-C... I dunno??...
  led.unexport();
  button.unexport();
});
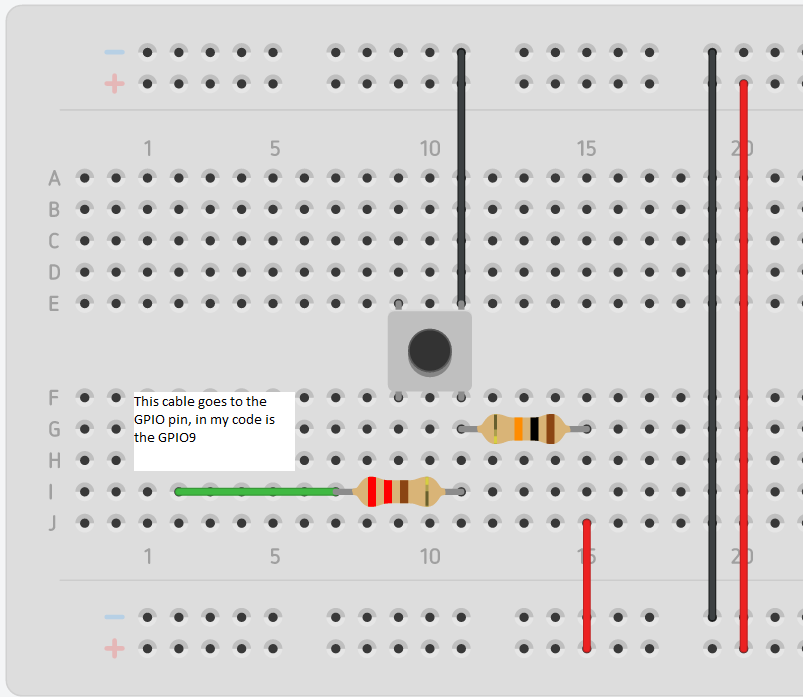
and this is the simple schematic to connect to the breadboard: