[SOLVED] How to countdown?

Been trying a variety of different approaches to do a countdown, but am struggling a bit…
Whats the best way to do a countdown? Any suggestion or help would be greatly appreciated.

Scenario:
User press’ a start button.
The countdown should be for 1 hour.
Display a percentage or time left (59 minutes ramining, etc.)
At the end of the hour, turn on an LED

  1. Make it work without Blynk
  2. Add Blynk
  3. Stir well, serve chilled. :tropical_drink:
6 Likes

Thanks @Pavel will try that. But not sure it will help solve anything.

I googled “arduino countdown” and i can assure you that you are not the first person to want to do a count down…

Thanks @Dave1829 but I am trying to do it all in BLYNK using a Photon.
I was able to achieve a simple version with the Arduino101 but wanting to do it using a Photon.

As Pavel said… not really Blynk related but I’m going to try and help.

@jhey, study the following code and make it fit your project. … and maybe this will come in handy for other people.


#include <ArduinoOTA.h>
#include <ESP8266WiFi.h>
#include <BlynkSimpleEsp8266.h>
#include <SimpleTimer.h>

char auth[] = "xxxxxxxx";
char ssid[] = "xxxxxxxx";
char pass[] = "xxxxxxxx";

SimpleTimer timer;

int CountdownRemainReset;
int CountdownRemain;
int CountdownTimer;

void setup() {
  Serial.begin(115200);
  WiFi.mode(WIFI_STA);
  Blynk.begin(auth, ssid, pass);
  while (Blynk.connect() == false) {}
  ArduinoOTA.setHostname("Countdowner"); // OPTIONAL
  ArduinoOTA.begin();
  CountdownTimer = timer.setInterval(1000, CountdownTimerFunction);
  timer.disable(CountdownTimer); // disable it on boot
}

void CountdownTimerFunction() {
  CountdownRemain--; // remove 1 every second
  CountdownShowFormatted(CountdownRemain);
  if (!CountdownRemain) { // check if CountdownRemain == 0/FALSE/LOW
    timer.disable(CountdownTimer); // if 0 stop timer
    Blynk.virtualWrite(1, LOW); // reset START/STOP button status
    Blynk.virtualWrite(0, "TIMER COMPLETE");
    Blynk.virtualWrite(6, 255); // LED for timer completed
    Blynk.virtualWrite(5, 0); // Timer LED status light off
  } else {
    Blynk.virtualWrite(6, 0); // LED for timer completed
  }
}

// Button Widget (Switch Type): Start/Pause Timer
BLYNK_WRITE(1) {
  if (param.asInt()) {
    if (CountdownRemain) { // check if there is a time set or not
      timer.enable(CountdownTimer);
      Blynk.virtualWrite(5, 255); // Timer LED status light on
    } else {
      Blynk.virtualWrite(1, LOW); // if CountdownRemain is set to 0, then dont start hte timer.
      Blynk.virtualWrite(0, "COUNTDOWN TIME NOT SET"); // if CountdownRemain is set to 0, then tell the user
    }
  } else {
    timer.disable(CountdownTimer);
    Blynk.virtualWrite(5, 0); // Timer LED status light off
  }
}

// Button Widget (Momentary): Reset Timer
BLYNK_WRITE(2) {
  CountdownRemain = CountdownRemainReset; // reset to original start time
}

// Slider Widget (60-180): Set Timer (mins)
BLYNK_WRITE(3) {
  if (timer.isEnabled(CountdownTimer)) { // only update if timer not running
    Blynk.virtualWrite(3, param.asInt() ); // if running, refuse to let use change slider
  } else {
    CountdownRemainReset = param.asInt() * 60 + 1; // + 1 set the timer to 1:00:00 instead of 00:59:59
    CountdownRemain = param.asInt() * 60;
    CountdownShowFormatted(CountdownRemain);
  }
}

void CountdownShowFormatted(int seconds) {
  long days = 0;
  long hours = 0;
  long mins = 0;
  long secs = 0;
  String secs_o = ":";
  String mins_o = ":";
  String hours_o = ":";
  secs = seconds; // set the seconds remaining
  mins = secs / 60; //convert seconds to minutes
  hours = mins / 60; //convert minutes to hours
  days = hours / 24; //convert hours to days
  secs = secs - (mins * 60); //subtract the coverted seconds to minutes in order to display 59 secs max
  mins = mins - (hours * 60); //subtract the coverted minutes to hours in order to display 59 minutes max
  hours = hours - (days * 24); //subtract the coverted hours to days in order to display 23 hours max
  if (secs < 10) {
    secs_o = ":0";
  }
  if (mins < 10) {
    mins_o = ":0";
  }
  if (hours < 10) {
    hours_o = ":0";
  }
  Blynk.virtualWrite(0, days + hours_o + hours + mins_o + mins + secs_o + secs);

}
void loop() {
  Blynk.run();
  ArduinoOTA.handle();
  timer.run();
}

Timer Running, LED status etc:

Time Complete: Completed LED turns on
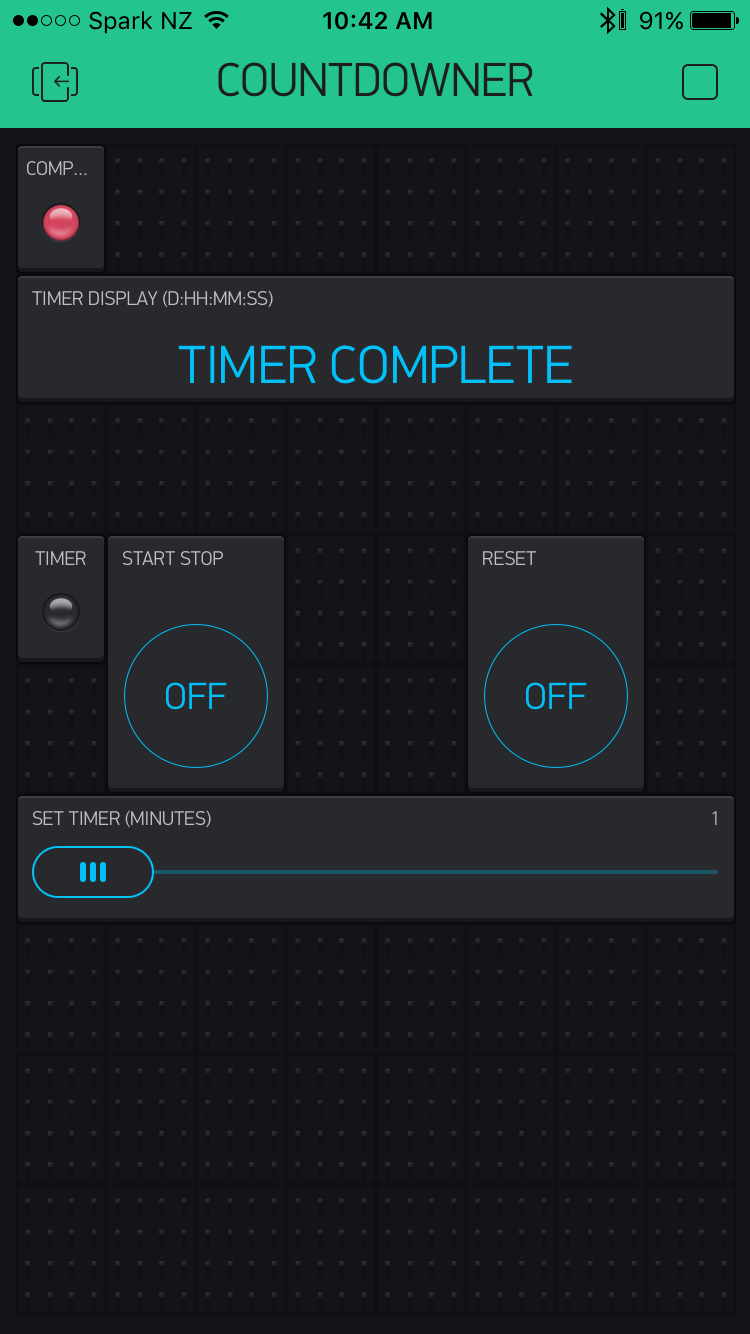
Project Clone:

11 Likes

@Jamin - Awesome, thank you very much for pointing me in the right direction! :trophy:
Will reference this post in my Hackster post.

2 Likes

Personally I would have ceased all assistance after this statement… and I usually go out of my way to write some code for someone in need, but they have to seem to try first.

@Jamin Thank you for your efforts here… as Yes, others like myself appreciate it. I am self taught, by example first, then following up with study, in most everything I do. Having code snippets like this to dissect really help!

I felt the same… but I know from experience and trawling through hundreds of useless forums posts where no one else helps… that I felt I had to help since I knew the answer.

The above example is probably a bit messy. If I had an hour to re-write it I would… but it serves the purpose :slight_smile:

2 Likes

Here is an additional bit of code for working out the overall progress dynamically.

// Get the progress (0-100%)
void CountdownProgress(int seconds){
    int progress = map(seconds,CountdownRemainReset,0,0,100); // make sure to invert it
    Blynk.virtualWrite(4,progress + String("%"));
}

Then update the following function from above:

void CountdownTimerFunction() {
  CountdownRemain--; // remove 1 every second
  CountdownShowFormatted(CountdownRemain);
  CountdownProgress(CountdownRemain);
  if (!CountdownRemain) { // check if CountdownRemain == 0/FALSE/LOW
    timer.disable(CountdownTimer); // if 0 stop timer
    Blynk.virtualWrite(1, LOW); // reset START/STOP button status
    Blynk.virtualWrite(0, "TIMER COMPLETE");
    Blynk.virtualWrite(6, 255); // LED for timer completed
    Blynk.virtualWrite(5, 0); // Timer LED status light off
  } else {
    Blynk.virtualWrite(6, 0); // LED for timer completed
  }
}
1 Like

@Gunner thanks for your comments. I am here seeking help, after spending many hours working on it.That response was to @Pavel 's comment.
If I had it working, I would not be asking for suggestions. Glad I found someone (@Jamin) willing to provide a valuable response, as opposed to negative feedback.
I will continue to work on the code and share my findings here and the tutorial I am trying to write:

you da man @Jamin !! :green_heart:
and Thanks to everyone for the negative/positive feedback!

1 Like

Negative feedback often has a positive purpose, and is essential in both electronics and real life… without it things may just sit around and wait for something else to do the work.

I have to agree. I take all negitivity as constructive criticism.

Gunner is a valued community member and he (and I) see many people ask silly questions… often unrelated to Blynk… so its easy to skip over it without helping.

Call us jaded @jhey :smile: lol

I’ve updated the thread title to Solved :slight_smile: We all learnt something today and its here for anyone else who happens to find it on Google :smiley:

2 Likes

so you waited until the 5th post of the thread to mention that? :wink:

here’s some more constructive criticism, you could in future ask questions better:

http://www.catb.org/~esr/faqs/smart-questions.html

BTW i think it is great you are developing projects for hearing impaired, keep it up :slight_smile:

The code is quite long for a count down timer.

I was wondering if one can read the time remaining from the timer.setTimeout()?

If one can it would be a rather neat solution, however I have “Googled” this but can’t seem to figure it out. Lots of Java examples but still…

Maybe somebody could advise?

The code I provided earlier in this thread does what you’re asking.

Great job thank you

Hello. I have installed your code, but I have a problem. When power is cut off, it does not resume where it left off. Could you generate a code for this with help from EEPROM? happy event if you help.

Each EEPROM memory location has a limited write capacity before that location “burns out”. Constantly writing to a location to store the latest countdown value would kill your EEPROM pretty quickly.

You’d be better-off writing Tha value to the Blynk cloud server then syncing it back to your device when it powers back up.

Pete.

1 Like