Hello everyone, sorry to use google translate, but I’m Italian and I am 56 years old, a little late to learn English well.
I own an Arduino Nano and a esp8266 form with which I would like to do some small automation for home.
You may link a wiring diagram, and its sketch to use to make it all work.
I have an 8 relay module and hardware as they are able to realize a few things.
Thank you all
First of all, you have to add some networking capabilities. You can choose between ethernet (cable) or wireless. I would recommend you buy a Wemos D1 Mini (Pro). This board has onboard wifi capabilities and will be very suitable for switching your relays. It can be programmed from the Arduino IDE.
I think that he already owns ESP8266. Basically he only wants to know how the things should be connected.
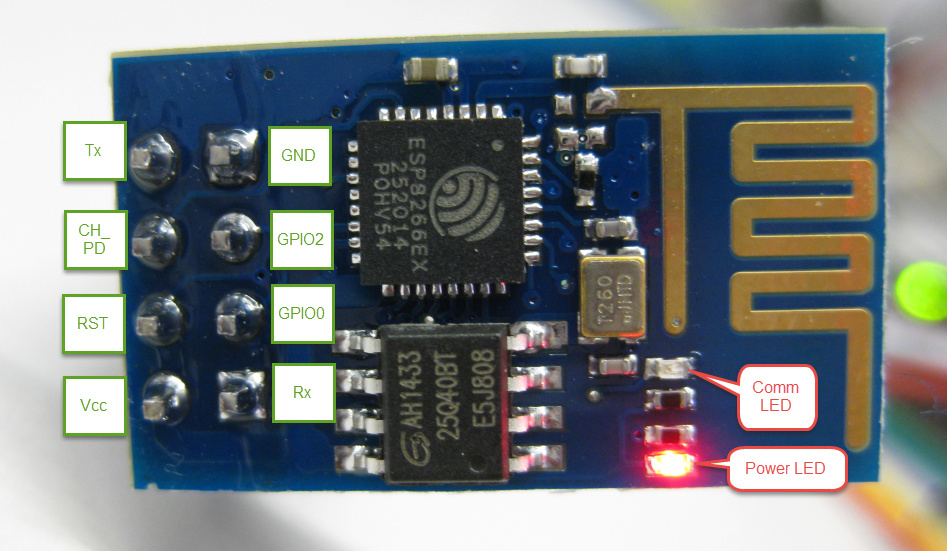
If you have esp-01 (that small thing with 4x2 pin row),I suggest to buy this: adapter
With this you didn’t need to make voltage dividers and buy LDO voltage regulator. You will simply connect 4wires to arduino, pull one pin high and you are ready to go. Then you only need to connect arduino to relays and set it up in Blynk app.
thanks for the quick replies.
So my situation is this:
I built an interface rS232 / TTL, as my computer still has the serial.
so I can also be programmed directly ESP8266 form.
I add that I’m unemployed, so I try to spend less money.
I also tried to read the communication between Arduino and ESP8266 and I find only two answers depending on the sketch that load, one is “Wifi shield not” the other I see only the key token.
Be patient, but I’m electrician and do not know the Arduino commands.
I was looking for a guide to understand step by step maneuvers to do, both on ESP on Arduino to create a working system.
Must I flash the module to use it? Or I can let him do to Arduino if possible?
Sorry for the stupid questions but I am novice.
Thank you and greetings from Italy
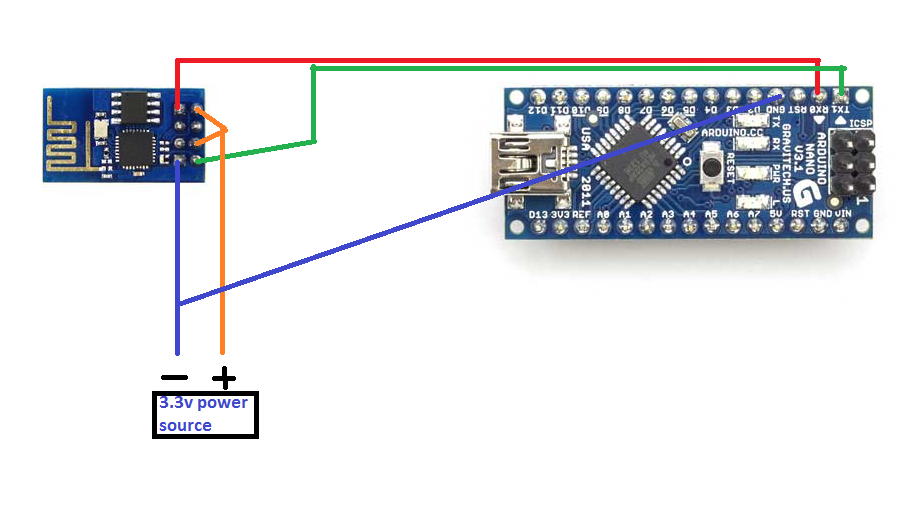
You need to connect it like this:
example sketch:
/**************************************************************
 * Blynk is a platform with iOS and Android apps to control
 * Arduino, Raspberry Pi and the likes over the Internet.
 * You can easily build graphic interfaces for all your
 * projects by simply dragging and dropping widgets.
 *
 *   Downloads, docs, tutorials: http://www.blynk.cc
 *   Blynk community:            http://community.blynk.cc
 *   Social networks:            http://www.fb.com/blynkapp
 *                               http://twitter.com/blynk_app
 *
 * Blynk library is licensed under MIT license
 * This example code is in public domain.
 *
 **************************************************************
 *
 * This example shows how to use ESP8266 Shield (with AT commands)
 * to connect your project to Blynk.
 *
 * Note: Ensure a stable serial connection to ESP8266!
 *       Firmware version 1.0.0 (AT v0.22) is needed.
 *       You can change ESP baud rate. Connect to AT console and call:
 *           AT+UART_DEF=9600,8,1,0,0
 *       In general, Soft Serial may be unstable.
 *       It is highly recommended to switch to Hard Serial.
 *
 * Change WiFi ssid, pass, and Blynk auth token to run :)
 * Feel free to apply it to any other example. It's simple!
 *
 **************************************************************/

#define BLYNK_PRINT Serial    // Comment this out to disable prints and save space
#include <ESP8266_Lib.h>
#include <BlynkSimpleShieldEsp8266.h>

// You should get Auth Token in the Blynk App.
// Go to the Project Settings (nut icon).
char auth[] = "YourAuthToken";

// Your WiFi credentials.
// Set password to "" for open networks.
char ssid[] = "YourNetworkName";
char pass[] = "YourPassword";

// Hardware Serial on Mega, Leonardo, Micro...
#define EspSerial Serial

// or Software Serial on Uno, Nano...
//#include <SoftwareSerial.h>
//SoftwareSerial EspSerial(2, 3); // RX, TX

// Your ESP8266 baud rate:
#define ESP8266_BAUD 9600

ESP8266 wifi(&EspSerial);

void setup()
{
  // Set console baud rate
  Serial.begin(9600);
  delay(10);
  // Set ESP8266 baud rate
  EspSerial.begin(ESP8266_BAUD);
  delay(10);

  Blynk.begin(auth, wifi, ssid, pass);
}

void loop()
{
  Blynk.run();
}
greetings from slovakia 
Thanks, therefore, my system works at the time, ie the connections between Arduino, esp and relay board, in addition to the 3.3-volt voltage regulator and voltage dividers to protect the rx and tx doors of the esp module, works with an app called Zeta control, with which I can drive 8 relays, but I can not do anything else.
That I can not read the inputs, both digital and analog.
Greetings from Italy
can you please post some wiring diagram?
I should draw it and post it here.
In any case it is connected as you indicated in the drawing.
Ie tx and rx the corresponding Arduino Nano with a resistive divider for the Arduino tx rx connection esp.
The power is supplied from an LM317 calibrated at 3.3 volts, then current sufficient to operate the esp form even at full absorption.
To control the relay using a ULN2003.
It all works well, with Zeta Control course.
Thank you
oh i see, then there should be no problems. I suggest you to read this: http://docs.blynk.cc/#getting-started-getting-started-with-the-blynk-app
and this: http://docs.blynk.cc/#getting-started-getting-started-with-hardware
Unfortunately the problems are there, even if load sketches that I find on the net, which by the way they all look alike to me, on my smartphone I always reply that my arduino nano is not connected to a network.
From reading the serial communication between Arduino and esp not see anything, it seems that Arduino does not transmit anything to the module, or if you send something the module responds with “error”.
Here’s my problem.
Thanks again.
Yes, of course, as I said, the connections are like the ones you’ve shown in the drawing.
Besides, it works and it conette with this app https://play.google.com/store/apps/details?id=org.zetaremote&hl=it
Excuse me, I wrote zeta zeta control and not remote.
Thank you
Try to send AT+GMR thru TTL and see what it does.
I have it all in the lab, are now using a laptop, but the evidence I have to do by sending the command to the single module, disconnecting Arduino.
If I turn on the module only esp after a few seconds I get the answer “WIFI CONNECTED”, but of course does not use it on the cloud Blynk.
Hello and thanks
I’m back, today I did other tests, in any case, the system does not connect to the cloud.
I checked the modem port, is enabled to forward 8442.
I tried other sketches but all do the same thing.
Ie no dialogue between Arduino and esp.
I only read “No shield connected”.
Now my question is this.
I need to load something on the ESP module?
As the ESP module also alone connects to the wifi network, I imagine that there is something not in the temporary memory.
While Arduino not sending any command I assume it is waiting for some string from the ESP module.
If I’m wrong, correct me.
Thank you all and greetings from Italy.
Is the blue led on esp blinking? You didn’t need to flash SW to esp, unless you have very old one. Can you post your arduino code here?
This is the code.
`#include <ESP8266_HardSer.h>
#include <BlynkSimpleShieldEsp8266_HardSer.h>
#define EspSerial Serial
ESP8266 wifi(EspSerial);
// You should get Auth Token in the Blynk App.
// Go to the Project Settings (nut icon).
char auth[] = “your_Token”;
void setup()
{
Serial.begin(9600);
delay(10);
EspSerial.begin(9600);
delay(10);
Blynk.begin(auth, wifi, “ssid”, “pass”);
delay(10);
while (Blynk.connect() == false) {
}
}
void loop()
{
Blynk.run();
}
`
Sorry for the error, the sketch run ok.
Yes, the blue LED blinks regularly, as with the red LED on the Arduino RX module, a sign that there is data exchange.
So there are some errors.
#include .....
#include .....
#define EspSerial Serial

ESP8266 wifi(&EspSerial); //missing &

// You should get Auth Token in the Blynk App.
// Go to the Project Settings (nut icon).
char auth[] = "your_Token";
char ssid[] = "your_ssid";
char pass[] = "your_pass";

void setup()
{
EspSerial.begin(9600);
delay(10);
Blynk.begin(auth, wifi, "ssid", "pass");
//that while loop is not needed
}

void loop()
{
Blynk.run();
}