I need help in programming the segmented switch, where I will turn on automatic and manual modes. for manual mode there are two button widgets, each of which is useful for turning on the lights, and in automatic mode for turning on the soil moisture sensor. can I be given an example of programming according to my description.
With Blynk app paused tap on the segment switch to bring up its settings than tap on the i in the top left and you’ll get this: Menu Example
The segment switch allows you to set variables and call functions between the two {} after case. Like so:
BLYNK_WRITE(V1) {
  switch (param.asInt())
  {
    case 1: // Item 1
      Serial.println("Item 1 selected");
      @ade - Put the things you want to happen when the 1st button on the segment switch is selected here!!!
      break;
    case 2: // Item 2
      Serial.println("Item 2 selected");
      break;
    case 3: // Item 3
      Serial.println("Item 3 selected");
      break;
    default:
      Serial.println("Unknown item selected");
  }
}Hmmm?? For some reason the example in the blynk app has {} after case and the Blynk example browser doesn’t. I wonder what the difference is
Could you please give a sample programmer like that which has been completed.
Here’s my repo of yard sprinklers systems I’ve built over the last few yrs: BlynkSprinklerSytems
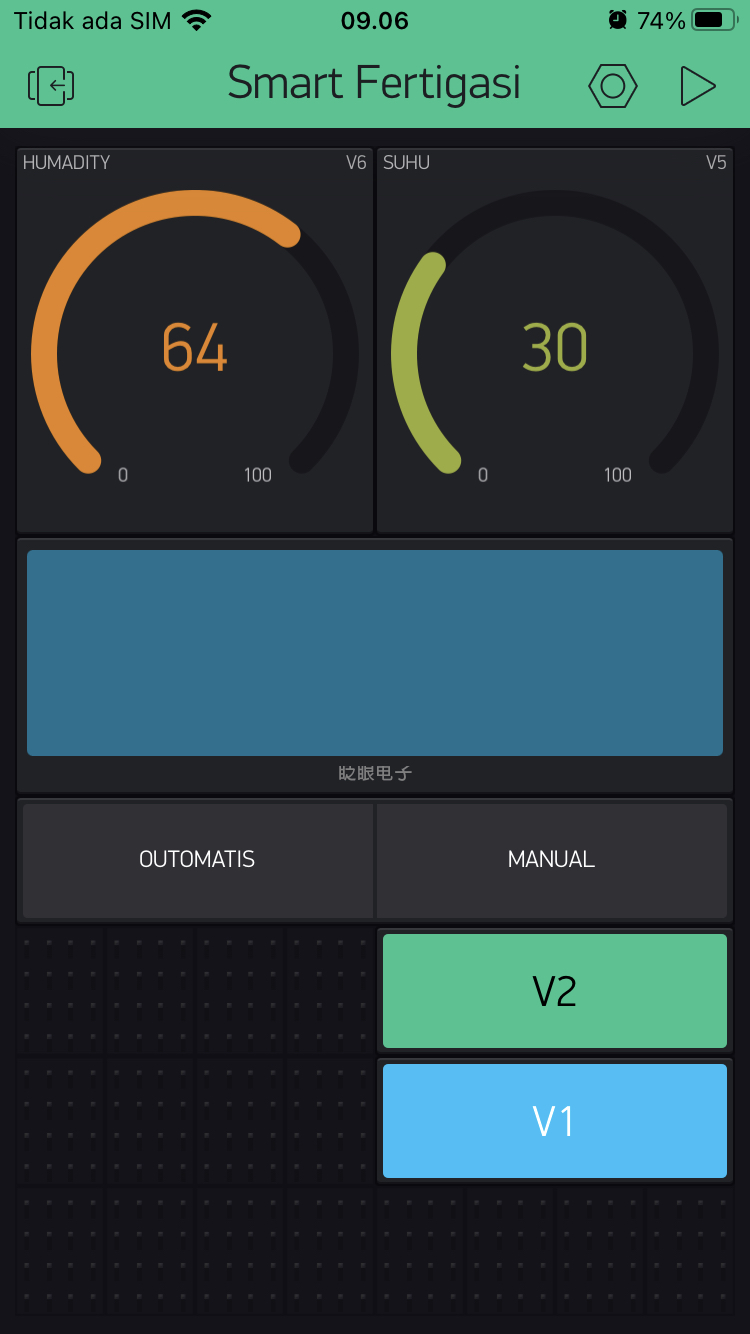
Scroll down until you find Mode Selection. in most of my code files the segment switch is on V0
I’m currently working on this file and at first glance it will look like the segment switch isn’t doing any good. But if you dig deeper you’ll find buttons that do stuff only if segment switch is set to Manuel and if u dig farther you’ll find timers that start sequences if the segment switch is in automatic
[Unformatted code removed by moderator]
can you help me in improving my programming. I have tried to follow the programming you gave me, but I still experience failures. I beg your help.
Well… I’m not very smart at all this, but I can try to help you if you’ll format your code above and post a link to the sensor your using.
To format you code put 3 backticks before it and 3 backtick after it. Backtick are these little things ~
Also you’ll need to explain a little more about what your wanting to do. I don’t quit understand what the segment switch is suppose to do.
can you try to improve my programming above. I don’t know what you are telling me.
@Ade please edit your post, using the pencil icon at the bottom, and add triple backticks at the beginning and end of your code so that it displays correctly.
Triple backticks look like this:
```
Pete.
#include <ESP8266WiFi.h>
#include <BlynkSimpleEsp8266.h>
#include <DHT.h>

char auth[] = “”;
char ssid[] = “”;
char pass[] = “”;

#define potPin A0
#define DHTPIN 0
#define DHTTYPE DHT11
DHT dht(DHTPIN, DHTTYPE);

BlynkTimer timer;

WidgetLCD lcd(V1);

int relay1 = 14;
int relay2 = 12;
int relay3 = 13;

MODE mode = unknown;

struct valve_t {
int pin;
bool manual; // false … automatic
bool state;

void sendSensor()
{
float h = dht.readHumidity();
float t = dht.readTemperature();

if (isnan(h) || isnan(t)) {
Serial.println(“Failed to read from DHT sensor!”);
return;
}
Blynk.virtualWrite(V5, t);
Blynk.virtualWrite(V6, h);
}
void Starup(){
int Tanah = analogRead(A0);
float tegangan = Tanah * (5.0 / 1023.0);
Serial.print("Nilai Potensio : ");
Serial.println(Tanah);

Blynk.virtualWrite(V1, Tanah);
lcd.print(0,0,“Kelembaban:”);
lcd.print(11,0,Tanah);

if(Tanah>=150&&Tanah<=300){
Blynk.virtualWrite(V1, Tanah);
lcd.print(0,1,“Keadaan:”);
lcd.print(8,1,“Baik”);
}
else if(Tanah>=300&&Tanah<=500){
Blynk.virtualWrite(V1, Tanah);
lcd.print(0,1,“Keadaan:”);
lcd.print(8,1,“Cukup”);
}
else if(Tanah>=500&&Tanah<=700){
Blynk.virtualWrite(V1, Tanah);
lcd.print(0,1,“Keadaan:”);
lcd.print(8,1,“Buruk”);
}
}
BLYNK_WRITE(V0) {
switch (mode = (MODE)param.asInt())
{
case manual:
Blynk.virtualWrite(“Mode: Manual”);
break;
case automatic:
Blynk.virtualWrite(“Mode: Automatic”);
break;
default:
mode = unknown;
}
setMode(mode);
}

void blynkWriteManual(int nr, int value) {
char msg[32];
valve[nr].manual = value;
}
BLYNK_WRITE(V11) {
if (blynkWriteManual(0, param.asInt()== HIGH)); {
digitalWrite(relay1, HIGH);
digitalWrite(relay2, HIGH);
}
else{
digitalWrite(relay1, LOW);
digitalWrite(relay2, LOW);
}
}
BLYNK_WRITE(V12) {
if (blynkWriteManual(2, param.asInt()== HIGH)); {
digitalWrite(relay3, HIGH);
digitalWrite(relay2, HIGH);
}
else{
digitalWrite(relay3, LOW);
digitalWrite(relay2, LOW);
}
}

void blynkWriteAuto(int nr, const BlynkParam& param) {
int Tanah = analogRead(A0);
float tegangan = Tanah * (5.0 / 1023.0);
if(Tanah>=150){
digitalWrite(relay1, HIGH);
digitalWrite(relay2, HIGH);
}
else{
digitalWrite(relay1, LOW);
digitalWrite(relay2, LOW);
}
}
void setup(){

Serial.begin(9600);

Blynk.begin(auth, ssid, pass);
dht.begin();
timer.setInterval(1000L, Starup);
timer.setInterval(1000L, sendSensor);
lcd.clear();

pinMode(relay1,OUTPUT);
pinMode(relay2,OUTPUT);
pinMode(relay3,OUTPUT);
}

void loop(){
Blynk.run();
timer.run();
}```I’ve deleted you unformatted code from your previous post.
Is there a reason why you chose not to edit that post and fix the formatting as I asked, but re-post the code with the correct formatting in a new post?
Pete.
I don’t know what you mean. I need your help in improving my programming.
phased anywhere my programming was wrong. Can you help me. thank you
When you create a new topic, it contains text which is intended to guide you through the process of providing the correct information, in the correct format, to help others to help you and to ensure that you follow the forum rules.
This includes information about how to correctly format code when you post it to the forum.
You ignored this, and posted unformatted code in post #6 of this topic.
@isfarm asked you to correct this and your response was…
I then explained in more detail and asked you to…
You ignored this request, left your unformatted code in post #6 and re-posted you code - this time with the correct formatting, in post #11
As a result, I had to go back and tidy-up the mess you’d left in post #6
I would say that you actually need help in learning how to follow basic instructions.
Pete.
And I don’t know what you want your program to do. When I write programs I have to get one thing working before adding in another thing. So I’d start with something like this:
#include <ESP8266WiFi.h>
#include <BlynkSimpleEsp8266.h>

// You should get Auth Token in the Blynk App.
// Go to the Project Settings (nut icon).
char auth[] = "Put code here";
BlynkTimer timer;
WidgetLCD lcd(V1); //set lcd widget to Advanced in Blynk App
int appButton11; //for storing the value we get from V11

// Your WiFi credentials.
// Set password to "" for open networks.
char ssid[] = "YourNetworkName";
char pass[] = "YourPassword";

BLYNK_WRITE(V11) {//asign a buuton in blynk app to V11 and set it to switch
    appButton11 = param.asInt();
    if (appButton11) {//this will run ever time the button in Blynk app on V11 is pressed and the button shows On
        lcd.print(0, 0, "Button Pressed");
    }
    else {//this will run ever time the V11 button is off
        lcd.clear();
    }
}

void setup()
{
  // Debug console
  Serial.begin(9600);

  Blynk.begin(auth, ssid, pass);
  // You can also specify server:
  //Blynk.begin(auth, ssid, pass, "blynk-cloud.com", 80);
  //Blynk.begin(auth, ssid, pass, IPAddress(192,168,1,100), 8080);

  lcd.clear(); //Use it to clear the LCD Widget
  lcd.print(0, 0, "Hello"); // use: (position X: 0-15, position Y: 0-1, "Message you want to print")
  lcd.print(1, 0, "World");
  // Please use timed events when LCD printintg in void loop to avoid sending too many commands
  // It will cause a FLOOD Error, and connection will be dropped
}

void loop()
{
  Blynk.run();
  timer.run();
}
If you can post a picture of your lcd screen in Blynk showing Button Pressed, we can go from there. Also, I’ve learned a lot from: Blynk Example Browser.