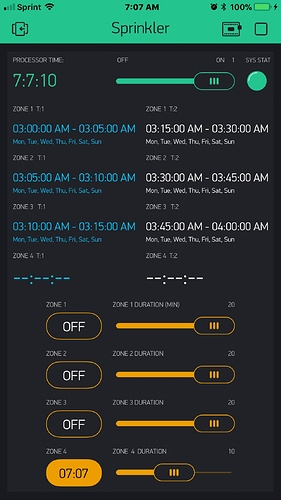
Sorry, I have some problems with my iPad.
Hello hagay, I’m using your code for irrigation since last year without problem.
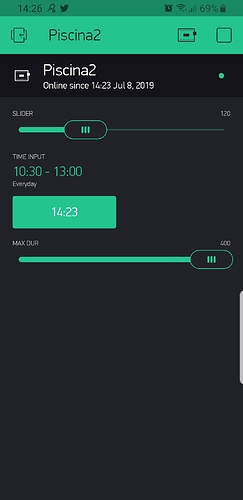
Now I’m also testing with my swimming pool motor pump on/off and I notice a funny behaviour.
If I use time input widget (start time) for start and stop, it start correctly but never stop, but maybe it not designed for it.
If use time input only for start and slider duration for stop, for instance six hour ( 360 minutes), it start correctly but every time my nodemcu lose wifi connection even for one second the counting restart from that time.
The time is showed on the button.
So my motor pump is always on…
Could you have a test on your device?
Thanks
Hi alessiocalosi.
I made a lot of changes to the code since my last post.
I was busy doing some real work so the change was on and off for long time and I did not post it here.
I now have the code on github and you can see it at :GitHub - hagayr/ESP8266_scheduler: Blynk Configurable Scheduler
It includes Automatic connect and OTA.
I think your issue is caused by the wifi disconnect.
when connected again the Blynk.syncAll(); see that the button is pressed (the app is not reset so the VP state is ON) and tries to activate the scheduler.
If you don’t want to change into my new code you can check the
BLYNK_CONNECTED() function.
and replace the
Blynk.syncAll();
with:
for (int i = 0; i<TIME_CNT*SCHEDULER_CNT ; i++) Blynk.syncVirtual(VP_SWCH0_TIME0+i);
for (int i = 0; i<SCHEDULER_CNT ; i++) Blynk.syncVirtual(VP_ACTV_DUR_SCHD0+i);
for (int i = 0; i<SCHEDULER_CNT ; i++) Blynk.syncVirtual(VP_MAX_DUR_SCHD0+i);
Blynk.syncVirtual(VP_SLEEP_SYS);
Blynk.syncVirtual(VP_DISBL_SYS);
Blynk.syncVirtual(VP_DISBL_DAYS);
this will make Blynk ignore the immidiate activation when connected again.
Hope this will help.
Hagay
I’m changing to your new code immediately!
Thank you very much.
Finally my system is working ok. I am using 24v solenoids, it was the easy way to do it.
Arizona, thks a lot for your code. I have only one doubt. When I manually switch off the system with the slide button, the system goes ON again after a few days. Is it normal?
Hello, @hagay, I’m starting this project and I was seeing the Github repository, and because I’m a noob, I don’t understand the files like Autoconn, device defines, etc. Can you please explain how to used.
Cumps.
Automatic Connect (using tzapu WififManager)
DeviceDefines.h to select the device in use
//#define SONOFF_4CH_PRO
#define ESP8285_NODEMCU
//#define SONOFF_TH16
//#define APTINEX_RP4CE8So I have to update the firmware of esp8266?
No, only the sketch.
The original code for this project doesn’t include OTA.
The code will be uploaded to the ESP using a serial cable. If you later wanted to add OTA functionality you could, provided the code doesn’t take up more than 50% of the available memory.
Pete.
@PeteKnight so the files only need to be updated and than upload to esp8266 like the, ino file.
https://github.com/hagayr/ESP8266_scheduler?files=1
I’m not sure what you mean by “updated”
The GitHub project you linked to does include OTA, which can be used to update the device once you’ve loaded the initial code via a serial cable.
Maybe rather than asking cryptic one-line questions you should explain in more detail where you are at with getting this project up and running.
Pete.
@PeteKnight restarting its better, my doubt is simple in the gui project that I linked what I do with the rest of that files like Autoconn, who I upload to Esp8266?
It’s an entire project, with sub files that will appear in individual tabs within the Arduino IDE. Download it all and save it in the same folder then open the .ino file.
Pete.
Hello, i tried to work with this project but I’m confused.
- first copy all the files to a folder
- Open the ESP8266_scheduler.ino
- go to DeviceDefines.h, change this #define ESP8285_NODEMCU, to ESP8266_NODEMCU.
- Than select NodeMcu 0.9 (ESP-12 Module)
- upload the file.
Is this i have to do?
Because i only have worked small projects only with a file, never worked with this structure.
And this is the last update the project have? 
Yes.
Pete.
Hello Everyone, I tried a lot options for my projects and now, I’m confused!!
My projects work with Wemos-D1-Mini V3.0
I use Arduino V1.8.10 with Blynk 0.6.1, Local server V0.41.5
-
My projects work fine in general, But When I scedule Timer3 (Pin Virtual V3) on Switch 1 (Pin Virtual V21), Zone 2 turn ON instead Zone 1 ??
-
Also, When I turn ON manually my zone, Zone 1 = OK, Zone 2 and 3 turn ON always (I push for turn OFF (try many time for that work) and the bad output on my wemos turn ON ??
-
I don’t understand the reset function, also I tried of change my output pin but no success!
There is my code :
// IrrigationSystemIOT V1.0 :                          //
// **Mettre des LEDs rouge au lieu de Vert et REF. a +5V au lieu de +3.3V**
//  LORSQUE L'ON UPLOAD : IL FAUT RIEN METTRE SUR SES I/O : GPIO : 0 (D3) ,2 (D4) ET 15 **(D8)**

#define BLYNK_PRINT Serial                                                            // Comment this out to disable prints and save space

#include <ESP8266WiFi.h>
#include <BlynkSimpleEsp8266.h>
#include <TimeLib.h>
#include <WidgetRTC.h>

BlynkTimer timer;                                                                   // Enable Timer object declaration
WidgetRTC rtc;                                                                      // this code use Real Time Clock widget in the blynk app to keep the clock updated from net

char auth[] = "xxxxxxxxxxxxxxxxxxxxxxxxx";                                   // You should get Auth Token in the Blynk App.
char ssid[] = "xxxxxxxxxxxxxxxxxxxxx";                                                 // SSID (name) of your wifi
char pass[] = "xxxxxxxxxxxxxxxxxxxxxxxxx";                                                      // your wifi password

void turn_on_off(int on_off, byte switch_no , byte time_no);
void turn_off_switch_no_0();
void turn_off_switch_no_1();
void turn_off_switch_no_2();

// define configuration (number of ZONE and number of Timers)
//#define SWITCH_CNT  2                                                                // Nombre de Zone (nombre de Zone programme)
//#define TIME_CNT    3                                                                // Nombre de Timers (nombre d'entree programme)
#define SWITCH_CNT  3                                                                // Nombre de Zone (nombre de Zone programme)
#define TIME_CNT    3                                                                // Nombre de Timers (nombre d'entree programme)

//--------------------------------( Declare Variables )-----------------------------//
#define WIFI_LED    2                                                            // WIFI_LED     pin port GPIO02 (D4)

int PuissanceWifiSignal = 0;
int off_on_Bouton = 0;                                                          // Var. pour controler le systeme (desactive ou active)(OFF = 0, ON = 1)

int Vpin14;                                                                     // Pin Virtual V14 pour le mode manuel Zone 1
int Vpin15;                                                                     // Pin Virtual V15 pour le mode manuel Zone 2
int Vpin16;                                                                     // Pin Virtual V16 pour le mode manuel Zone 3
int Vpin35;                                                                     // Pin Virtual V35 pour selectionner le mode du systeme (OFF, ON)

//byte switch_pins[] = {5 , 4, 0};                                                        // Number of gpio to be used as switch/relay control
byte switch_pins[] = {5 , 4, 0};
bool switch_default[] = {LOW,LOW,LOW};

////////////////////////////////////////////////////////////////////////////////////////
// This code can control up to 4 switches                                             //
// For each switch up to 4 schedule start and end times can be configured - (V0..V15) //
// A default duration can be defined per switch                           - (V16..V19)//
// If an end time is not defined at the app the default duration is used              //
// default duration is also used when manually activating the switch       - (V20..V23)//
// for each switch when start time is reached the switch turns on for the duration    //
//                                                                                    //
// maximum duration is used for safety (to limit activation time)         - (V24..V27)//
////////////////////////////////////////////////////////////////////////////////////////

int  start_time_sec[SWITCH_CNT][TIME_CNT];     // array of 4 start times (in seconds) for 4 switches [switch number][schedual timer number]
bool start_valid[SWITCH_CNT][TIME_CNT];        // is the start time valid ?
bool weekdays[SWITCH_CNT][TIME_CNT][8];        // array of 8 days (day 0 not used) for each schedule time
int  active_duration[SWITCH_CNT][TIME_CNT+1];  // duration per switch per time(in sec)
bool end_valid[SWITCH_CNT][TIME_CNT];          // is the end time valid ?
int  max_duration[SWITCH_CNT];                 // max duration per switch

// when activating a switch a timer is set for the configured duration
// when the duration ends the switch is turned off by the timer
// the id of the timer is saved using end_timer_id
// if switch is manually turned off the end_timer_id is used to stop the timer.
// end_timer_id is initialized to 32 (per entry) at the setup section
int end_timer_id[SWITCH_CNT];

//////////////////////////////////////////////////////////
// get schedual parameters from App                     //
//////////////////////////////////////////////////////////
// This function is called when ever a timer is set from the APP (V0..V8)
// it receive the start (and optionally end) time from the time input widget
//  and saves them in the appropriate arrays

void set_time(BlynkParam param, byte switch_no, byte time_no){
    TimeInputParam t(param);                                                 // Process start time
 if (t.hasStartTime()){
   Serial.println(String("Start: ") +
                  t.getStartHour() + ":" +
                  t.getStartMinute() + ":" +
                  t.getStartSecond());
   Serial.println(String("Start in sec : ") + param[0].asLong() + String(" for switch ") + switch_no + String(" time_no : ") + time_no);
   start_time_sec[switch_no][time_no]= param[0].asLong();
   start_valid[switch_no][time_no] = true;
 }else{
   // Do nothing
   Serial.println(String("No Start Time Given for switch  : ") + switch_no + String(" time_no : ") + time_no);
   start_valid[switch_no][time_no] = false;
 }

 //////////////////////////////////////////////////////////////////////////////
 // check if end time is received convert and save it as day time in seconds //
 //////////////////////////////////////////////////////////////////////////////
 if (t.hasStopTime()){
   Serial.println(String("Stop: ") +
                  t.getStopHour() + ":" +
                  t.getStopMinute() + ":" +
                  t.getStopSecond());
   Serial.println(String("Stop in sec  : ") + param[1].asLong() + String(" for switch ") + switch_no + String(" time_no : ") + time_no);
   active_duration[switch_no][time_no] = (param[1].asLong()-start_time_sec[switch_no][time_no]);

   // if end time is smaller than start time this means end time is at next day
   if (active_duration[switch_no][time_no]<0) active_duration[switch_no][time_no]= 86400 + active_duration[switch_no][time_no];

   Serial.println(String("Stop duration : ") + active_duration[switch_no][time_no]);
   end_valid[switch_no][time_no] = true;
 }else{                                                                                // if end time is not defined //
   // Do nothing
   Serial.println(String("No Stop Time Given for switch   : ") + switch_no + String(" time_no : ") + time_no);
   end_valid[switch_no][time_no] = false;
 }

 for (int i = 1; i <= 7; i++) {                                                  // Process weekdays (1. Mon, 2. Tue, 3. Wed, ...)
   if (t.isWeekdaySelected(i)){
     Serial.println(String("Day ") + i + " is selected");
     weekdays[switch_no][time_no][i] = true;
   }else{
     weekdays[switch_no][time_no][i] = false;
   }
 }
   Serial.println();
}

BLYNK_WRITE(V35){
 Vpin35 = param.asInt();                                                                 	// This reads status of on/off mode and displays on screen
 if (Vpin35 == 1){		                                								                      // Si Vpin35 a ON, LED_RGB_G_Status = 1, SYSTEM ON : WAINTING SCEDULE
   off_on_Bouton = 1;                                                          	          // Var. "off_on" = 1 pour activer le timer de la scedule
   Serial.println(String("Mode OFF_ON (1- OFF / 2- ON ) : ") + off_on_Bouton);Serial.println("");
 }else{                                                        	                          // Si Vpin35 a OFF, LED_RGB_B_Status = 1, SYSTEM OFF : WAINTING SCEDULE
   off_on_Bouton = 0;                                                  	                  // Var. "off_on" = 0 pour desactiver le timer de la scedule
   Serial.println(String("Mode OFF_ON (1- OFF / 2- ON ) : ") + off_on_Bouton);Serial.println("");
  }


}

BLYNK_WRITE(V0){set_time(param, 1,1);}                                          // V0..V3 for ZONE 1
BLYNK_WRITE(V1){set_time(param, 1,2);}
BLYNK_WRITE(V2){set_time(param, 1,3);}
BLYNK_WRITE(V3){set_time(param, 1,4);}
//BLYNK_WRITE(V3){set_time(param, 1,4);}//** BUG START ZONE 2 INSTEAD ZONE 1 ??

BLYNK_WRITE(V4){set_time(param, 2,1);}                                          // V4..V7 for ZONE 2
BLYNK_WRITE(V5){set_time(param, 2,2);}
BLYNK_WRITE(V6){set_time(param, 2,3);}
BLYNK_WRITE(V7){set_time(param, 2,4);}

BLYNK_WRITE(V8) {set_time(param, 3,1);}                                         // V8..V11 for ZONE 3
BLYNK_WRITE(V9) {set_time(param, 3,2);}
BLYNK_WRITE(V10){set_time(param, 3,3);}
BLYNK_WRITE(V11){set_time(param, 3,4);}

// use a slider to define default activation duration (slider count in minute)
BLYNK_WRITE(V66){
 active_duration[1][TIME_CNT] = param.asInt()*60;
 Serial.print("\r\n");Serial.print("Slider_V66 Time Zone #1 : ");Serial.print(active_duration[1][TIME_CNT]);Serial.print("\r\n");
}

BLYNK_WRITE(V67){
 active_duration[2][TIME_CNT] = param.asInt()*60;
 Serial.print("\r\n");Serial.print("Slider_V67 Time Zone #2 : ");Serial.print(active_duration[2][TIME_CNT]);Serial.print("\r\n");
}

BLYNK_WRITE(V68){
 active_duration[3][TIME_CNT] = param.asInt()*60;
 Serial.print("\r\n");Serial.print("Slider_V68 Time Zone #3 : ");Serial.print(active_duration[3][TIME_CNT]);Serial.print("\r\n");
}

// use a slider to define default max duration (slider count in minute)
BLYNK_WRITE(V70){
 max_duration[1] = param.asInt()*60;
 Serial.print("\r\n");Serial.print("Slider_V70 Time Zone #1 : ");Serial.print(max_duration[1]);Serial.print("\r\n");
}

BLYNK_WRITE(V71){
 max_duration[2] = param.asInt()*60;
 Serial.print("\r\n");Serial.print("Slider_V71 Time Zone #2 : ");Serial.print(max_duration[2]);Serial.print("\r\n");
}

BLYNK_WRITE(V72){
 max_duration[3] = param.asInt()*60;
 Serial.print("\r\n");Serial.print("Slider_V72 Time Zone #3 : ");Serial.print(max_duration[3]);Serial.print("\r\n");
}

BLYNK_WRITE(V14){                                                               // Mode Manuel for Zone 1
 Vpin14 = param.asInt();
 if (Vpin14 == 1){
   Blynk.virtualWrite(V21,1);Serial.print("Turn ON Zone 1 MANUELLEMENT ");Serial.println();
   //digitalWrite(S_Valve_Zone_1, HIGH);
   digitalWrite(5, HIGH);
 }else{
   Blynk.virtualWrite(V21,0);Serial.print("Turn OFF Zone 1 MANUELLEMENT ");Serial.println();
   //digitalWrite(S_Valve_Zone_1, LOW);
   digitalWrite(5, LOW);
 }
}
BLYNK_WRITE(V15){                                                               // Mode Manuel for Zone 2
 Vpin15 = param.asInt();
 if (Vpin15 == 1){
   Blynk.virtualWrite(V22,1);Serial.print("Turn ON Zone 2 MANUELLEMENT ");Serial.println();
   //digitalWrite(S_Valve_Zone_2, HIGH);
   digitalWrite(4, HIGH);
 }else{
   Blynk.virtualWrite(V22,0);Serial.print("Turn OFF Zone 2 MANUELLEMENT ");Serial.println();
   //digitalWrite(S_Valve_Zone_2, LOW);
   digitalWrite(4, LOW);
 }
}
BLYNK_WRITE(V16){                                                               // Mode Manuel for Zone 3
 Vpin16 = param.asInt();
 if (Vpin16 == 1){
   Blynk.virtualWrite(V23,1);Serial.print("Turn ON Zone 3 MANUELLEMENT ");Serial.println();
   //digitalWrite(S_Valve_Zone_3, HIGH);
   digitalWrite(0, HIGH);
 }else{
   Blynk.virtualWrite(V23,0);Serial.print("Turn OFF Zone 3 MANUELLEMENT ");Serial.println();
   //digitalWrite(S_Valve_Zone_3, LOW);
   digitalWrite(0, LOW);
 }
}

/////////////////////////////////////////////////////////////////
// Handle switch events (from app or from scheduler )          //
/////////////////////////////////////////////////////////////////

// turn off switch after active duration ends, duration number is not important here
void turn_off_switch_no_1(){ turn_on_off(0,1,0); Blynk.virtualWrite(V21,0); Serial.println(String("timer turn off switch 1 ") );}
void turn_off_switch_no_2(){ turn_on_off(0,2,0); Blynk.virtualWrite(V22,0); Serial.println(String("timer turn off switch 2 ") );}
void turn_off_switch_no_3(){ turn_on_off(0,3,0); Blynk.virtualWrite(V23,0); Serial.println(String("timer turn off switch 3 ") );}

void turn_on_off(int on_off, byte switch_no , byte time_no){						                                 // handle switch state
   long active_duration_ms ;char Time_print[16];
                                                                             													 // Si la var. Val_Detection_Pluie = 0 et Val_HumiditeSolAV = 0
   if ( (on_off==1) && (off_on_Bouton == 1) ){
     sprintf(Time_print, "%02d:%02d", hour(), minute());						                                     // create time as string to print on activation button
     digitalWrite(switch_pins[switch_no],!switch_default[switch_no]);					                         // turn on the switch (or off if default is on)
                                                                             													 // if end time is valid use the active duration assigned to this time
   												                                                                               // (change to msec will be done later)
     if (end_valid[switch_no][time_no])
        active_duration_ms = ((long)active_duration[switch_no][time_no]);
     else                                                                                               // otherwise use the general time duration
        active_duration_ms = ((long)active_duration[switch_no][TIME_CNT]);

     if ( (max_duration[switch_no]< 120) | (max_duration[switch_no]>active_duration_ms) )      	       // max duration smaller than two min is not valid
        active_duration_ms = active_duration_ms*1000;
     else
       active_duration_ms = ((long)max_duration[switch_no])*1000;

     if (end_timer_id[switch_no]!=32) timer.deleteTimer(end_timer_id[switch_no]);			 // if new timer is set before another one ended then disable previous timer

     switch (switch_no){                                                               		 // turn on switch and set timer
       case 1:
         Blynk.setProperty(V21, "onLabel", String(Time_print));
         Blynk.virtualWrite(V21,1);
         end_timer_id[0]=timer.setTimeout(active_duration_ms, turn_off_switch_no_1);
        break;
       case 2:
         Blynk.setProperty(V22, "onLabel", String(Time_print));
         Blynk.virtualWrite(V22,1);
         end_timer_id[1]=timer.setTimeout(active_duration_ms, turn_off_switch_no_2);
        break;
       case 3:
         Blynk.setProperty(V23, "onLabel", String(Time_print));
         Blynk.virtualWrite(V23,1);
         end_timer_id[2]=timer.setTimeout(active_duration_ms, turn_off_switch_no_3);
        break;
     }
     Serial.println(String("1-Turn ON switch : ") + switch_no + String(" for duration : ") + active_duration_ms/60000 + String(" min "));
   }else{
     digitalWrite(switch_pins[switch_no],switch_default[switch_no]);
     timer.deleteTimer(end_timer_id[switch_no]);end_timer_id[switch_no]=32;
     Serial.println(String("Turn OFF switch : ") + switch_no);
   }
}

// set switch state from APP
BLYNK_WRITE(V21){turn_on_off(param.asInt(),1,TIME_CNT);}
BLYNK_WRITE(V22){turn_on_off(param.asInt(),2,TIME_CNT);}
BLYNK_WRITE(V23){turn_on_off(param.asInt(),3,TIME_CNT);}

/////////////////////////////////////////////////////////////////////////////////////////////
// the following function is called every 60 seconds by a timer                            //
//  the function checks if a start time is reached and if yes it will call                 //
//   the turn_on_off function (to turn on the switch and set timer for turning off switch) //
/////////////////////////////////////////////////////////////////////////////////////////////
void ActiveToday(){                                                                       // check if schedule #1 should run today
 if(Blynk.connected()){                                                                  // set wifi led if no connection
   Serial.print("...... Blynk Connected (ActiveToday Fonction) ...\n\r");
 }else{
 }
 if(year() != 1970){
   unsigned int nowseconds = ((hour() * 3600) + (minute() * 60) + second());
   int dayadjustment = -1;
   if(weekday() == 1){
     dayadjustment = 6; // needed for Sunday Time library is day 1 and Blynk is day 7
   }
   for (int switch_cnt = 1;  switch_cnt< SWITCH_CNT; switch_cnt++){
        for (int timer_cnt = 1;  timer_cnt< TIME_CNT; timer_cnt++){
             if (start_valid[switch_cnt][timer_cnt] == true){
               if (weekdays[switch_cnt][timer_cnt][weekday() + dayadjustment]==true){
                  if (nowseconds >= start_time_sec[switch_cnt][timer_cnt]){
                     if(nowseconds < start_time_sec[switch_cnt][timer_cnt]+90){
                       turn_on_off(1,switch_cnt,timer_cnt);
                       Serial.println(String("2-Turn ON switch : ") + switch_cnt);
                     }
                  }
               }
             }
        }
    }
 }
}

void Wifi_Connection(void){                                                             // Fonction qui verifie si la connection Wifi est etabli
 if(Blynk.connected()){
   Serial.print("......  Blynk Connected (Wifi_Connection Fonction) ...\n\r");
   digitalWrite(WIFI_LED, LOW);
 }else{
   digitalWrite(WIFI_LED, HIGH);
   Serial.print("?????????????????????????? Blynk Not Connected ???????????????????????????\n\r");
 }
}

void ReadWifiSignal(void){                                                    // Fonction qui lis la puissance su signal Wifi
 Blynk.virtualWrite(V32, PuissanceWifiSignal);                               // Envoyer le signal du Wifi vers Blynk V11
 PuissanceWifiSignal = abs(WiFi.RSSI());                                     // Wifi -1 db strong, -127 db weak. Make positive for easy charting
}

void clockDisplay()                                                           // Digital clock display of the time
{
 String currentTime = String(hour()) + ":" + minute() + ":" + second();      // You can call hour(), minute(), ... at any time. Please see Time library examples for details
 String currentDate = String(day()) + "/" + month() + "/" + year();
 Serial.print("Current time : ");Serial.print(currentTime);
 Serial.print(" , Date : ");Serial.print(currentDate);Serial.println();

 Blynk.virtualWrite(V31, currentTime);                                      // Send Time to Blynk APP
 Blynk.virtualWrite(V30, currentDate);                                      // Send date to the App--Not used but is available--this will show processor date if it is important to you
}

void setup(){
 for (int i = 1; i<SWITCH_CNT ; i++){                                            // Reset output pins used and system variables
   pinMode(switch_pins[i], OUTPUT);                                              // reset output pins
   digitalWrite(switch_pins[i],switch_default[i]);                               // set switch to default
   end_timer_id[i] = 32;                                                         // reset end timer id's
   for (int j = 1; j<TIME_CNT ; j++){
     end_valid[i][j] = false;                                                    // reset end valid array
   }
 }

 //timer.enable(main_timer_id);
 pinMode(WIFI_LED, OUTPUT);
 digitalWrite(WIFI_LED, HIGH);                                                     // Mets la pin WIFI_LED à OFF

 Serial.begin(115200);                                                             // Debug console
 Blynk.begin(auth, ssid, pass, IPAddress(192,168,50,80), 8080);                    // Authentification aupres du serveur local Blynk - Authenticate to Blynk Private Server

 Serial.println("Booting");
 while (Blynk.connect() == false) {  }                                             // Wait until connected
 Serial.println("--------------------------------------------");
 Serial.println(String("Blynk Version ") + BLYNK_VERSION);
 Serial.println("--------------------------------------------");

 WiFi.hostname ("IrrigationIOT_Wemos-D1_#3");
 Serial.print("\r\nHost name : ");
 Serial.println(WiFi.hostname());

 Blynk.syncAll();
 rtc.begin();                                                                       // Begin synchronizing time
 timer.setInterval(60000L, ActiveToday);                                            // check every 60s if ON / OFF trigger time has been reached
 setSyncInterval(10*60);                                                                 // Sync interval in seconds (10 minutes)

 timer.setInterval(4000L, clockDisplay);                                                 // check every 5s clock display
//  timer.setInterval(4000L, Wifi_Connection);                                             // check every 10s if ON / OFF Wifi connection
//  timer.setInterval(4000L, ReadWifiSignal);                                               // check every 6s Wifi Signal

}

void loop(){
 timer.run();
 if(Blynk.connected()){
   Blynk.run();
 }
}
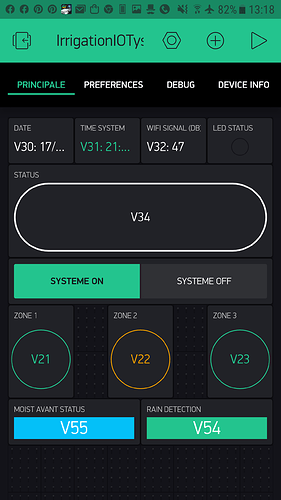
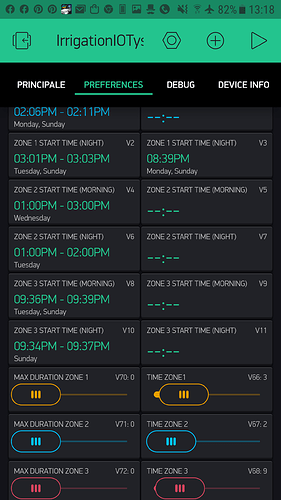
Here is my clone project on my old Galaxy S6 phone :
75Here are my screenshots :


