yes i have BT widget and when i open it i see the tex :“connect bluetooth devices”
I’m the same person of post.
I don’t understand why the HC05 when I upload the code turn on/off random
you should provide as much details as possible, like sketch, library version, wiring diagram, etc…
You appear to have created a second login to the forum.
Please do not do this. Your @lolloi login has been suspended.
Pete.
I am using both IDE version 2.0 and 1.8.4.
I’m trying to translate the code written in the post into the Blynk “version”, so both the slider and the button I would like to be virtual (Blynk Legacy).
I’m using the latest versions of all libraries.
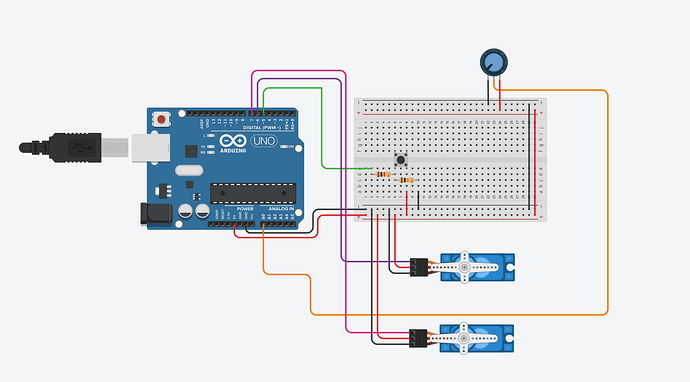
The objective of the program is to move the servos using a slider that is activated only when the state of the button is equal to 1.
I attach a video of the version with slider and physical button and a image of arduino’s connection (Physical verson)
What exactly does this mean?
That’s a bad move as far as Blynk is concerned. I’d always recommend using version 0.6.1 with Blynk Legacy.
If you want to understand how you receive the values from widgets attached to virtual pins then you should read this:
Pete.
I test the program on IDE 2.0 and 1.8.4
Both arduino ide versions should work fine, it doesn’t matter if you were using version 2.0 or 1.8.4 which is too old, the latest version is 1.8.19
I understood the basic concept but I did not understand how to compile the whole program
the app does not even find the hc-06, and those few times there it does not connect
Impossible to comment without further information.
Pete.
I understood the concept of the article you sent me only that it is explained toolo the part of void setup() and not the loop() and the declaration of variables before setup(), in my case for the servos.
Also because there is no written how to make arduino communicate with blynk and I am afraid that I got the program compilation wrong.
#include <BlynkSimpleSerialBLE.h>
#include <SoftwareSerial.h>

// You could use a spare Hardware Serial on boards that have it (like Mega)
SoftwareSerial DebugSerial(0, 1); // RX, TX

#define BLYNK_PRINT DebugSerial
#define BLYNK_USE_DIRECT_CONNECT
/* Fill-in your Template ID (only if using Blynk.Cloud) */
//#define BLYNK_TEMPLATE_ID   "YourTemplateID"

// You should get Auth Token in the Blynk App.
// Go to the Project Settings (nut icon).
char auth[] = "WbL8ecNmeAicgjcHuLWM9v2Wi5V6ZuAK";

void setup()
{
  pinMode(2, OUTPUT);
}

BLYNK_WRITE(V1)
{
  if (param.asInt() == 0)
  {
    digitalWrite(2, LOW);
  }
  else
  {
    digitalWrite(2, HIGH);
  }
}
void loop()
{
  Blynk.run();
}
Is that correct?
Maybe you be better writing your responses in your native language, because I understand very little of this comment.
There are so many things wrong with you sketch that it’s difficult to know where to begin.
Why don’t you start with one of the SketchBuilder examples?….
Also, you clearly don’t understand how to use hardware and software serial ports correctly. I suggest that you read this…
Pete.
Unfortunately I am not very knowledgeable about the whole blynk ecosystem.
And I’ve got about a week to get this whole project done.
Would you be able to convert the program keeping the same function but with both sliers and buttons virtual?
Pls
I am sincerely curious to know how to do it, but I do not have much time.
You almost certainly can’t afford my hourly rate $$$$
Pete.
I have the money to pay you, but being in a forum I expected that someone could give me a hand, probably for experienced people this program is extremely easy so do not require even so much effort
And as a very important project for my future, I need it…
I’ll try to do it from scratch.
thank you anyway
