[WORK IN PROGRESS]
A little How To guide with some tips for everyone having issues with this board.
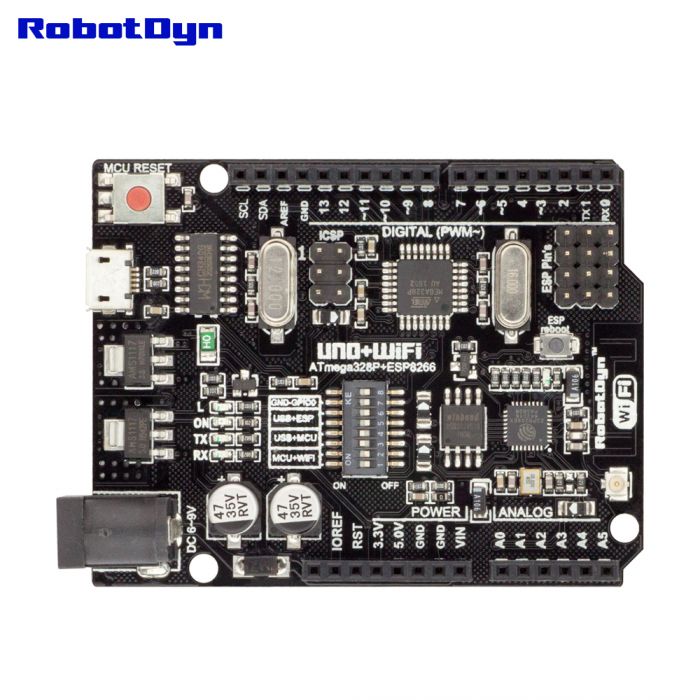
1 - DIP SWITCHES
This board has 8 switches you need to set before doing anything:
- 1, 2 ON, everything else OFF: it puts in comms the ATMega with the 8266 onboard chip. You need this setup to run your program and connect to wifi/internet/blynk. Since this board has only one hardware serial, ATMega and 8266 will be using it. You cannot use the Serial Monitor via USB. You can use a I2C Lcd Display as a debug monitor.
- 3, 4 ON, everything else OFF: it puts in comms the ATMega chip with the USB-Serial CH340. Use this to upload your sketches to the ATMega Chip.
- 5, 6 ON, everything else OFF: it puts in comms the 8266 chip with the USB-Serial CH340. Use this to manually send AT commands to the 8266 chip (ex. via Arduino Serial Monitor)
- 5, 6, 7 ON, everything else OFF: use this setup to upload the firmware in the 8266 chip
- 8 is an unconnected, unused pin.
When using Arduino’s Serial Monitor to send AT cmds to 8266, remember to set “Both NL & CR” and the connection speed (standard is 115200). To achieve better stability, there’s an AT command that sets the 8266 chip baud speed to 9600. I’ll talk about it later.
2 - FIRMWARE
All the board i’ve received were completely blank-empty so no second guess, but my advise is to upload the firmware from the link below even if you’ve already got something in your boards. I tried couple of versions and this (old) one is the only that has been working flawlessy with Blynk. So, step by step:
-
Download this: Programmer + Firmware 1541.exe . No it’s not a virus. It’s a self extracting EXE created with 7zip if you’re wondering. Go on and unpack it. Inside you will find Flash Download Tools 364 and Firmware ESP8266_NONOS_SDK_1541 with only the files you need.
-
Set your UNO+WiFi switches to 5, 6 ,7 ON and everything else OFF then plug it to your computer.
-
Run ESPFlashDownloadTool_v3.6.4.exe, then click on ESP8266 Download Tool. Use these settings:
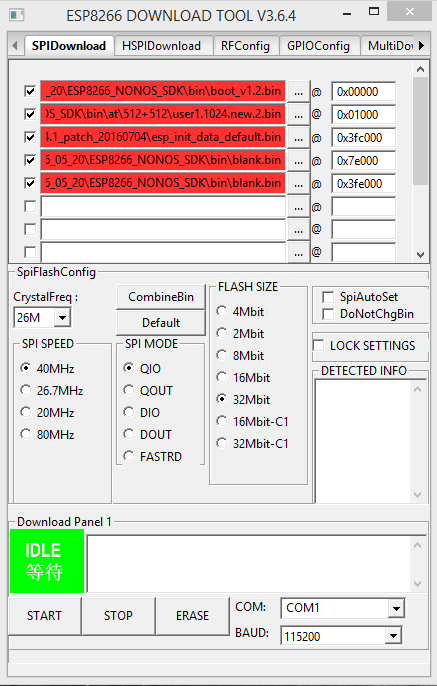
Check COM Port: mouse dx on This PC -> Properties -> Device Manager -> Ports(COM & LPT) -> look for USB-SERIAL CH340 , keep Baud Rate at 115200 then click START. It takes maybe a minute or two.
- Unplug the board, close the FlashTool, set pin 5, 6 to ON and everything else OFF, plug the board to the USB again and run Arduino IDE
- In Arduino IDE: Tools -> Port -> select the COM port
Tools -> Serial Monitor -> Set “Both NL & CR” and Baud rate to 115200
Write AT+GMR and hit ENTER. If this appears, everything’s fine
AT version:1.1.0.0(May 11 2016 18:09:56)
SDK version:1.5.4(baaeaebb)
compile time:May 20 2016 15:06:44
OK
-
now to set the board’s baudrate to 9600 write
AT+UART_DEF=9600,8,1,0,0
this will set the board to 9600 AND save this setting in the flash memory -
Now set the Serial Monitor speed to 9600 and try again with AT+GMR. If the answer is the same, you,re ready to go
3 - LIBRARIES
Other than the Blynk official library, I’m also using:
LiquidCrystal_PCF8574 for the LCD Display with I2C Driver
Arduino WiFi library for ESP8266 modules for a better WiFi management
Ticker library for Arduino for timed events since both Blynk.timer and SimplyTimer are having issues with this board
