In my mind I would like the app to have 3 variables only. (I think that’s all I’ll need)
Button 1. Start / Stop loop
Setting 1. Run time (voltage on for x number of seconds)
Setting 2. Delay time (voltage off for y number of seconds)
That’s it.
Example, I would like to turn on the program via button 1.
Once the program is on, the loop begins. The output would trigger for x amount of seconds set as the ‘run time’.
After x seconds, there will be a period of y seconds where there is no voltage output…
And so on, continuous loop.
I am fairly familiar with wiring this, just need help with the programming. I have wired up door relays etc with push buttons on the nodemcu so i think I’ll be alright once I have the correct programming.
The on/off switch willsimply be a switch widget, so no real choice to be made there.
The controls for off and on time could be sliders, but it’s very easy to accidentally ‘nudge’ these when using the app. A better solution may be the horizontal or vertical stepper widgets.
All your widgets will be attached to virtual pins.
In your code, when a control attached to a virtual pin is updated, a function called BLYNK_WRITE(Vxxx) is triggered (whee xxx is the number of the virtual pin that your widget is attached to).
Within that function, the param.asInt() command can be used to retrieve the value from the widget and assign it to a variable (you should use global variables for this).
On/off switch widgets will return 0 or 1, sliders or stepper widgets will return the current value in the range you specified when you created the widget.
You’ll want to use an if statement to check if the value of the on/off switch was 1 (on) then timeout timers to open the valve for the on_duration time and close it after the off_duration time. I assume that you’ll be using seconds, or minutes when set these durations in your app, but the timeout timer works on milliseconds, so you’ll need to multiply the value that comes back from your widget by 1,000 or 60,000 to give the correct duration.
If none of this means anything to you, look at the examples on Sketch Builder, and search the forum for the key words that i’ve Provided like ‘global variables’ and ‘timeout timer’ for examples.
Use plenty of Serial.print commands so that you can see what’s happening as you develop your code, and come back with your code (correctly formatted of course) if you get stuck along the way.
I will set 2 global variables - int ‘run’ and int ‘delay’
I will have an on / off switch which start and stop the code.
I will have 2 vertical sliders each set to a virtual pin
Each virtual pin will relate to either ‘run’ or ‘delay’
I can set the vertical sliders to an whole number value. 2 would represent 2000ms (by multiplying this number by 1000 in the code)
Here is an example I made to “pulse” a servo step in order to control speed of movement… the timer concepts and controls should give you something to look at toward you application. There are other examples in that topic that might help with code ideas as well.
I have only managed to scratch together the following - I am seriously lost at this point. Can someone help me out or at least point me to a good source for begginers. I think all I have done so far is ‘read’ value fed from the slider widget…
# **define** BLYNK_PRINT Serial

# **include** <ESP8266WiFi.h>

# **include** <BlynkSimpleEsp8266.h>

**char** auth[] = "YourAuthToken";

**char** ssid[] = "YourNetworkName";

**char** pass[] = "YourPassword";

**void** setup()

{

// Debug console

Serial.begin(9600);

Blynk.begin(auth, ssid, pass);

Loop.begin

}

**BLYNK_WRITE** (V1) // Time interval for misting 0.5-10 seconds

{

mistruntime = param.asInt(); // assigning incoming value from pin V4 to a variable

serial.println(mistruntime);

}

**BLYNK_WRITE** (V2) // Time interval for delay 5-120 seconds

{

delaytime = param.asInt(); // assigning incoming value from pin V4 to a variable

serial.println(delaytime);

}

**void** loop()

{

  Blynk.run

;

}
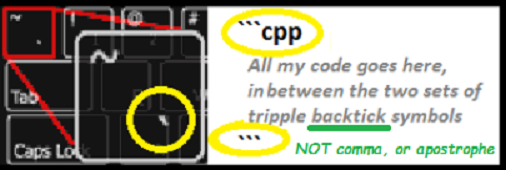
No and no… but if you place the first backticks & letters CPP, then copy paste your code, then follow up with the final backticks, then the exact same code syntax shows as would be in the IDE… while yours is missing commands and formatting such as replacement characters (ASCII codes) like "e instead of " etc.
#define BLYNK_PRINT Serial


#include <ESP8266WiFi.h>
#include <BlynkSimpleEsp8266.h>

// You should get Auth Token in the Blynk App.
// Go to the Project Settings (nut icon).
char auth[] = "YourAuthToken";

// Your WiFi credentials.
// Set password to "" for open networks.
char ssid[] = "YourNetworkName";
char pass[] = "YourPassword";

void setup()
{
  // Debug console
  Serial.begin(9600);

  Blynk.begin(auth, ssid, pass);
  // You can also specify server:
  //Blynk.begin(auth, ssid, pass, "blynk-cloud.com", 80);
  //Blynk.begin(auth, ssid, pass, IPAddress(192,168,1,100), 8080);
}
**BLYNK_WRITE** (V1) // Time interval for misting 0.5-10 seconds

{

mistruntime = param.asInt(); // assigning incoming value from pin V1 to a variable

serial.println(mistruntime);

}

**BLYNK_WRITE** (V2) // Time interval for delay 5-120 seconds

{

delaytime = param.asInt(); // assigning incoming value from pin V2 to a variable

serial.println(delaytime);
void loop()
{
  Blynk.run();
}
Don’t you have the “original” still in the IDE files
PS, you could have gone back and edited the initial posts instead of adding more and more
Ayhow, enough posting lessons for today… If I interpret your code correctly you should be getting serial prints for whatever values your widgets are putting out, each time the widget is “pressed or moved”. So what is wrong?
OK, so I am guessing all this time you are not using your own code… otherwise you would probably have some ideas on how to write the functions… and what you have been posting is no help as I don’t know what you started with vs what you have been placing unformatted into these posts.
Look through the Help files and Documentation, even the Sketch Builder for proper syntax of Blynk functions etc.

 Don’t you have the “original” still in the IDE files