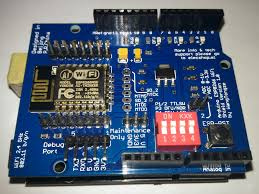
I am using blynk Arduino ESP8266 Wifi Shield Version 1.0 by Wang Tongze and it works quite well. Now my problem is that blynk does not recognize the GPIO buttons how can I fix it? .On the phone I have 4 buttons and four leds which light up well, the buttons they work well too.Now what I would like is that instead of turning on the LEDs I would like to change the color of the buttons.The problem lies in the fact that in the scheck I’m wrong with the GPIO
#define BLYNK_PRINT Serial

#include <BlynkSimpleEsp8266.h>
//#include <SimpleTimer.h>


WidgetTerminal terminal(V1);
/*i led si possono accendere anche senza abilitare altri pin viruali ma solo dichiarandoli.
   Esempio:WidgetLED led1(V1);

*/
WidgetLED led1(V1);
WidgetLED led2(V2);
WidgetLED led3(V3);
WidgetLED led4(V4);
WidgetLED led5(V5);
WidgetLED led6(V6);

//.........................
String content = "";
char character;
BlynkTimer timer;
//...............

//................
BLYNK_WRITE(V9)
{
  int pinValue = param.asInt();
  if (pinValue == HIGH) {
    Blynk.virtualWrite(V0, "clr");
    // Blynk.virtualWrite(V1, LOW);
    led1.off();
    led2.off();
    led3.off();
    led4.off();
    led5.off();
  }
}
//............

//............
void setup()
{
  //

  // Debug console
  Serial.begin(9600);

  Blynk.begin(auth, ssid, pass);
  // ----------------------------
  timer.setInterval(10L, SerialInput);  // Run every 10ms non alzare il tempo causa buffer ancora pieno
  Blynk.virtualWrite(V0, "clr");  // Clear the terminal from past info.
  //----------------------------------


}
void SerialInput() {
  //.................


  //.....................
  if (Serial.available()) {  // Guarda sulla seriali se ci sono dati in arrivo
    character = Serial.read();  // Leggi il carattere seriale

    content.concat(character);  // Aggiungi carattere a stringere String
    if (character == '\n') { // Carattere speciale che indica fine riga
      Blynk.virtualWrite(V0, content);  // invia una stringa al terminale
      //   content = "";  // Clear holding String
      //________________

      content.trim();// elimina spazi iniziali e finali
      if (content == "Cucina")
      {
        //Blynk.setProperty(V1, "color" , "#D3435C"); // Cambia colore in rosso in questo caso è il led1
        Blynk.virtualWrite(V0, content);  // invia una stringa al terminale


        led1.on();


      }
      else {
        led1.off();

      }

      //----------------------
      if (content == "Luci1")
      {
        Blynk.virtualWrite(V0, content);  // invia una stringa al terminale

        led2.on();
      }
      else {
        led2.off();
      }
      //-------------------
      if (content == "Luci2")
      {
        Blynk.virtualWrite(V0, content);  // invia una stringa al terminale
        led3.on();
      }
      else {
        led3.off();
      }
      //------------------
      if (content == "Caldaia")
      {
        Blynk.virtualWrite(V0, content);  // invia una stringa al terminale
        led4.on();
      }
      else {
        led4.off();
      }
      //----------------
      if (content == "Clima")
      {
        Blynk.virtualWrite(V0, content);  // invia una stringa al terminale
        led5.on();
      }
      else {
        led5.off();
      }
      /*
        else if (content != "Luci1"){
        Blynk.virtualWrite(V3, 0);
        led2.off();
        }
      */
      //----------------------
      content = "";  // Clear holding String
      //-----------
      /*
            if (content == "") {

              led1.off();
              led2.off();
              led3.off();
              led4.off();
              led5.off();
            }
      */
      //-----------
    }
  }
  Serial.flush();//svuoto il buffer
  terminal.flush();
}
void loop()
{
  Blynk.run();
  timer.run();
}
Sorry but I did not understand why scheck meta is not formatted well
Resolved
I am not sure if I am interpreting your issue correctly…
Changing many widget parameters, including colour, from the sketch can be done via the Blynk.setProperty command But ONLY when they are using virtual Pins
B[quote=“etabeta, post:1, topic:32655”]
blynk does not recognize the GPIO buttons how can I fix it?
[/quote]
Your sketch doesn’t use any GPIO pins, and the button widgets in your app should be connected to virtual pins, not digital pins.
Also, you don’t have any Wi-Fi or Blynk credentials declared, but I assume you’ve removed these otherwise the sketch wouldn’t compile.
You’re treating your Arduino ESP thingy as an ESP device, when I suspect from the name that it’s actually an Arduino with an ESP that’s designed to work as a Wi-Fi modem - in which case you won’t get it working with this sketch.
Personally, I’d say that you’d be far better off using a NodeMCU or Wemos D1 Mini as your IoT hardware rather than devices like the one you’re using.
Unfortunately I have already purchased this device.On the phone is set as “esp8266” Regarding the digital pins work because from them the physical buttons on arduino.Ed the problem lies in the fact that in the scheck of blynk I can not connect them to virtual pins because I he says they are not recognized. Where am I doing wrong?If I use virtual pins how to redirect them to GPIOs?
In the various examples always refer to the nodMCU.In the scheck the digital buttons I did not need to declare them already working like that
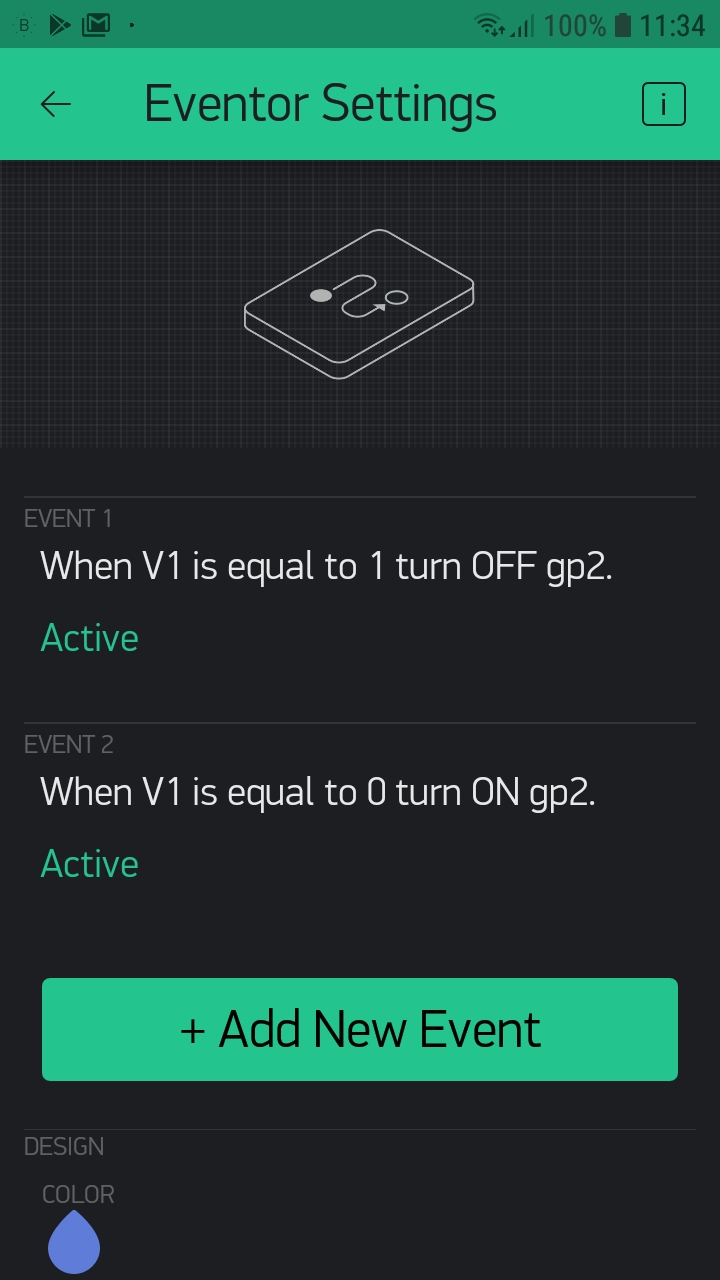
So my problem is connecting the digital pins to a virtual pin. When I try to do it, blynk tells me that GPIOs are not declared, so how can I declare them?
Exactly how have you tried “connecting the digital pins to a virtual pin” and exactly what message do you get?
Is this a message from the Blynk app, or from the Arduino IDE?
When in the scheck I go to tell him that GP5 must be equal 0 tells me that gp5 has not been declared. I forgot to expand the program via the ide of arduino, and so it is the ide of arduino that says it is not declared
How EXACTLY are you trying to do this in your sketch?
Post the portion of code where you’re doing this, and explain where in your sketch you’re including this code.
OK, @etabeta Something you may not be understanding. The shield you have can probably run in different modes, much like other combo MCU devices that we have seen here (AKA Robotdyn)
A) As a standalone ESP8266 using it’s own pins
B) As an Arduino with WiFi via the ESP in AT WiFi to USB (Serial) Mode.
Regardless of which mode you use, Blynk will only see it as an Arduino or an ESP8266, depending on the DIP settings and the Blynk library/setup used… But apparently not both at once.
Google around for what limited info there is on this board… then pick what mode you what to use… or better yet… Get a $5 Wemos D1 Mini.
Yes, I said it … as a long term Arduino with ESP as shield user, I am NOT recommending these over priced combo mashups… too much effort for the gain. Even a simple Arduino/ESP-01 hookup is better.
I think that @etabeta is probably using the wrong syntax for his digital writes, and rather than just using the pin number he’s probably using a variable to represent the pin number, but of course that variable hasn’t been declared, hence the:
message.
But, it is like getting blood out of the proverbial
After a little further reading of that post I linked, while not clear, it looks like one can possibly load and run separate code on boath ESP8266 and UNO (via SoftSerial)… but you have to keep switching the DIP interface back and forth for programming??
Anyhow… @etabeta If that dual running MCU function does work, then in theory it could be treated as a standalone ESP running Blynk with a softwareSerial link to non-Blynk code on the Arduino… Sorta simular to this - Turning "Old" Arduinos into Perfectly Usable IoT Devices
But not really practical… and despite my attempts to do something similar, it is NOT a process you will get much assistance with from here.

 … as a long term Arduino with ESP as shield user, I am NOT recommending these over priced combo mashups… too much effort for the gain. Even a simple Arduino/ESP-01 hookup is better.