@firdosh don’t know what is a community.
we all are volunteers in this forum
even monkeys 

2 Likes
Thanks For the help.
Finally all four relays are working fine with buttons.
After reading the post u shared about best gpio pins in Nodemcu. i changed a few pins.
The issue am now facing is when the nodemcu is given power the relay / ledpin 4 starts for a brief moment then turns back down and while turning down relay / ledpin 3 also glows and dies ( but led pin 3 does that glow and die in less than a second like a pulse ).
I think the issue for Relay / Ledpin 4 ( GPIO15 ) is due to the reason that its pulled low during startup ( Right.? ).
But cant seem to understand why Relay / Ledpin 3 ( GPIO 14 ) is giving a pulse.?
Please post your full updated code (don’t forget the triple backticks).
Pete
GPIO 12,13,14 are High for 100ms at boot , then low
GPIO15 has pulldown, and must be low at boot
Only GPIO 4 and 5 are low at boot and remain low
better use ESP32 
1 Like
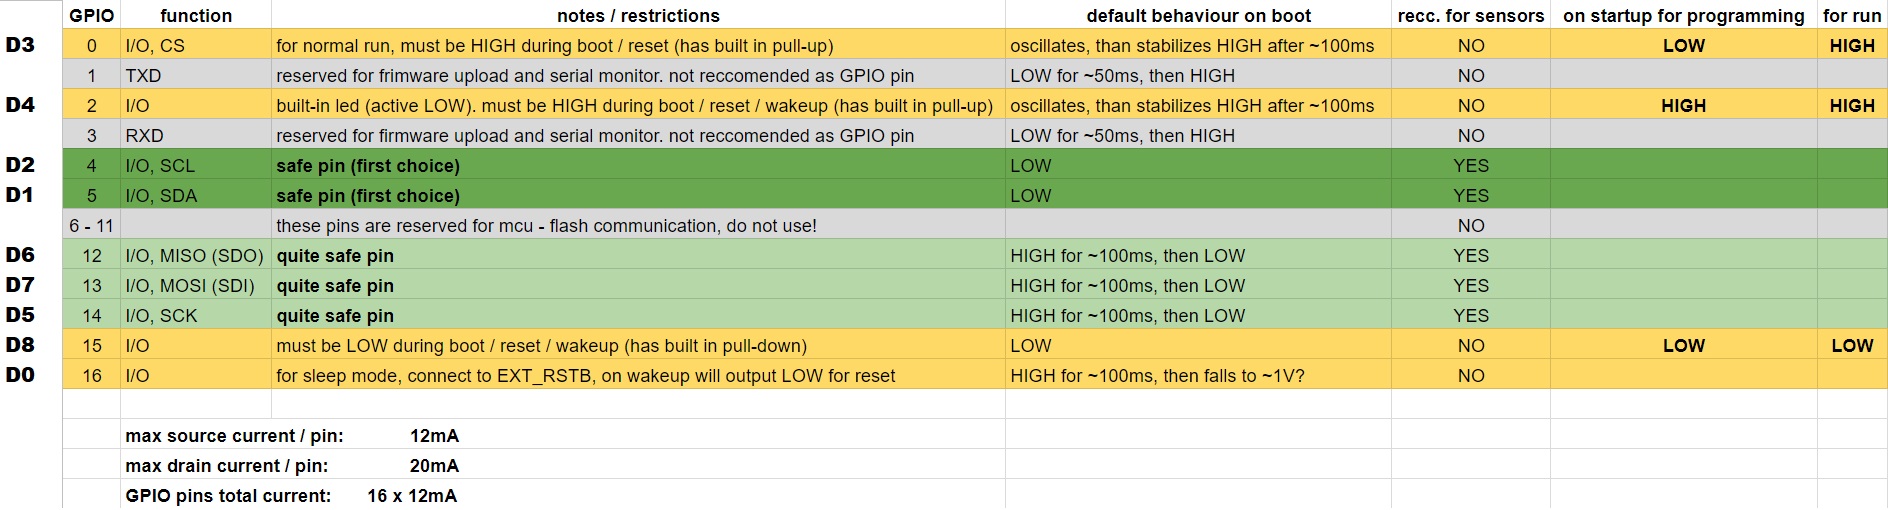
I think he meant relay goes on/off at start, GPIO 14 is high for 100ms at boot
Here is the Code i am Using
#include <ESP8266WebServer.h>
#include <WiFiManager.h>      //https://github.com/tzapu/WiFiManager
#include <DNSServer.h>
#include <ESP8266WiFi.h>
#include <BlynkSimpleEsp8266.h>

// You should get Auth Token in the Blynk App.
// Go to the Project Settings (nut icon).
char auth[] = "4147957xxxxxxxxxxxxxxxxxx";
char ssid[] = "Net"; // username or ssid of your WI-FI
char pass[] = "Ne"; // password of your Wi-Fi

// Your WiFi credentials.
// Set password to "" for open networks.

// Set your LED and physical button pins here
const int ledPin1 = 12;
const int ledPin2 = 13;
const int ledPin3 = 14;
const int ledPin4 = 2;
const int btnPin1 = 5;
const int btnPin2 = 4;
const int btnPin3 = 0;
const int btnPin4 = 1;

BlynkTimer timer;
void checkPhysicalButton();

int led1State = LOW;
int btn1State = HIGH;

int led2State = LOW;
int btn2State = HIGH;

int led3State = LOW;
int btn3State = HIGH;

int led4State = LOW;
int btn4State = HIGH;

// Every time we connect to the cloud...
BLYNK_CONNECTED() {
  // Request the latest state from the server
  Blynk.syncVirtual(V12);
  Blynk.syncVirtual(V13);
  Blynk.syncVirtual(V14);
  Blynk.syncVirtual(V15);

  // Alternatively, you could override server state using:
  //Blynk.virtualWrite(V12, led1State);
  //Blynk.virtualWrite(V13, led2State);
  //Blynk.virtualWrite(V14, led3State);
  //Blynk.virtualWrite(V15, led4State);

}

// When App button is pushed - switch the state
BLYNK_WRITE(V12) {
  led1State = param.asInt();
  digitalWrite(ledPin1, led1State);
}

 BLYNK_WRITE(V13) {
  led2State = param.asInt();
  digitalWrite(ledPin2, led2State);
 }
BLYNK_WRITE(V14) {
  led3State = param.asInt();
  digitalWrite(ledPin3, led3State);
}
BLYNK_WRITE(V15) {
  led4State = param.asInt();
  digitalWrite(ledPin4, led4State);
}

void checkPhysicalButton()
{
  if (digitalRead(btnPin1) == LOW) {
    // btn1State is used to avoid sequential toggles
    if (btn1State != LOW) {

      // Toggle LED state
      led1State = !led1State;
      digitalWrite(ledPin1, led1State);

      // Update Button Widget
      Blynk.virtualWrite(V12, led1State);
    }
    btn1State = LOW;
  } else {
    btn1State = HIGH;
  }

  if (digitalRead(btnPin2) == LOW) {
    // btnState is used to avoid sequential toggles
    if (btn2State != LOW) {

      // Toggle LED state
      led2State = !led2State;
      digitalWrite(ledPin2, led2State);

      // Update Button Widget
      Blynk.virtualWrite(V13, led2State);
    }
    btn2State = LOW;
  } else {
    btn2State = HIGH;
  }

  if (digitalRead(btnPin3) == LOW) {
    // btnState is used to avoid sequential toggles
    if (btn3State != LOW) {

      // Toggle LED state
      led3State = !led3State;
      digitalWrite(ledPin3, led3State);

      // Update Button Widget
      Blynk.virtualWrite(V14, led3State);
    }
    btn3State = LOW;
  } else {
    btn3State = HIGH;
  }

  if (digitalRead(btnPin4) == LOW) {
    // btnState is used to avoid sequential toggles
    if (btn4State != LOW) {

      // Toggle LED state
      led4State = !led4State;
      digitalWrite(ledPin4, led4State);

      // Update Button Widget
      Blynk.virtualWrite(V15, led4State);
    }
    btn4State = LOW;
  } else {
    btn4State = HIGH;
  }
}

void setup()
{
  Serial.begin(115200);
  WiFiManager wifiManager;
wifiManager.autoConnect("AutoConnectAP");
Serial.println("");
 Serial.println("wifi connected...yeey :");
Serial.println("IP address:");
Blynk.begin(auth, WiFi.SSID().c_str(), WiFi.psk().c_str());

  // Debug console
  Serial.begin(9600);

  // You can also specify server:
  //Blynk.begin(auth, ssid, pass, "blynk-cloud.com", 8442);
  //Blynk.begin(auth, ssid, pass, IPAddress(192,168,1,100), 8442);

  pinMode(ledPin1, OUTPUT);
  pinMode(btnPin1, INPUT_PULLUP);
  digitalWrite(ledPin1, led1State);


  pinMode(ledPin2, OUTPUT);
  pinMode(btnPin2, INPUT_PULLUP);
  digitalWrite(ledPin2, led2State);


  pinMode(ledPin3, OUTPUT);
  pinMode(btnPin3, INPUT_PULLUP);
  digitalWrite(ledPin3, led3State);


  pinMode(ledPin4, OUTPUT);
  pinMode(btnPin4, INPUT_PULLUP);
  digitalWrite(ledPin4, led4State);

  // Setup a function to be called every 100 ms
  timer.setInterval(500L, checkPhysicalButton);
}

void loop()
{
  Blynk.run();
  timer.run();
}
Now all 4 Relays/LED is working great with Blynk + Physical Buttons.
1 Like
Now i tried integrating the blynk with IFttt For use with google assistant.
But upon saying the trigger phrase nothing is happening.
Here is the image of what i am doing.
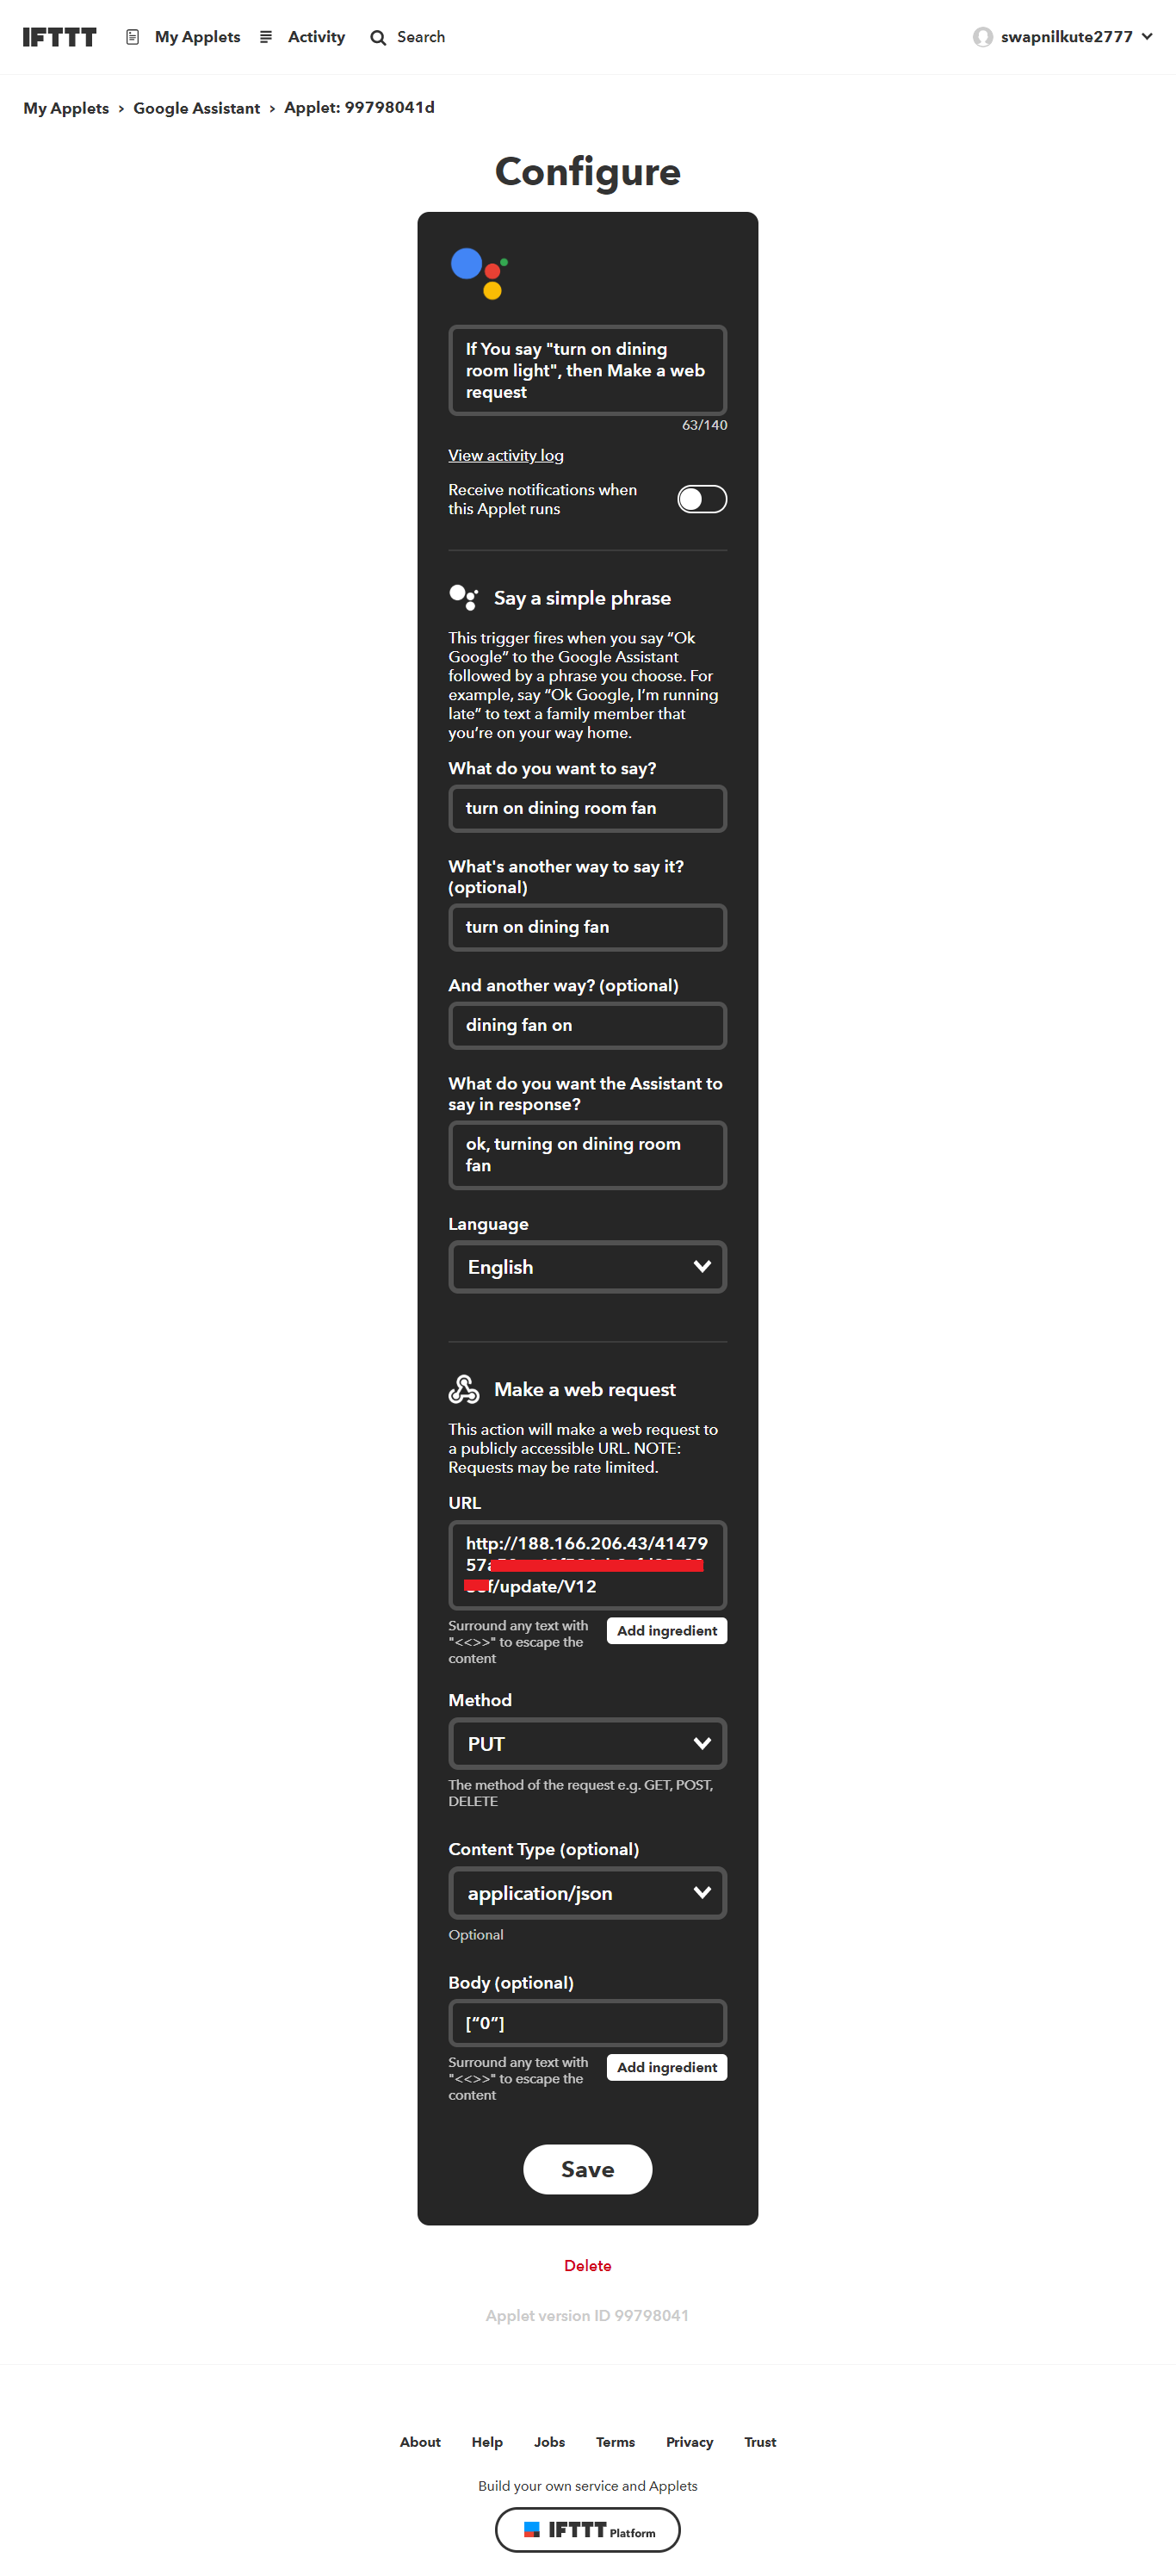
Tried using GPIO Pin no, instead of Virtual,
Tried changing body to 0 or 1
Google assistant says ok turning the fan on but nothing happens.
Is the IP address that you’re using the one that you get when you ping blynk-cloud.com?
You’re better-off using GET rather than PUT. See this example:
Pete.
Thanx man that worked wonderfully,
What worked for me was changing PUT to GET.
Also Using the Value?=1 in The URL Did the Trick.
Thanks for helping out.
2 Likes
Yes esp32 is better tried doing it with esp32 also and it works wonders as compared to Esp8266.
That was a valuable advice, Thanks for It.
3 Likes
I am having the same problem, do you think you can help me by showing me your applet? I would appreciate it a lot