Good day all:
New user here trying for several days to get a Particle Electron (also tried a Particle E-series) to connect with the Blynk service. I can’t even get the Quickstart process to connect. I do the Quickstart process with selecting Particle as my device, GSM as my connect method, paste the code into the Particle Web IDE, and select the Blynk library. It compiles, uploads, and yet no action from Blynk. I am totally mystified. I have also tried other program code after putting in the appropriate Blynk code with no luck.
Any suggestions for this not very sophisticated user would be terrific!
Thanks for your thoughts.
Are you manually registering the device and getting the token that way? Assuming device never shows as online in device list?
Greetings:
Yes I was doing it manually, thanks
You seem to have missed some steps from the process.
When I do QuickStart and choose Particle and GSM the next option is to choose the IDE. The options are Arduino, Platform IO and Other.
You say you are using the Particle Web IDE, so I assume you are choosing “Other”.
If I do this then I get this message…
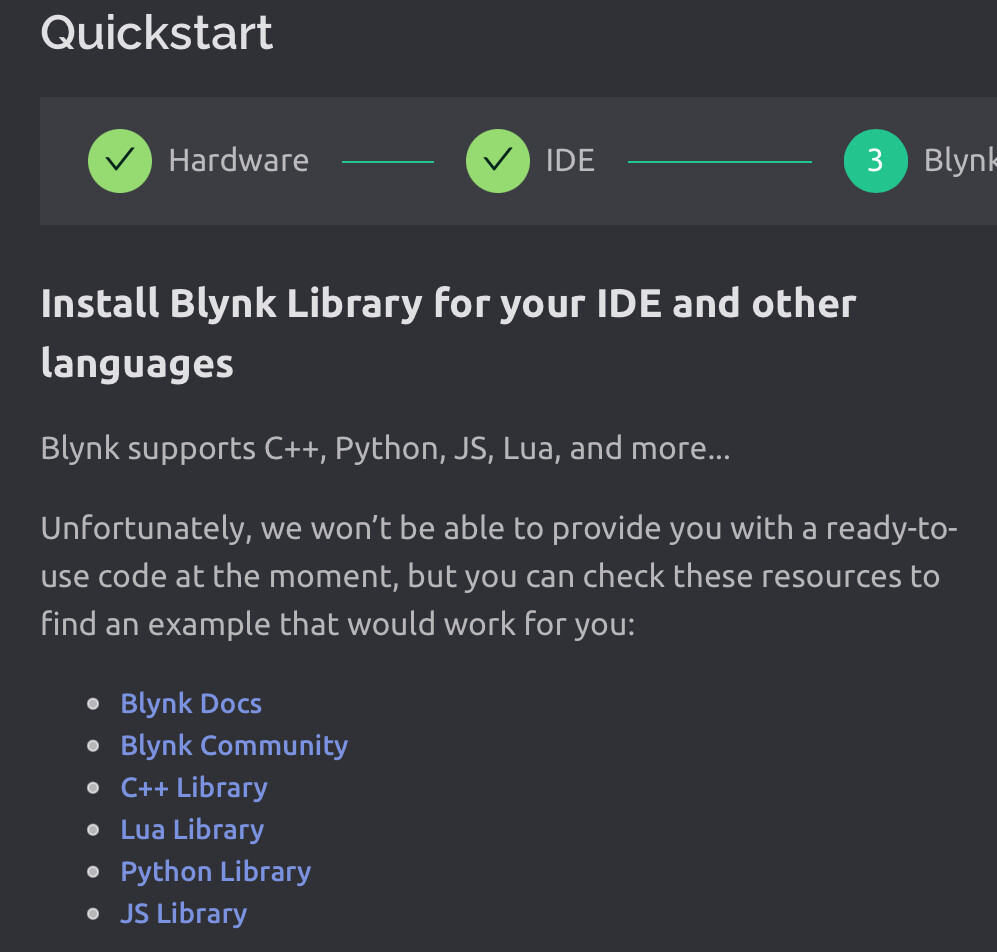
so you are told “ Unfortunately, we won’t be able to provide you with a ready-to-use code at the moment”.
So I don’t understand this next comment from you…
As no code is generated. The only thing that is generated are three lines of Firmware Configuration which need to be pasted at the top of whichever sketch you choose to use.
So, I guess you’re not choosing “Other” as your IDE, or doing something else that you haven’t listed in your list of steps?
Maybe you should explain more.
Pete.
Took a quick look it seems that is the old library for the old version of Blynk. I would recommend using the Blynk http api to handle working with blynk as I do not see any particle examples for the new Blynk 2.0
1 Like
Thanks for your assistance.
I was choosing “other” for my IDE, then pasting the generated 3 lines to the Particle IDE, along with the Blynk library.
However, I may have just had a breakthrough. I opened one of Blynk code examples included with the Blynk library. I put in my particulars, along with the current Blynk cloud IP address which was different then the original address shown in the code. My test template now shows I’m connected.
So I assume the issue with the Quickstart is it’s setup for legacy Blynk, and my other attempts might have been using an old IP address?
Yes, that’s exactly what the screenshot is telling you that you need to do.
No, QuickStart is 100% Blynk IoT.
If the example from the library (as opposed to QuickStart) has an outdated IP then I’d suggest you share exact details of the library version and specific example you are using.
Pete.
Looks like the particle web IDE is Blynk library 1.1.0 so maybe just the examples are outdated in particles web IDE?
I had noticed that the Blynk library was 1.1.0; I loaded it quite a while ago and today tried to see if there was an updated version but didn’t come up with anything. The Electron example program I loaded and adjusted the Ip address was: “Particle_Electron.ino”.
I think I’m OK for now, so I thank you both for your quick rescue response.
I can’t find an example called “Particle_Electron.ino” (or anything similar) in the Blynk library examples from Blynk.
I guess this must come from Particle?
Blynk has cloud severs in multiple locations around the world, but your Blynk account and projects only live on one of those servers. When you’re using a system which isn’t local to your physical location (as I assume the Particle IDE does) then this remote system may not resolve the same Blynk server as the one where your Blynk project lives.
With Blynk Legacy, the solution to this was to ping blynk-cloud.com From your local PC and use the resulting IP address, to ensure that the correct Blynk server was used.
Blynk IoT has introduced a better system, which is to add a regional subdomain suffix which can be used instead of pinging the new IoT cloud servers at blynk.cloud.
This subdomain system future-proofs projects against IP address changes (a real possibility once IPv6 is more widely used).
The Blynk console and app show which regional server you are using. In my case it’s the server in London, so my regional server is lon1.blynk.cloud
It looks like it would be better if these Particle Blynk examples, wherever it is that they are coming from, we’re amended to use the regional server url rather than the IP address for that server.
Pete.
1 Like
Thanks for the great info.
I found that Blynk library directly from the Particle IDE library system. I have lots to learn…
Cheers.
1 Like
Can you post the full .ino sketch that you are currently using?
Pete.
cpp
/*************************************************************
  Blynk is a platform with iOS and Android apps to control
  Arduino, Raspberry Pi and the likes over the Internet.
  You can easily build graphic interfaces for all your
  projects by simply dragging and dropping widgets.

    Downloads, docs, tutorials: http://www.blynk.cc
    Sketch generator:           http://examples.blynk.cc
    Blynk community:            http://community.blynk.cc
    Follow us:                  http://www.fb.com/blynkapp
                                http://twitter.com/blynk_app

  Blynk library is licensed under MIT license
  This example code is in public domain.

 *************************************************************

  No coding required for direct digital/analog pin operations!

 *************************************************************/

#define BLYNK_PRINT Serial  // Set serial output for debug prints
//#define BLYNK_DEBUG       // Uncomment this to see detailed prints

/* Fill-in your Template ID (only if using Blynk.Cloud) */
//#define BLYNK_TEMPLATE_ID   "YourTemplateID"


// Uncomment this, if you want to set network credentials
//#include "cellular_hal.h"
//STARTUP(cellular_credentials_set("broadband", "", "", NULL));

// Run "ping blynk-cloud.com", and set Blynk IP to the shown address
#define BLYNK_IP        IPAddress(45,55,130,102)

// Set Blynk hertbeat interval.
// Each heartbeat uses ~90 bytes of data.
#define BLYNK_HEARTBEAT 60

// Set Particle keep-alive ping interval.
// Each ping uses 121 bytes of data.
#define PARTICLE_KEEPALIVE 20

#include <blynk.h>

// You should get Auth Token in the Blynk App.
// Go to the Project Settings (nut icon).
char auth[] = "YourAuthToken";

void setup() {
  Serial.begin(9600);
  Particle.keepAlive(PARTICLE_KEEPALIVE);
  Blynk.begin(auth, BLYNK_IP);
}

void loop() {
  Blynk.run();
}
You appear to be in the US, so I suspect that if you replaced this:
with this:
Blynk.begin(auth, “ny3.blynk.cloud”);
then your sketch would still work and you would have removed the potentially changeable IP address.
Pete.
Got it, good to know.
Thanks for the assistance!