NodeRed not working 100% with Blynk, please help!

Hello everyone!

I started for a couple of days to setup a dashboard with node red. I am using Blynk (local server) for my project for some while, and it is working great. Congratulations to founders of blynk for this great app/server.
So, as I said, I discovered node-red, and I started to build a dashboard. But I am stuck with a problem and I don’t know how to solve it… My logic says it must work, but in reality it is not :frowning:

Here is a picture, some print screens put together, of my flow and config nodes.
http://home.adrianc.ro/node-red-blynk-flow.jpg

The strange problem is that, the switch is working, it turns on and off the connected relay of my arduino, from the dashboard, and from the blynk app too, and the status of the switch is displayed correctly. BUT, when the arduino switches it (automatically, when certain conditions occurs) the status of the switch is not updated on the dashboard! Can’t tell why?!

I have in my arduino sketch a line that reads the relaystate and update that blynk pin accordingly:

     if (relayPSstate == LOW) Blynk.virtualWrite(V14, HIGH);

If I check the status of the pin, throught blynk restful API, it is showing correct status 1 or 0 depending if relay is ON or OFF, but in dashboard the switch is not updated. It is updated ONLY when I turn manually ON or OFF a button in the Bynk App or, of course in dashboard.
I dont know if I made myself clear, sorry for my english.

Second problem is with the slider.
If I turn the slider left-right in the dashboard, it immediately updates on the phone in blynk app. But ONLY on the phone. The hardware itself, ignores what I am doing in the dashboard. Why?
If I turn the slider in the dashboard, and I tap the slider on the phone, the hardware reacts. So the arduino reacts only from blynk app on the phone!
In the hardware side I have only this (regarding the slider):

BLYNK_WRITE(V20) {  //  slider Widget on V20 
  variable = param.asInt();  // 
}

What am I doing wrong? Am I missing something?
There is another way of doing the switch part? and the slider part?
Slider part is inspired from here, in the topic “Controlling blynk with node red and vice versa”.

Thank you!
Adrian.

My first advice is not to run any Blynk code on your hardware device. Use MQTT for communication between the device and your server, and use the Blynk ws contrib for communication between Node-Red and your Blynk server.

Secondly, I can’t see why you’re using API calls to the server. This is totally unnecessary when you’re using the Blynk ws contrib.

The syntax of this looks a bit odd to me:


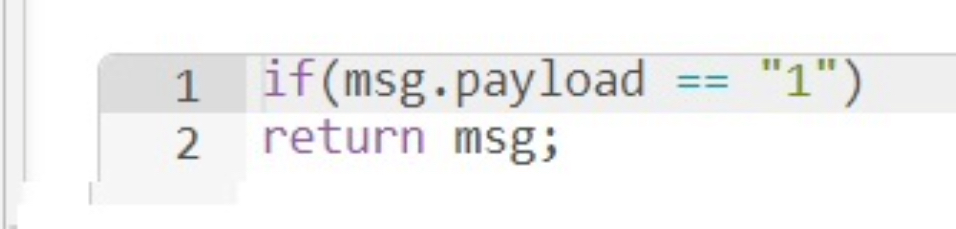
If you only want msg.payloads of “1” to be passed through then I think you need some curly brackets around the return msg; line of code.

Have you read this topic:

Pete.

Thanks for reply, Pete.

Yesterday I started to read the post of yours, that you indicated… Seems like a bit “complicated”. (I know that for you its simple, but for newbies like me in MQTT it isn’t, and is so time consuming to set, install and understand everything. I like to keep things as simple as I can. Before I will be force to switch to MQTT (which honestly I don’t prefer, because I think Blynk server is sufficient for me, Blynk is almoust like a MQTT…no?:slight_smile: I must find if there is another solution.

So, is there any other way I can achieve the switch state correctly, only with blynk and node red?
And what about the slider… why is it that the hardware don’t react at dashboard slider, only at blynk app slider (even if they sync succesfully)???

Those X files makes me nuts…
Thank you!

I was totally new to the Pi and MQTT when I started. I turned to Blynk because of the shortcomings of the Node-Red dashboard. Setting-up the Blynk server is far more complex than adding Mosquitto to your existing setup.

I’m not sure why your slider isn’t working. I guess it may be the way hat the dashboard slider node is configured. Have you tried to add a debug node to it to see what it’s outputting?

Pete.

Yes, I’ve added one, seems ok, It outputs the values from 0 to 255 as it should. Slider widget in blynk app also automatically changes with the value from dashboard… but the arduino ignores it… until I tap the slider widget on the phone blynk app… Very very strange!

It may seem okay to you, but posting a screenshot would give additional information.

I think the issue may be to do with the fact that devices don’t process incoming widget changes from the same Auth code, to prevent an infinite loop occurring.
The solution to this is to use the Bridge node, or issue a sync command to that virtual pin immediately after the write to the pin (maybe with a short delay node to control the timing).
Another reason why using MQTT for server to device commands is better than using Blynk commands.

Pete.

I just installed MQTT server. I made the first part from your tutorial, now I am trying to make the alexa trick. But you didn’t mention wich Alexa node you are using…there are many…

Thank you!

I use the Alexa Home Skill Bridge:

https://alexa-node-red.bm.hardill.me.uk/docs#

It can be installed via the palette manager, but you have to create a free account as described above.

Pete.

Ok. I install the alexa node, created the account, adding a test device as described in documentation. Seems like its not working. Alexa confirms each operations with OK, but in blynk app the button wont change its state.
In the mean time, I saw an error in the node-red console:
18 Oct 20:18:30 - [error] [alexa-home-conf:873b7d51.105ac] Error: connect ECONNREFUSED 34.240.81.189:8883

I must set a port forward for 8883, to my server?

Thank you!

No.

When you add a debug node (set to full message mode) what does it show when you send a command to the device?
The output from the Alexa node will be a TurnOnRequest or TurnOffRequest on msg.command, which will need to be changed to something that Blynk understands.
Reading this might help…

Pete.

Seems like the message after change node is true or false… dont know why…
here are some printscreens: http://home.adrianc.ro/payload-from-alexa.jpg
http://home.adrianc.ro/change-node.jpg

You’re searching msg.payload, not msg.command

Pete.

Ok, Pete. It works now. I’ve added a second change node, to change from true into 1, and from false into 0. Now it’s working as it should.
Ok… I learned something today, wow. Never thought I could control with Alexa my arduino suff :slight_smile: Great!
…but… now, back to my main problem.
The switches within the dashboard… How can I use MQTT for this…
Basically I need to control the relays, and the dashboard switch to change its state, no matter if the relay was activated by the hardware, or manually by me.

I have some clues now… maybe if you will guide me with a schematic, it will be much easyer:)

Well. it’s just like in tutorial you made it :smile:
So, if I change that to msg.command, it means that second change node is not necesarry anymore.

You’re correct! I need to re-visit that.
Better to use the function I linked to earlier.

You need to use a sketch which has no Blynk code in it. Once the sketch has connected to WiFi and your MQTT server, you then subscribe to the topic that you’ll use to send commands to control the relay.
When a message arrives on that topic you’ll then work-out what the value of the message was (I guess you’ll use 0/1, but it could be On/Off, Apple/Banana depending on your preference).
You’ll then trigger a digitalWrite to control your relay pin.

The “Turn On/Off…” topic I linked to has some example code (which isn’t mine, so I can’t vouch for it).

This is a simplified version of my regular code:

Pete.