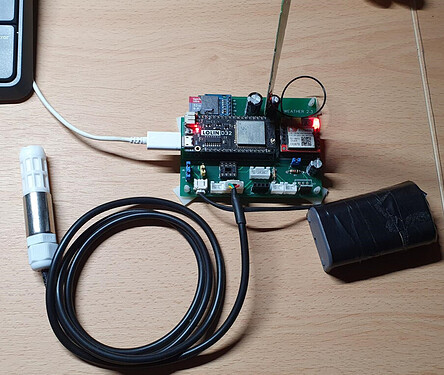
Hello friends
I am writing to ask you about the following. I have a device to measure temperature and humidity consisting of a nodemcu esp8266 board and it uses short dht22. the device works perfectly but the idea now is to transfer it to a device that works in a vehicle. I need gsm connectivity, I have the SIM800L. could i make the nodemcu work with this chip to transmit the data to blink over the internet from a sim card? do you know if there is any example for nodemcu+SIM800L+DHT11/22? I’ve searched everywhere and can’t find anything specific. Thank you.
The principal is very similar to using any other type of board. Use SoftwareSerial to creat a ‘virtual’ COM port to connect to your GSM board and the TinyGSM library.
The DHT series of sensors are awful though!
Pete.
— Use SoftwareSerial to creat a ‘virtual’ COM port to connect to your GSM board and the TinyGSM library.
I’m going to try it.
—he DHT series of sensors are awful though!
I would like you to recommend the sensors that you think work best, here in Argentina I don’t know if I can get them, but it’s worth trying. Thanks Pete.
I tend to use the SHT30 sensor, mostly because they are available in waterproof versions so the same code can be used for an external weather station project and an internal temp/humidity sensor.
You can also the BME280 sensor if it’s only used internally.
Pete.
Dear Pete
I’ll give you the code I got, I have my doubts about how I’m leaving it, since I still don’t understand how softwareserial works. Since it’s ESP8266 I imagine I’m missing something to reference it in the declarations but I still can’t find good examples.
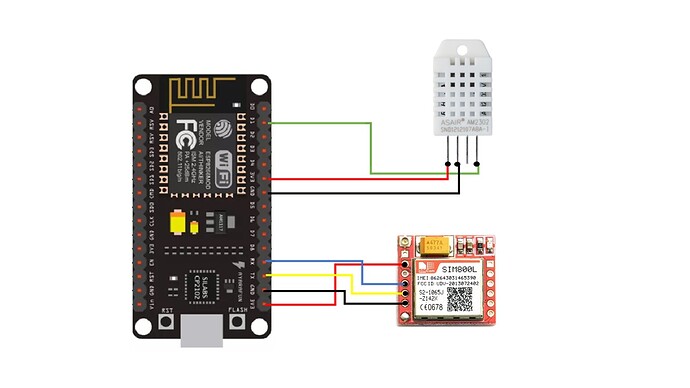
I am also sending you an image of how I think it is connected to see if I am failing it or it is correctly connected.
Thank you
#define BLYNK_TEMPLATE_ID "bti"
#define BLYNK_DEVICE_NAME "bdn"
#define BLYNK_AUTH_TOKEN "bat"

#define BLYNK_PRINT Serial

//#define BLYNK_TEMPLATE_ID   "YourTemplateID"

#define TINY_GSM_MODEM_SIM800


#include <TinyGsmClient.h>
#include <BlynkSimpleTinyGSM.h>
#include <DHT.h>


char apn[]  = "MIWIFI";
char user[] = "";
char pass[] = "";

// Hardware Serial on Mega, Leonardo, Micro
//#define SerialAT Serial1

// or Software Serial on Uno, Nano
#include <SoftwareSerial.h>
SoftwareSerial SerialAT(3, 1); // RX, TX

TinyGsm modem(SerialAT);


#define DHTPIN 5


#define DHTTYPE DHT22

DHT dht(DHTPIN, DHTTYPE);

char auth[] = BLYNK_AUTH_TOKEN;


BlynkTimer timer;


void sendSensor()
{
  float h = dht.readHumidity();
  float t = dht.readTemperature(); // or dht.readTemperature(true) for Fahrenheit

  if (isnan(h) || isnan(t)) {
    Serial.println("Fallo en la lectura del sensor DHT!");
    return;
  }

  Blynk.virtualWrite(V0, h);
  Blynk.virtualWrite(V1, t);
}


void setup()
{
  // Debug console
  Serial.begin(9600);

  delay(10);

  // Set GSM module baud rate
  SerialAT.begin(115200);
  delay(3000);

  // Restart takes quite some time
  // To skip it, call init() instead of restart()
  Serial.println("Initializing modem...");
  modem.restart();

  // Unlock your SIM card with a PIN
  //modem.simUnlock("1234");

  Blynk.begin(auth, modem, apn, user, pass);
  dht.begin();

  timer.setInterval(1000L, sendSensor);
}

void loop()
{
  Blynk.run();
    timer.run();
}
Your current wiring diagram has some problems…
-
you’re attempting to power the SIM800 via the 3v3 pin on the NodeMCU. You can’t do this, as the NodeMCU can’t provide sufficient current on this pin to power tge SIM800 in transmit mode.
-
you’ve connected the SIM800 to tge Tx and Rx pins on the NodeMCU. These are the same pins that are used by the serial interface connected to the USB port, which are used for uploading firmware and for debug messages. This is the HARDWARE serial port, and it already exists.
You need to create a SOFTWARE (virtual) serial port which used different pins, so that the NodeMCU can talk to the SIM800 without the communication being messed-up by debug data being sent to the serial monitor. -
You’ve connected the Tx pin on the NodeMCU to the Tx pin on the SIM800 and the same for the Rx pins. This isn’t how it works. When your NodeMCU is transmitting data to the SIM800 the SIM800 listens for that data on the Rx pin and vice-versa. You have to connect:
Tx —> Rx
Rx —> Tx
Obviously this will be the SoftwareSerial Rx and Tx pins on the NodeMCU, not those pins labelled Tx and Tx on the board.
Now for your code issues…
As already discussed, these need to be different pins.
I very much doubt of your SIM800’s default baud rate is 115200. However, as you’ll be connecting it to a SoftwareSerial power which is relying on the processor to emulate a COM power, this baud rate needs to be lower. The NodeMCU is good for baud rates up to about 38400 when using SoftwareSerial, but the important thing is that the NodeMCU and the SIM800 are talking to eachother at the same baud rate. If your SIM800’s baud rate I’d higher than 38400 then you’ll need to reconfigure it, probably via an AT command.
I’d increase this to at least 5 seconds (5000ms) if you’re using the DHT range of sensors.
Is this really the APN for your SIM card?
I’d suggest that you read this to understand more about SoftwareSerial etc…
Pete.
Hi @KazaDoor,
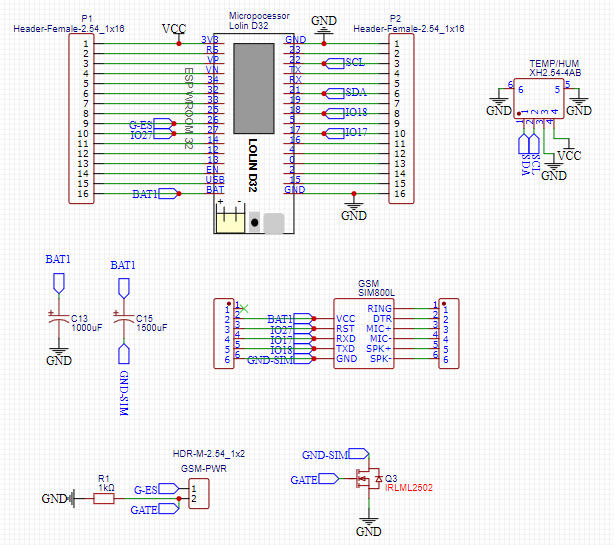
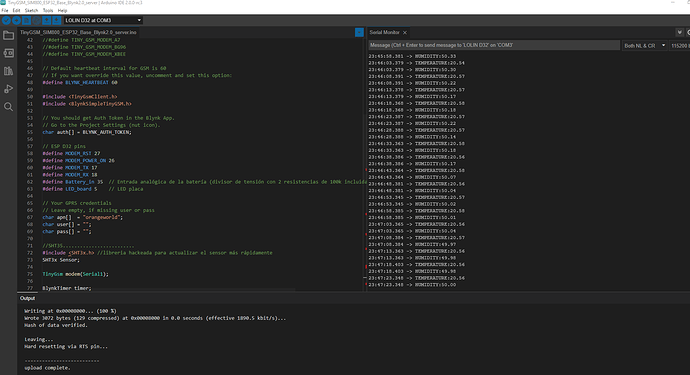
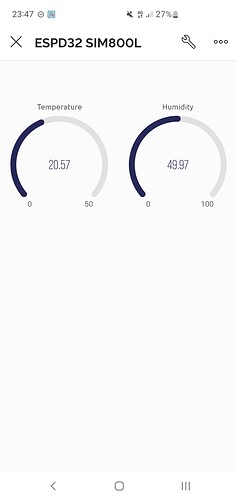
You can find below a working example using the EspD32 + Sim800L + SHT35.
Adapt this basic code to your needs as I’m using the EspD32 rather than the Nodemcu…
Keep in mind that, in my case, VCC for SIM800L is managed by a MOSFET.
/*************************************************************
  Download latest Blynk library here:
    https://github.com/blynkkk/blynk-library/releases/latest

  Blynk is a platform with iOS and Android apps to control
  Arduino, Raspberry Pi and the likes over the Internet.
  You can easily build graphic interfaces for all your
  projects by simply dragging and dropping widgets.

    Downloads, docs, tutorials: http://www.blynk.cc
    Sketch generator:           http://examples.blynk.cc
    Blynk community:            http://community.blynk.cc
    Follow us:                  http://www.fb.com/blynkapp
                                http://twitter.com/blynk_app

  Blynk library is licensed under MIT license
  This example code is in public domain.

 *************************************************************
  Attention! Please check out TinyGSM guide:
    https://tiny.cc/tinygsm-readme

  Change GPRS apm, user, pass, and Blynk auth token to run :)
  Feel free to apply it to any other example. It's simple!

 *************************************************************/

/* Comment this out to disable prints and save space */
#define BLYNK_PRINT Serial

#define BLYNK_TEMPLATE_ID "mmmmmmmmmm"
#define BLYNK_DEVICE_NAME "ESPD32 SIM800L"
#define BLYNK_AUTH_TOKEN "nnnnnnnnnnnnnn"

#define BLYNK_TIMEOUT_MS     30000UL
// Select your modem:
#define TINY_GSM_MODEM_SIM800
//#define TINY_GSM_MODEM_SIM900
//#define TINY_GSM_MODEM_M590
//#define TINY_GSM_MODEM_A6
//#define TINY_GSM_MODEM_A7
//#define TINY_GSM_MODEM_BG96
//#define TINY_GSM_MODEM_XBEE

// Default heartbeat interval for GSM is 60
// If you want override this value, uncomment and set this option:
#define BLYNK_HEARTBEAT 60

#include <TinyGsmClient.h>
#include <BlynkSimpleTinyGSM.h>

// You should get Auth Token in the Blynk App.
// Go to the Project Settings (nut icon).
char auth[] = BLYNK_AUTH_TOKEN;

// ESP D32 pins
#define MODEM_RST 27
#define MODEM_POWER_ON 26
#define MODEM_TX 17
#define MODEM_RX 18
#define Battery_in 35
#define LED_board 5    // LED placa

// Your GPRS credentials
// Leave empty, if missing user or pass
char apn[]  = "orangeworld";
char user[] = "";
char pass[] = "";

//SHT35.........................
#include <SHT3x.h>
SHT3x Sensor;

TinyGsm modem(Serial1);

BlynkTimer timer;

void setup()
{
  // Debug console
 Serial.begin(115200);

 delay(10);

 Sensor.Begin();  //sht3x

 pinMode(Battery_in, INPUT);
 pinMode(LED_board, OUTPUT);      // LED placa
 digitalWrite(LED_board, HIGH);   // Apago el LED de la PLACA

 pinMode(MODEM_RST, OUTPUT);
 pinMode(MODEM_POWER_ON, OUTPUT);
 digitalWrite(MODEM_RST, HIGH);
 digitalWrite(MODEM_POWER_ON, HIGH);


 // Set GSM module baud rate
 //Serial1.begin(9600);
 Serial1.begin(115200, SERIAL_8N1, MODEM_RX, MODEM_TX);

 delay(3000);

 // Restart takes quite some time
 // To skip it, call init() instead of restart()
 Serial.println("Initializing modem...");
 modem.init();
 //modem.restart();
 // Unlock your SIM card with a PIN
 //modem.simUnlock("1234");

 // Blynk.begin(auth, modem, apn, user, pass);
 Blynk.config(modem, auth);
 Blynk.connectNetwork(apn, user, pass);
 timer.setInterval(5000L, CHECK_SENSOR);    // Check sensor

}

void CHECK_SENSOR()
{
  Sensor.UpdateData();
  float temp = Sensor.GetTemperature();
  float hum = Sensor.GetRelHumidity();
  Blynk.virtualWrite(V0, temp);
  Blynk.virtualWrite(V1, hum);
  Serial.print("TEMPERATURE:");
  Serial.println(temp);
  Serial.print("HUMIDITY:");
  Serial.println(hum);
}

void loop()
{
  Blynk.run();
  timer.run();
}
Hope this helps…
Regards
Hello friend, sorry I went on vacation for a few days and came back covered from work. Your example is great, I will try to apply it to esp8266. Give me a few days so I can see if I have any more questions, thank you very much for your contribution and Pete’s.
hi pete
I think I have corrected everything you asked for, I’m telling you that from the TX of the SIM800I I connect it to the D5 and from the RX to the D6.
I give you two codes, they are similar, I tried both. I don’t know where I’m wrong. It appears to me that it is not connecting. I have already solved the power supply, and it is proven because it receives messages (when I send it an SMS it shows me an erroneous code on the serial monitor). I wait your answer. Thank you.
CODE 1
#define BLYNK_TEMPLATE_ID "TMPLtuVSdxWI"
#define BLYNK_TEMPLATE_NAME "CLIMAXGSMFULL"
#define BLYNK_AUTH_TOKEN "4hoUUAPxoe_TDiKMlu8bzZAk45a8Tluf"

#define BLYNK_PRINT Serial

//#define BLYNK_TEMPLATE_ID   "YourTemplateID"

#define TINY_GSM_MODEM_SIM800


#include <TinyGsmClient.h>
#include <BlynkSimpleTinyGSM.h>
#include <DHT.h>


char apn[]  = "igprs.claro.com.ar";
char user[] = "";
char pass[] = "";

// Hardware Serial on Mega, Leonardo, Micro
#define SerialMon Serial
#define SerialAT Serial1

// or Software Serial on Uno, Nano
#include <SoftwareSerial.h>
#define rxPin D5
#define txPin D6
SoftwareSerial sim800(rxPin,txPin);

TinyGsm modem(SerialAT);


#define DHTPIN 4


#define DHTTYPE DHT22

DHT dht(DHTPIN, DHTTYPE);

char auth[] = BLYNK_AUTH_TOKEN;


BlynkTimer timer;


void sendSensor()
{
  float h = dht.readHumidity();
  float t = dht.readTemperature(); // or dht.readTemperature(true) for Fahrenheit

  if (isnan(h) || isnan(t)) {
    Serial.println("Fallo en la lectura del sensor DHT!");
    return;
  }

  Blynk.virtualWrite(V0, h);
  Blynk.virtualWrite(V1, t);
}


void setup()
{
   Serial.begin(115200);
  Serial.println("Arduino serial initialize");

  sim800.begin(38400);
  Serial.println("SIM800L serial initialize");

  Blynk.begin(auth, modem, apn, user, pass);

  dht.begin();
  Serial.println("initialize DHT22");

//  // Restart takes quite some time
//  // To skip it, call init() instead of restart()
//  Serial.println("Initializing modem...");
//  modem.restart();

  // Unlock your SIM card with a PIN
  //modem.simUnlock("1234");


  timer.setInterval(5000L, sendSensor);
}

void loop()
{
  Blynk.run();
    timer.run();
}
CODE 2
#define BLYNK_PRINT Serial

#define BLYNK_TEMPLATE_ID "TMPLtuVSdxWI"
#define BLYNK_TEMPLATE_NAME "CLIMAXGSMFULL"
#define BLYNK_AUTH_TOKEN "4hoUUAPxoe_TDiKMlu8bzZAk45a8Tluf"

#define BLYNK_TIMEOUT_MS     30000UL
// Select your modem:
#define TINY_GSM_MODEM_SIM800
//#define TINY_GSM_MODEM_SIM900
//#define TINY_GSM_MODEM_M590
//#define TINY_GSM_MODEM_A6
//#define TINY_GSM_MODEM_A7
//#define TINY_GSM_MODEM_BG96
//#define TINY_GSM_MODEM_XBEE

// Default heartbeat interval for GSM is 60
// If you want override this value, uncomment and set this option:
#define BLYNK_HEARTBEAT 60

#include <TinyGsmClient.h>
#include <BlynkSimpleTinyGSM.h>

// You should get Auth Token in the Blynk App.
// Go to the Project Settings (nut icon).
char auth[] = BLYNK_AUTH_TOKEN;
//
//// ESP D32 pins
//#define MODEM_RST
//#define MODEM_POWER_ON
//#define MODEM_TX 14;
//#define MODEM_RX 12;
//#define Battery_in
//#define LED_board 5   // LED placa

// Your GPRS credentials
// Leave empty, if missing user or pass
char apn[]  = "igprs.claro.com.ar";
char user[] = "";
char pass[] = "";

#include <DHT.h>

#define DHTPIN 4


#define DHTTYPE DHT22

DHT dht(DHTPIN, DHTTYPE);

TinyGsm modem(Serial1);

BlynkTimer timer;

// or Software Serial on Uno, Nano
#include <SoftwareSerial.h>
#define rxPin D5
#define txPin D6
SoftwareSerial sim800(rxPin,txPin);

void setup()
{
  // Debug console
 Serial.begin(115200);

 delay(10);


 delay(3000);

 // Restart takes quite some time
 // To skip it, call init() instead of restart()
 Serial.println("Initializing modem...");
 modem.init();
 //modem.restart();
 // Unlock your SIM card with a PIN
 //modem.simUnlock("1234");

 // Blynk.begin(auth, modem, apn, user, pass);
 Blynk.config(modem, auth);
 Blynk.connectNetwork(apn, user, pass);


timer.setInterval(5000L, sendsensor);
}

void sendsensor()
{
float h = dht.readHumidity();
  float t = dht.readTemperature(); // or dht.readTemperature(true) for Fahrenheit

  if (isnan(h) || isnan(t)) {
    Serial.println("Fallo en la lectura del sensor DHT!");
    return;
  }

  Blynk.virtualWrite(V0, h);
  Blynk.virtualWrite(V1, t);
}

void loop()
{
  Blynk.run();
  timer.run();
}
ERROR CODE IN CONSOLE SERIAL
/ _ )/ /_ _____ / /__
/ _ / / // / _ / '/
///_, /////_
/__/ v1.1.0 on ESP8266
#StandWithUkraine https://bit.ly/swua
[13287] Modem init…
[23489] Cannot init
ets Jan 8 2013,rst cause:4, boot mode:(3,7)
wdt reset
load 0x4010f000, len 3460, room 16
tail 4
chksum 0xcc
load 0x3fff20b8, len 40, room 4
tail 4
chksum 0xc9
csum 0xc9
v000479b0
~ld
Initializing modem…
[13283]
Questions…
What baud rate is the SIM800 operating at, and how do you know this?
Why are you using Serial1 (that’s Serial plus the number “1” in your sketch?
Which piece of code produced the serial output that you posted?
BTW, you need to use triple backticks when you post serial output.
Pete.
What baud rate is the SIM800 operating at, and how do you know this?
From what I deduce, I configure the baud rate in the command sim800.begin(38400);
In case it is not, I apologize, handling the sim800 is something new for me and the truth is that I still do not understand it well. If there is any command to specify it and control which one works, I would like you to tell me.
Why are you using Serial1 (that’s Serial plus the number “1” in your sketch?
It is a copied and then customized sketch, in order to understand how sim800 works and to be able to make it work with the nodemcu and the DHT22, I did not find any concrete example of these 3 devices with Blynk, that is why I am adapting what I find, but it is difficult with sim800.
Which piece of code produced the serial output that you posted?
into the code 2, apparently in the function modem.init()
it does not start and reboots the device.
I put the screen, sorry for not having put the 3 quotes before.
Initializing modem...
06:17:31.484 -> [13280]
06:17:31.484 -> ___ __ __
06:17:31.530 -> / _ )/ /_ _____ / /__
06:17:31.530 -> / _ / / // / _ \/ '_/
06:17:31.530 -> /____/_/\_, /_//_/_/\_\
06:17:31.530 -> /___/ v1.1.0 on ESP8266
06:17:31.530 ->
06:17:31.530 -> #StandWithUkraine https://bit.ly/swua
06:17:31.530 ->
06:17:31.530 ->
06:17:31.530 -> [13286] Modem init...
06:17:41.716 -> [23488] Cannot init
06:17:51.817 ->
06:17:51.817 -> ets Jan 8 2013,rst cause:2, boot mode:(3,7)
06:17:51.817 ->
06:17:51.817 -> load 0x4010f000, len 3460, room 16
06:17:51.817 -> tail 4
06:17:51.817 -> chksum 0xcc
06:17:51.817 -> load 0x3fff20b8, len 40, room 4
06:17:51.817 -> tail 4
06:17:51.817 -> chksum 0xc9
06:17:51.817 -> csum 0xc9
06:17:51.817 -> v000479b0
06:17:51.817 -> ~ld
06:17:54.911 -> Initializing modem...
06:18:05.116 -> [13281]
06:18:05.116 -> ___ __ __
06:18:05.116 -> / _ )/ /_ _____ / /__
06:18:05.116 -> / _ / / // / _ \/ '_/
06:18:05.116 -> /____/_/\_, /_//_/_/\_\
06:18:05.116 -> /___/ v1.1.0 on ESP8266
06:18:05.116 ->
06:18:05.116 -> #StandWithUkraine https://bit.ly/swua
06:18:05.116 ->
06:18:05.116 ->
06:18:05.116 -> [13287] Modem init...
06:18:15.303 -> [23489] Cannot init
06:18:25.410 ->
06:18:25.410 -> ets Jan 8 2013,rst cause:2, boot mode:(3,7)
06:18:25.410 ->
06:18:25.410 -> load 0x4010f000, len 3460, room 16
06:18:25.410 -> tail 4
06:18:25.410 -> chksum 0xcc
06:18:25.410 -> load 0x3fff20b8, len 40, room 4
06:18:25.410 -> tail 4
06:18:25.410 -> chksum 0xc9
06:18:25.457 -> csum 0xc9
06:18:25.457 -> v000479b0
06:18:25.457 -> ~ld
06:18:28.494 -> Initializing modem...
06:18:38.699 -> [13280]
06:18:38.699 -> ___ __ __
06:18:38.699 -> / _ )/ /_ _____ / /__
06:18:38.699 -> / _ / / // / _ \/ '_/
06:18:38.699 -> /____/_/\_, /_//_/_/\_\
06:18:38.699 -> /___/ v1.1.0 on ESP8266
06:18:38.699 ->
06:18:38.699 -> #StandWithUkraine https://bit.ly/swua
06:18:38.745 ->
06:18:38.745 ->
06:18:38.745 -> [13286] Modem init...
Kaza.
That configures the rate at which the ESP8266 sends data to the SIM800 and listens for replies.
However, if the SIM800 is listening for messages, or sending-out data at a different baud rate, then the the two devices will never be able to communicate with each other.
You need to start by finding what baud rate the SIM800 is set to, and either match that rate - or if it’s higher than 38400 baud then reconfigure the SIM800 to a lower baud rate.
Pete.
I found on the forums and the SIM800l datashell sheet that I can change the baud rate to with the command AT+IPR=RATE BAUD
In the case that it is 9600, it would remain AT+IPR=9600
I also found that to save this (so that it lasts between boot cycles), I have to use the AT&W command
The question is where do I put them in the code, and how?
You don’t.
You really need an FTDI adapter to do this.
Pete.
