Hello guys! I’m starting to do projects with the Blynk platform and I’m having trouble getting the percentage of soil moisture to show up in the app.
I would like to know what I’m wrong so I can fix it.
Hello guys! I’m starting to do projects with the Blynk platform and I’m having trouble getting the percentage of soil moisture to show up in the app.
I would like to know what I’m wrong so I can fix it.
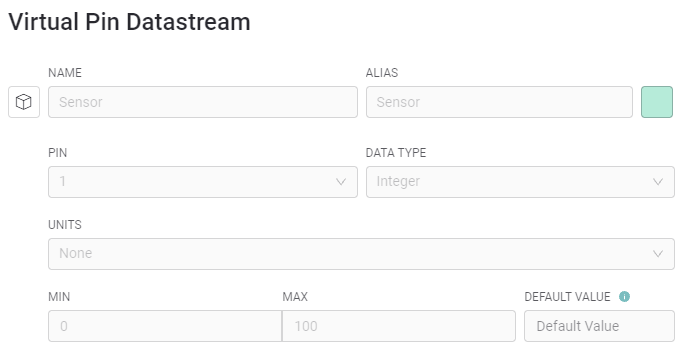
How is your V1 datastream configured?
Pete.
I think you’ll find that the formula you’re applying to your analog reading will always return a negative value.
Adding a serial print statement into that function will confirm the values you’re seeing.
Pete.
Try this
void sendSensor()
{

  sensorData = analogRead(A0); //reading the sensor on A0

  if ( isnan(sensorData) ){
    // Serial.println("Failed to read from Hygrometer Soil Moisture sensor!");
    return;
  } else {
    // Serial.println(sensorData);
    // When the plant is watered well the sensor will read a value 380~400, I will keep the 400
    // value but if you want you can change it below.

    sensorData = constrain(sensorData,400,1023);  //Keep the ranges!
    output = map(sensorData,400,1023,100,0);  //Map value : 400 will be 100 and 1023 will be 0
    // Serial.println(output);

    Blynk.virtualWrite(V1, output);

  }
}
It worked! Thanks a lot for the help!
I would like to know how I could use the slider value as a minimum threshold for soil moisture. For example, the valve will only open if the soil moisture is less than the value set on the slider.
I tried to do according to some tutorials I found, but it didn’t work.
You can add if statement, for example if ( output < 15 ) activate the valve
To use a slider you can create a variable and assign the incoming data from the virtual pin to it.
Something similar to this?
I did something similar to this, but i am not sure why my LED is not turning on/off when its within the range
int slider;

BLYNK_WRITE(V1) //slider widget assigned to virtual pin V1
{

slider = param.asInt();

}
Now you can use slider variable in the if statement, for example if ( value <= slider ) turn on the valve.
@fehrrera posting screenshots of your code makes it very difficult for us to comment on it.
You should copy/paste your code and surround it with triple backticks. Triple backticks look like this:
```
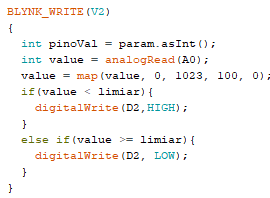
You’re using a variable called limiarin this function. Where is this coming from, and what is its purpose?
Also, it would be helpful for you and others if you gave your variables more meaningful names.
Pete.
Ok. I’m sending the code with comments and variable names that can be understood better.
My question would be: how can I make the setpoint value (slider) be in an if variable as @john93 had said.
indent preformatted text by 4 spaces
#define BLYNK_TEMPLATE_ID "TMPLpyZEN5La"
#define BLYNK_DEVICE_NAME "Teste"
#define BLYNK_FIRMWARE_VERSION "0.1.0"
#define BLYNK_PRINT Serial
//#define BLYNK_DEBUG
#define APP_DEBUG
// Uncomment your board, or configure a custom board in Settings.h
//#define USE_SPARKFUN_BLYNK_BOARD
//#define USE_NODE_MCU_BOARD
//#define USE_WITTY_CLOUD_BOARD
//#define USE_WEMOS_D1_MINI
#include "BlynkEdgent.h"
#define sensor A0
#define relay D2
int setpoint = 0; //setpoint value configured in the app (slider)
int h; //humidity variable
BlynkTimer timer;
BLYNK_WRITE(V0)//Button that activates the relay
{
int pinValue = param.asInt();
digitalWrite(D2,pinValue);
}
BLYNK_WRITE(V2)//Slider
{
  int setpoint = param.asInt();
  }
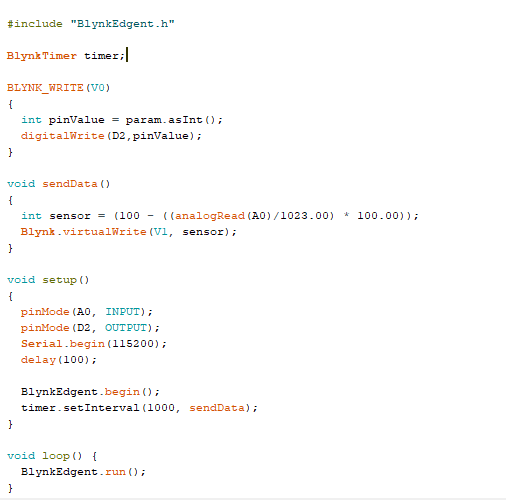
void sendData()//Function that sends data from the moisture soil sensor to the app
{
int value = analogRead(A0);//sensor reading
value = map(value, 0, 1023, 100, 0); //remap to values from 0 to 100
Blynk.virtualWrite(V1, value);
}
void setup()
{
pinMode(sensor, INPUT);//set sensor as input
pinMode(relay, OUTPUT);//set relay as input
Serial.begin(115200);
delay(100);
BlynkEdgent.begin();
timer.setInterval(100L, sendData);
}
void loop() {
BlynkEdgent.run();
timer.run();
}By pitting int in front of setpoint you are declaring setpoint to be a local variable. That means that the value you assign to it is not visible outside of the BLYNK_WRITE(V2) function.
If you look at the code snippet that @John93 provided, you’ll see that he declared the variable outside of the function, making it global, and didn’t re-declare it inside the function.
Pete.
Ok, making this variable global is it possible to use the slider value in another function like in sendData, for example?
BLYNK_WRITE(V2)//Slider
{
setpoint = param.asInt();
relaystatus = true;
}
void sendData()//Function that sends data from the moisture soil sensor to the app
{
value = analogRead(sensor);//sensor reading
value = map(value, 0, 1023, 100, 0); //remap to values from 0 to 100
if((setpoint < value) && (relaystatus == true))
{
digitalWrite(relay, LOW); // assuming relay is active HIGH
relaystatus = false;
}
if((setpoint > value) && (relaystatus == true))
{
digitalWrite(relay, HIGH); // assuming relay is active HIGH
relaystatus = false;
}
Blynk.virtualWrite(V1, value);
}
I put the setpoint viariavel as global. And I added an if structure in the sendData function to trigger the relay.
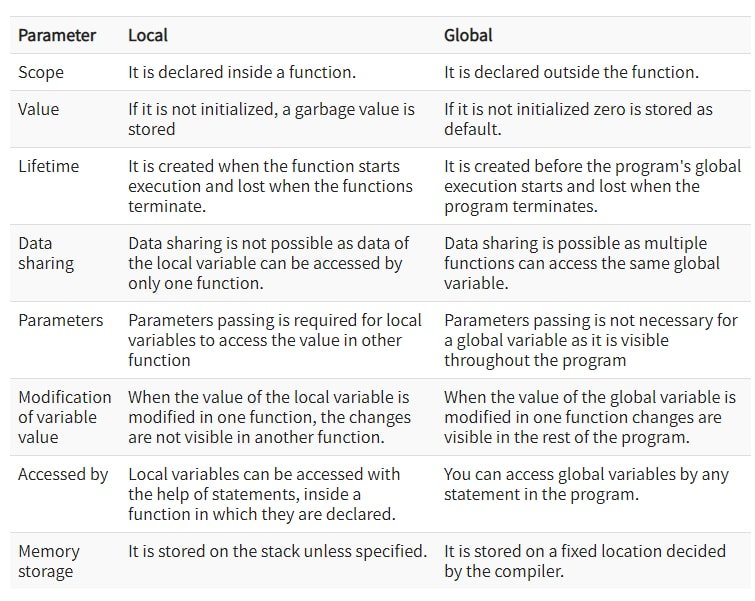
Global Variable
A Global Variable in the program is a variable defined outside the subroutine or function. It has a global scope means it holds its value throughout the lifetime of the program. Hence, it can be accessed throughout the program by any function defined within the program, unless it is shadowed.
Advantages of using Global variables :
You can access the global variable from all the functions or modules in a program.
You only require to declare global variable single time outside the modules.
It is ideally used for storing “constants” as it helps you keep the consistency.
a global variable is useful when multiple functions are accessing the same data.
Global vs local variable :
Yes of course.
I’m unsure about what you are using relaystatus for.
Also, the code tends to be more readable and logical if you do the comparison the other way around…
if((value < setpoint)`
or better still, use sensible variable names:
if((soil_humidity < target_humidity)`
because you’re actually wanting to say “if the soil humidity is less than the target humidity then water the plants”.
Pete.
Humidity setpoint slider worked!
I would like to know if it is possible to create a delay that the relay will be activated for a certain time (configured with a slider in the app) and after that it will be turned off.
#include "BlynkEdgent.h"
#define sensor A0
#define relay D2
int target_humidity = 0; //setpoint value configured in the app (slider)
int soil_humidity; //humidity variable
bool relaystatus = false;
int interval = 0; //Time that the relay will be on before it is turned off
int pinValue = 0; //Variable that will save the button's value
BlynkTimer timer;
BLYNK_WRITE(V0)//Button that activates the relay
{
pinValue = param.asInt();
}
BLYNK_WRITE(V2)//Slider
{
target_humidity = param.asInt();
}
BLYNK_WRITE(V3)//Time that the relay will be on before it is turned off
{
interval = param.asInt();
}
void sendData()//Function that sends data from the moisture soil sensor to the app
{
soil_humidity = analogRead(sensor);//sensor reading
soil_humidity = map(soil_humidity, 0, 1023, 100, 0); //remap to values from 0 to 100
if(pinValue == 1){ //If the relay is activated by the button
digitalWrite(relay, HIGH);
}
else if(pinValue == 0){ //If the relay is not activated by the button
if(soil_humidity > target_humidity)
{
digitalWrite(relay, LOW); // assuming relay is active HIGH
}
if(soil_humidity < target_humidity)
{
digitalWrite(relay, HIGH); // assuming relay is active HIGH
delay(interval * 1000);
digitalWrite(relay, LOW);
} }
Blynk.virtualWrite(V1, soil_humidity);
}
For example, the BLYNK.WRITE(V3) function is the slider for setting this delay in seconds. But when I go to test the relay is turning on and off and this delay time does not happen.
While it’s sometimes useful to start small then gradually add to the functionality, it’s usually best to have some idea about the overall functionality that you’re trying to achieve at the beginning, as this can have an impact on some of your design decisions as you proceed.
Otherwise, it’s a bit like starting to build a house without any idea what the finished product will look like.
The simple answer is that you probably ought to use a timeout timer, which is initiated when the watering system is turned on, and when the timer expires it turns off the watering system.
However, if you then want a display of the remaining time then a different approach is probably better.
Having clients drip-feeding functional requirements is the worst nightmare of a software developer, which is why it’s best to gather and document your functional requirements at the beginning and design your software solution with these in mind.
Pete.
@PeteKnight What I need is for the relay to shut down after the timeout is reached. There is no need for a display of the remaining time, just that this timeout is set in the app.