hi friend…
wiring arduino mega with ESP8266 wifi module it same like old blynk?
and coding to get online also same or just litter bit difference?.
i check example code totally difference.
here my coding and it work fine with old blynk. which part need to adjust for getting online with new blynk 2.0?
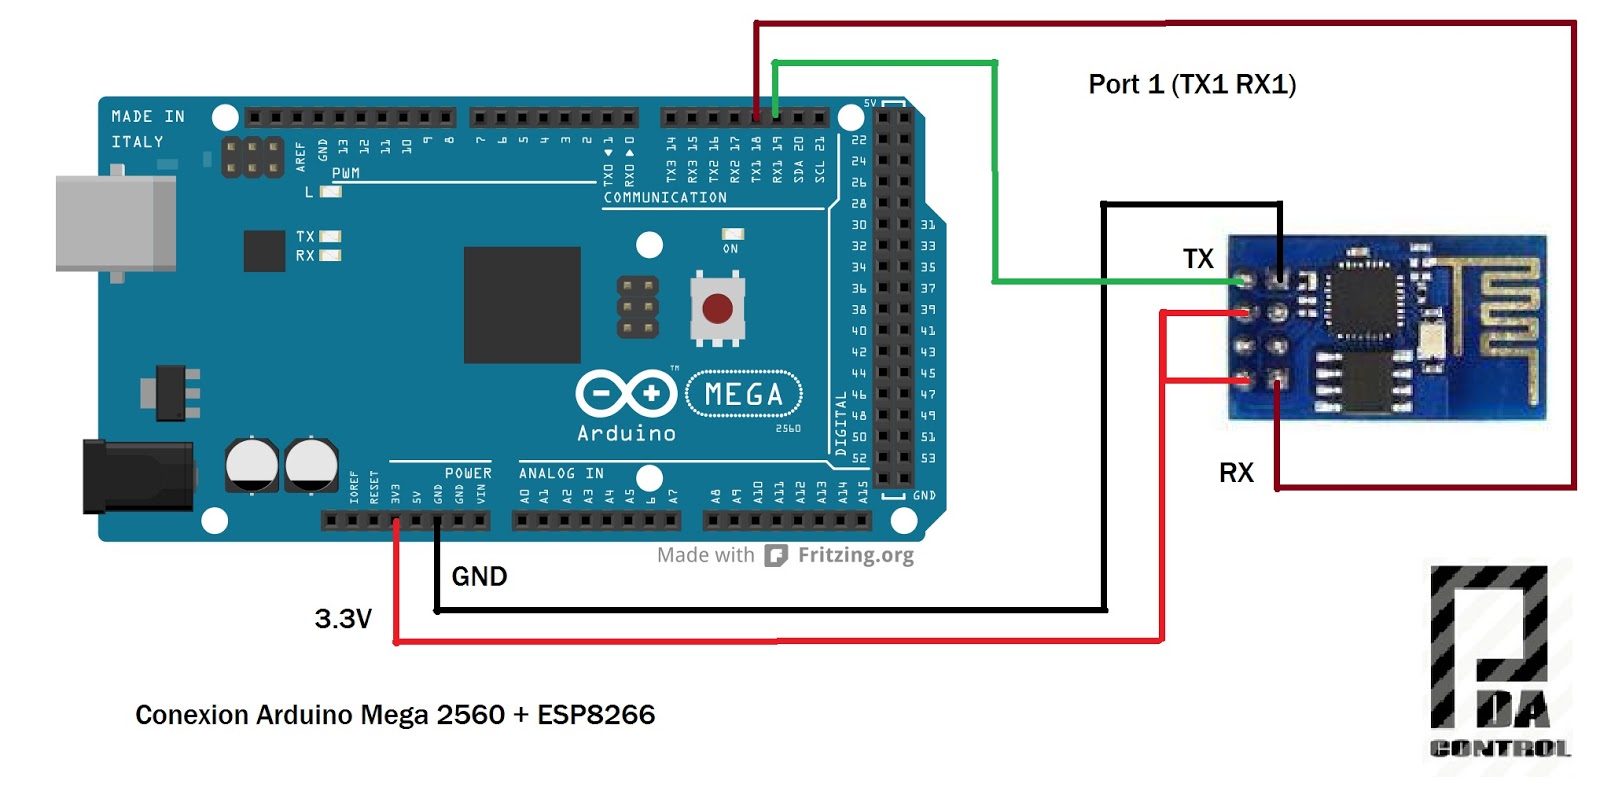
device : arduino mega + esp8266
#include <SPI.h>
#include <Wire.h>
#include <LiquidCrystal_I2C.h>
#include <ESP8266_Lib.h>
#include <BlynkSimpleShieldEsp8266.h> // include Blynk ESP8266

#define BLYNK_PRINT Serial  // Comment this out to disable prints and save space
LiquidCrystal_I2C lcd(0x27,16,2);  // 0x27 or 39 or 0x3F

char auth[] = "xxxxxxxxxxxxxxxxxxxxxxxxxxx";  // awe token here
char ssid[] = "xxxxxxxxxxx"; //wifi id change here
char pass[] = "xxxxxxxxxxxxx"; // wifi password change here


// Hardware Serial on Mega, Leonardo, Micro...
#define EspSerial Serial1  // // #19 TX1, #18 RX1  on MEGA
#define ESP8266_BAUD 9600  // make sure 9600, 115220 not stable
ESP8266 wifi(&EspSerial);

#define sensor1 2  // sensor 1 at pin 2
#define sensor2 3  // sensor 2 at pin 3
#define sensor3 4  // sensor 3 at pin 4
#define sensor4 5  // sensor 4 at pin 5
#define bz 6 // buzzer at pin 6
#define ledGreen1 7  // LED green at pin 7
#define ledYellow1 8  // LED yellow at pin 8
#define ledRed1 9  // LED red at pin9
#define ledGreen2 10  // LED green at pin 7
#define ledYellow2 11  // LED yellow at pin 8
#define ledRed2 12  // LED red at pin9

int levelup1;
int leveldown1;
int levelup2;
int leveldown2;

WidgetLED led1(V0);
WidgetLED led2(V1);

#define BLYNK_GREEN     "#23C48E"
#define BLYNK_YELLOW    "#ED9D00"
#define BLYNK_RED       "#D3435C"
BlynkTimer timer;
//BlynkTimer timer1;


void setup()
{

pinMode(sensor1, INPUT);
pinMode(sensor2, INPUT);
pinMode(sensor3, INPUT);
pinMode(sensor4, INPUT);
pinMode(bz, OUTPUT);
pinMode(ledGreen1, OUTPUT);
pinMode(ledYellow1, OUTPUT);
pinMode(ledRed1, OUTPUT);
pinMode(ledGreen2, OUTPUT);
pinMode(ledYellow2, OUTPUT);
pinMode(ledRed2, OUTPUT);

digitalWrite(bz,HIGH);
delay(100);
digitalWrite(bz,LOW);
lcd.init();
lcd.backlight();
lcd.begin(16,2);
Serial.begin(9600);
lcd.setCursor(0,0);
lcd.print("MEDICAL LIQUID");
lcd.setCursor(0,1);
lcd.print("LEVEL MONITORING");
 delay(5000);
digitalWrite(bz,HIGH);
delay(100);
digitalWrite(bz,LOW);
lcd.clear();
lcd.setCursor(0,0);
lcd.print("PLS WAIT...");
lcd.setCursor(0,1);
lcd.print("SETTING UP..");
EspSerial.begin(ESP8266_BAUD);  // Set ESP8266 baud rate
delay(10);
Blynk.begin(auth, wifi, ssid, pass);
timer.setInterval(500L, sensor ); // every 500ms sent this data
// timer1.setInterval(1000L, blinkLed); // every 10sec sent this data
delay(100);
lcd.clear();
digitalWrite(bz,HIGH);
delay(100);
digitalWrite(bz,LOW);
led1.on();  // turn on virtual LED1
led2.on();  // turn on virtual LED2
}

void loop()
{
levelup1 = digitalRead(sensor1);
leveldown1 = digitalRead(sensor2);
levelup2 = digitalRead(sensor3);
leveldown2 = digitalRead(sensor4);
Blynk.run();
timer.run();

}
void sensor()
{


if(levelup1==HIGH && leveldown1==HIGH) // if water full > 75%
{
led1.setColor(BLYNK_GREEN); // set led color green
Blynk.virtualWrite(V2,100);
  lcd.setCursor(0,0);
  lcd.print("KATIL 1:");
  lcd.setCursor(8,0);
 lcd.print(">75%");
 digitalWrite(ledGreen1,HIGH);
 digitalWrite(ledYellow1,LOW);
 digitalWrite(ledRed1,LOW);
 digitalWrite(bz,LOW);
}
if(levelup1==LOW && leveldown1==HIGH) // if water half 25 - 75%
{
 led1.setColor(BLYNK_YELLOW); // set led color yellow
 Blynk.virtualWrite(V2,50);
 lcd.setCursor(0,0);
  lcd.print("KATIL 1:");
  lcd.setCursor(8,0);
 lcd.print("*50%");
 digitalWrite(ledGreen1,LOW);
 digitalWrite(ledYellow1,HIGH);
 digitalWrite(ledRed1,LOW);
 digitalWrite(bz,LOW);
}
if(levelup1==LOW && leveldown1==LOW) // if water half <25%
{
 led1.setColor(BLYNK_RED);// set led color red
 Blynk.virtualWrite(V2,25);
 lcd.setCursor(0,0);
  lcd.print("KATIL 1:");
  lcd.setCursor(8,0);
 lcd.print("<25%");
 digitalWrite(ledGreen1,LOW);
 digitalWrite(ledYellow1,LOW);
 digitalWrite(ledRed1,HIGH);
 digitalWrite(bz,HIGH);
 delay(50);
 digitalWrite(bz,LOW);
 delay(1000);
 Blynk.notify("PARAS AIR KATIL 1 KURANG DARI 20%");  // sent notification to hp
}
// sensor botol 2
if(levelup2==HIGH && leveldown2==HIGH) // if water full > 75%
{
led2.setColor(BLYNK_GREEN); // set led color green
Blynk.virtualWrite(V3,100);
  lcd.setCursor(0,1);
  lcd.print("KATIL 2:");
  lcd.setCursor(8,1);
 lcd.print(">75%");
 digitalWrite(ledGreen2,HIGH);
 digitalWrite(ledYellow2,LOW);
 digitalWrite(ledRed2,LOW);
 digitalWrite(bz,LOW);
}
if(levelup2==LOW && leveldown2==HIGH) // if water half 25 - 75%
{
 led2.setColor(BLYNK_YELLOW); // set led color yellow
 Blynk.virtualWrite(V3,50);
 lcd.setCursor(0,1);
  lcd.print("KATIL 2:");
  lcd.setCursor(8,1);
 lcd.print("*50%");
 digitalWrite(ledGreen2,LOW);
 digitalWrite(ledYellow2,HIGH);
 digitalWrite(ledRed2,LOW);
 digitalWrite(bz,LOW);
}
if(levelup2==LOW && leveldown2==LOW) // if water half <25%
{
 led2.setColor(BLYNK_RED);// set led color red
 Blynk.virtualWrite(V3,25);
 lcd.setCursor(0,1);
  lcd.print("KATIL 2:");
  lcd.setCursor(8,1);
 lcd.print("<25%");
 digitalWrite(ledGreen2,LOW);
 digitalWrite(ledYellow2,LOW);
 digitalWrite(ledRed2,HIGH);
 digitalWrite(bz,HIGH);
 delay(50);
 digitalWrite(bz,LOW);
 delay(1000);
 Blynk.notify("PARAS AIR KATIL 2 KURANG DARI 20%");  // sent notification to hp
}
else
{

}

}