My IoT based automated light systems constantly shows error "Device Disconnected"

I am working with NodeMCU and wrote this code, everything was working fine and smooth then all of a sudden it stopped working! Is something wrong with my code? When I comment out the void loop() part it works fine again, but with the void loop() included in the code the app keeps displaying device disconnected! (I think something is wrong with the code inside the void loop() ).
@Dmitriy (mentioned you as I am new here and dont know much about anybody else)

   /*************************************************************
      Download latest Blynk library here:
    https://github.com/blynkkk/blynk-library/releases/latest

      Blynk is a platform with iOS and Android apps to control
      Arduino, Raspberry Pi and the likes over the Internet.
      You can easily build graphic interfaces for all your
      projects by simply dragging and dropping widgets.

    Downloads, docs, tutorials: http://www.blynk.cc
    Sketch generator:           http://examples.blynk.cc
    Blynk community:            http://community.blynk.cc
    Social networks:            http://www.fb.com/blynkapp
                                http://twitter.com/blynk_app

      Blynk library is licensed under MIT license
      This example code is in public domain.

     *************************************************************
      This example runs directly on NodeMCU.

      Note: This requires ESP8266 support package:
    https://github.com/esp8266/Arduino

      Please be sure to select the right NodeMCU module
      in the Tools -> Board menu!

      For advanced settings please follow ESP examples :
       - ESP8266_Standalone_Manual_IP.ino
       - ESP8266_Standalone_SmartConfig.ino
       - ESP8266_Standalone_SSL.ino

      Change WiFi ssid, pass, and Blynk auth token to run :)
      Feel free to apply it to any other example. It's simple!
     *************************************************************/

    /* Comment this out to disable prints and save space */
    #define BLYNK_PRINT Serial


    #include <ESP8266WiFi.h>
    #include <BlynkSimpleEsp8266.h>
    #include <Servo.h>

    Servo servo;
    int lightState;
    int state;
    int cstate;
    int sensorPin = A0;
    int ledPin = D5;
    int ledPin2 = D6;
    int ledPin3 = D7;
    int ledPin4 = D4;
    int ledPin5 = D2;

    WidgetLCD lcd(V3);
    WidgetLED led1(V2);
    WidgetLED led2(V1);

    // You should get Auth Token in the Blynk App.
    // Go to the Project Settings (nut icon).
    char auth[] = "466057f0b46a47a*************************";

    // Your WiFi credentials.
    // Set password to "" for open networks.
    char ssid[] = "************";
    char pass[] = "***************************";

    BLYNK_WRITE(V5)
    {
      servo.write(param.asInt());
      led2.on();
      int val=param.asInt();
      if(val>=176)
      {
    //Blynk.virtualWrite(V7, 0);
    //lcd.clear();
    //lcd.print(0, 0, "Curtains Closed");
    Blynk.setProperty(V1, "color", "#FF0000");
      }
      else
      {
    //Blynk.virtualWrite(V7, 1);
    //lcd.clear();
    //lcd.print(0, 0, "Curtains Open");
    Blynk.setProperty(V1, "color", "#14db1a");
      }
    }
    BLYNK_WRITE(V4)
    {
      int pinData = param.asInt();
      led1.on();
      if(pinData==1)
      {
    digitalWrite(ledPin, HIGH);
    //Blynk.virtualWrite(V6, pinData);
    Blynk.setProperty(V2, "color", "#14db1a");
    //lcd.print(0,1,"               ");
    //lcd.print(0,1,"Lights On");
      }
      else
      {
    digitalWrite(ledPin, LOW);
    //Blynk.virtualWrite(V6, pinData);
    Blynk.setProperty(V2, "color", "#FF0000");
    //lcd.print(0,1,"                ");
    //lcd.print(0,1,"Lights Off");
      }
    }

    void setup()
    {
      // Debug console
      Serial.begin(115200);
      lcd.clear();
      servo.attach(D8);
      pinMode(ledPin, OUTPUT);
      pinMode(ledPin2, OUTPUT);
      pinMode(ledPin3, OUTPUT);
      pinMode(ledPin4, OUTPUT);
      pinMode(ledPin5, OUTPUT);
      
      Blynk.begin(auth, ssid, pass);
      // You can also specify server:
      //Blynk.begin(auth, ssid, pass, "blynk-cloud.com", 8442);
      //Blynk.begin(auth, ssid, pass, IPAddress(192,168,1,100), 8442);
    }

    void loop()
    {
      Blynk.run();
      state=analogRead(sensorPin);
      lightState=digitalRead(ledPin);
      lcd.print(0,0,"Luminosity:");
      lcd.print(11,0,state);
      if (state<=50)
      {
    digitalWrite(ledPin, HIGH);
    digitalWrite(ledPin2, HIGH);
    digitalWrite(ledPin3, HIGH);
    digitalWrite(ledPin4, HIGH);
    digitalWrite(ledPin5, HIGH);
    servo.write(178);
    Blynk.setProperty(V2, "color", "#14db1a");
    Blynk.setProperty(V1, "color", "#FF0000");
    lcd.print(0,1,"Lights On");
    delay(1000);
    lcd.print(0,1,"                ");
    delay(1000);
    lcd.print(0,1,"Curtains Closed");
    lcd.print(0,1,"                ");
    delay(1000);
      }
      else
      {
    digitalWrite(ledPin, LOW);
    digitalWrite(ledPin2, LOW);
    digitalWrite(ledPin3, LOW);
    digitalWrite(ledPin4, LOW);
    digitalWrite(ledPin5, LOW);
    servo.write(2);
    Blynk.setProperty(V2, "color", "#FF0000");
    Blynk.setProperty(V1, "color", "#14db1a");
    lcd.print(0,1,"Lights Off");
    delay(1000);
    lcd.print(0,1,"               ");
    delay(1000);
    lcd.print(0,1,"Curtains Open");
    delay(1000);
    lcd.print(0,1,"               ");
    delay(1000);
      }
      
    }

Um… yup… everything is wrong in your void loop() :stuck_out_tongue_winking_eye:

Take some time to read up on these documents… learn to use BlynkTimer and timed loops and keep your void loop() clear of everything except Blynk.run() and timer.run() if at all possible.

Oh, yes… and stay AWAY from delay(), except in rare cases where you need the occasional SMALL delay (e.g. a couple of ms here and there), use timers instead.

http://help.blynk.cc/getting-started-library-auth-token-code-examples/blynk-basics/how-to-display-any-sensor-data-in-blynk-app

http://help.blynk.cc/getting-started-library-auth-token-code-examples/blynk-basics/how-to-control-anything-with-blynk-app

Cooool!! Everything is wrong!! (its okay, its my first project on Blynk :stuck_out_tongue:)
BTW thanks for replying :wink:

Hehe… yes… perhaps not the ideal Welcome :stuck_out_tongue:

The Blynk library needs to run constantly in the background… housekeeping, running Blynk functions, maintaining the communication link to the App (via the server with normal WiFi link)… so any blocking code is BAD… that includes delays. As is filling your void loop with code to run… with long tasks, it can take many seconds in between iterations of Blynk.run() and this causes the disconnections.

Proper Blynk coding edict requires use of BlynkTimer to account for any required delays and timing.

1 Like

Hey @Gunner can you please also provide some info on controlling devices based on sensor readings!!

Run through the Sketch Builder examples:

https://examples.blynk.cc/?board=ESP8266&shield=ESP8266%20WiFi&example=GettingStarted%2FServo

https://examples.blynk.cc/?board=ESP8266&shield=ESP8266%20WiFi&example=Widgets%2FLED%2FLED_StatusOfButton

Hey @Gunner if you dont mind can you please review this piece of code!!

The problem statement is: I want to control 5 leds and a servo motor based on the readings based from a light sensor if the reading from sensor falls below 50 the 5 leds should turn on and servo should rotate to 2 degrees for any other reading the 5 leds should remain off and servo should rotate 178 degrees. Also I wish to be able to control the leds and servo manually (this is where the trouble lies).

So far I have been successful in creating the automatic part of the project i.e. leds and servo control based on sensor reading but I am miserably failing at Manual control I tried almost every possible way I could think of but none worked :disappointed_relieved: Can you suggest me something?
We need to keep the auto and manual part seperate I mean we can’t just call the BYNK_WRITE function anywhere randomly in that case there will be a clash between commands as the sensor will say something else and the widget on our app will say something else!! either an order of priority or a clear distinction between the two needs to be established.

#define BLYNK_PRINT Serial

#include <ESP8266WiFi.h>
#include <BlynkSimpleEsp8266.h>
#include<Servo.h>
// You should get Auth Token in the Blynk App.
// Go to the Project Settings (nut icon).
char auth[] = "74a5d02e4731************************";

// Your WiFi credentials.
// Set password to "" for open networks.
char ssid[] = "*************";
char pass[] = "*************************";
int sensorValue;
int lightState;
int angle;
int pinData;
int sensorPin = A0;
int leds[5] = {D5,D6,D7,D4,D2};
WidgetLCD lcd(V0);
WidgetLED led1(V4);
WidgetLED led2(V5);
Servo servo;
BlynkTimer timer;
void myTimerEvent()
     {   
         lcd.print(11,0,"     ");
         sensorValue=analogRead(sensorPin);
         lightState=digitalRead(leds[1]);
         Serial.println("The analog sensor value is:");
         Serial.println(sensorValue);
         lcd.print(0,0,"Luminosity:");
         lcd.print(11,0,sensorValue);
         lcd.print(0,1,"LIGHTS:");
         if(lightState==1)
         {
          lcd.print(7,1,"        ");
          lcd.print(7,1,"On");
          Blynk.setProperty(V4,"color","#008000");
         }
         else
         {
          lcd.print(7,1,"Off");
          Blynk.setProperty(V4,"color","#ff0000");
         }
         myFunction();  
       }
BLYNK_WRITE(V1)
{
  int s=param.asInt();
  switch(param.asInt())
  {
    case 1: 
    Serial.println("Manual Mode Selected");
   // for(int i=0;s<=1;i++)
   //{
    
   //}
     if(pinData==1)
  {
  for(int g=0;g<5;g++)
  { digitalWrite(leds[g],HIGH);
  }
  }
  else
  {
    for(int i=0;i<5;i++)
    {
      digitalWrite(leds[i],LOW);
    }
  }
  servo.write(angle);
    break;
    case 2: 
    Serial.println("Manual Mode");
    lcd.clear();
    lcd.print(0,0,"Manual Mode");
    
    default: 
    Serial.println("Auto Mode Selected");
    break;
       
    
  }
}
BLYNK_WRITE(V2)
    {
       angle=param.asInt();
    }
BLYNK_WRITE(V3)
{
   pinData=param.asInt();
  
   }
     
void myFunction()
{
  if(sensorValue<=50)
  {
    for(int j=0;j<5;j++)
    {
    digitalWrite(leds[j], HIGH);  
    }
    servo.write(2);
    
    Blynk.setProperty(V5,"color","#ff0000");
    
    //lcd.print(7,1,"            ");
    //lcd.print(7,1,"ON");
  }
  else
  {
    for(int z=0;z<5;z++)
    {
    digitalWrite(leds[z], LOW);  
    }
    servo.write(178);
    
    Blynk.setProperty(V5,"color","#008000");
    //lcd.print(7,1,"OFF");
  }
}
void setup()
{
  // Debug console
  Serial.begin(115200);
  for(int i=0;i<5;i++)
  {
    pinMode(leds[i],OUTPUT);
  }
  
  Blynk.begin(auth, ssid, pass);
  timer.setInterval(1000L, myTimerEvent);
  lcd.clear();
  servo.attach(D8);
  led1.on();
  led2.on();
  
}

void loop()
{
  Blynk.run();
  timer.run();
  
}

I looked at it, but honestly I really need to take code and run it in front of me to analyse what it is really doing… big investment in time, which I have plenty of, and energy, which I don’t :stuck_out_tongue:

But if I understand your needs correctly, I recommend you break the tasks (and coding) into discrete functions like this very simplified Pseudocode:

BLYNK_WRITE(vPin) { // Auto/Manual FLAG toggle switch - only runs when button changes state
  // If ON set AUTO flag HIGH
  // Else set AUTO flag LOW
}

BLYNK_WRITE(vPin) { // Manual control switch - only runs when button changes state
  // If OFF and AUTO flag LOW run DoFunctionA()
  // If OFF and AUTO flag LOW run DoFunctionB()
  // Else do nothing
}

void DecisionFunction() {  // timed loop - runs every second or so
  //  if AUTO flag HIGH and conditions are correct for A action, run DoFunctionA()
  //  if AUTO flag HIGH and conditions are correct for B action, run DoFunctionB()
  //  Else do nothing
}


void DoFunctionA() {  // Runs once
  // turn ON stuff
  // move stuff to position A
}

void DoFunctionB() {  // Runs once
  // turn OFF stuff
  // move stuff to position B
}

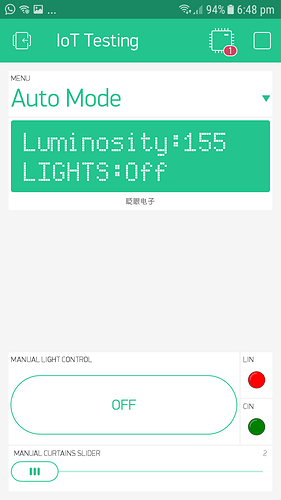
@Gunner mate!! I have tried everything, every single possible thing I could think of including your suggestion!!
Here I am attaching the screenshot of my app interface.!

The button and slider at the bottom are for manual control of Leds and Servo. I just dont know how to avoid conflict between the two!!!
you see as I wrote earlier there are two conditions for leds to light up: One when sensor reading is below 50 and two when the button is pressed now what happens is if the user wishes to turn on or off the leds irrespective of sensor value it is not possibly as if at the time of pressing the button to turn off leds if sensor value is below 50 it will turn on again and similarly if one wishes to turn on leds and sensor value is above 50 then according to the defined conditions it will turn off again :expressionless: and worse the slider just not accepts the command or the device gets disconnected.

The auto mode in my opinion is sorted in the above code written by me it will be the default mode but how to set this manual thing!! :confounded::confounded::confounded: if you think an entirely different approach should be followed we can do that as well.

Thanks :slightly_smiling_face:

@Gunner the trouble with this is calling the BLYNK_WRITE() function!! the only way I know of calling it is just defining it right away! and you cannot define another function inside a function i.e. I cannot use BLYNK_WRITE inside DoFunctionA or DoFunctionB.

Why would you want to call BLYNK_WRITE() inside another void() function anyway? At least in your desired case.

I don’t think you understand how Blynk functions work… they are independent functions of their own and CAN be used to run commands or even other void() functions… not generally the other way around (although that technically can be done by using the Blynk.syncVirtual(vPin) command).

Anyhow… I recommend you keep studying the Docs & Help Center and try some more of the examples in the Sketch Builder in order to better understand how Blynk works.

This simple Blynk Function will toggle a digital pin, based on Button State:

BLYNK_WRITE(V0) {  // Only runs when Button set to V0 changes state
  int BUTTON0 = param.asInt();  // Get value as integer
  if (BUTTON0 == 1) {
    digitalWrite(13, HIGH);  // Directly turn ON pin 13  }
  }
  else {
    digitalWrite(13, LOW);  // Directly turn OFF pin 13  }
  }
}

And as was the basis of my pseudo code example… You can also call other void() functions from within this Blynk Function, to do the same thing if need be - this one uses a Button on V1:

BLYNK_WRITE(V1) {  // Only runs when Button set to V1 changes state
  int BUTTON1 = param.asInt(); // Get value as integer
  if (BUTTON1 == 1) {
    LEDON();  // Indirectly turn ON pin 13 by calling another Arduino function
  }
  else {
    LEDOFF();  // Indirectly turn OFF pin 13 by calling another Arduino function
  }
}

void LEDON() {  // Arduino Function to turn ON digital pin 13
  digitalWrite(13, HIGH);
}

void LEDOFF() {  // Arduino Function to turn OFF digital pin 13
  digitalWrite(13, LOW);
}
1 Like

Hmmmm @Gunner this gives me a new idea to try to solve my problem. Thanks I will try it and tell you if it worked.

But the idea is simple.
The hardware should make take defined decisions based on sensor readings but when user wants to take control in his hands the user should be able to control the hardware irrespective of sensor readings i.e. in this particular condition we are defying all the other conditions which we have defined earlier for sensor based automatic control.(sounds a bit confusing but that’s it)

Then as per my last example, you would add another timed function, scanning the sensor every so often, and calling the appropriate ON or OFF function as required.

Similar principle of a light switched from both ends of a room… either one will control the lights, independently of the other… but replace one switch with a motion sensor and you have a form of both AUTO and MANUAL control.

The only way to use BLYNK_WRITE(Vpin) function is to straightaway define it

BLYNK_WRITE(Vpin)
{
int pinData=param.asInt();
if (pinData==1)
{
Do this;
}
else
{
Do this;
}
} 

But what if one wishes to use an in app widget like a slider or button to perform an action on hardware only under a certain condition?
like

if(anyparameter==50)
{                                         //this is not possible
BLYNK_WRITE(Vpin)
{
}
}  

or

if(anyparameter==50)
{
myFunction();
}
void myFunction()
{
BLYNK_WRITE(Vpin)      //this too is not possible
{

}
}

Isn’t it possible to call the BLYNK_WRITE(); function like this and define it somewhere else??

Look up virtualWrite() and sync then study all the docs in detail.

if (anyparameter == 50) {
  Blynk.syncVirtual(vPin);  // this IS possible
  }