Hallo,
We’re can I edit the generated code ?
My project is not working well.
I want to tweek the generated code.
Equipment: Arduino yun, 16 relay card Samsung note8
would you said how to post your code on this forum ?
I have the blynk app there i add 16 button I change the state from switch to push for the first 12 button last 4 are switch button
First problem when I powered up my arduino yun all switch go to 1 high when I push they go normal
Second problem some push button stay high. Like they are in switch mode.
In the arduino yun I use blynk sketch
Where is the code generated
please provide your code else we can’t help you ! 
Alexis,
That is my first question I don’t know where the code is generated.
In the arduino or in the blink app.
So far I didn’t write any code but the switch is working I only need to fine tune the code but I don’t know how blynk works with arduino.
The app automatically generated a code somewhere
No it didn’t… you had to have uploaded a sketch to your Arduino with your AUTH code and any WiFi credentials… but the Yun seems seems to have a built in sketch and web panel?
https://store.arduino.cc/usa/arduino-yun-rev-2
But for customising your own code you would probably use the IDE and something like this…
That IS the sketch that you add onto as you learn to program with Arduino and Blynk.
http://help.blynk.cc/getting-started-library-auth-token-code-examples
It’s the Blynk Sketch that you say you’re using that we need to see, so can you post it here please?
(Don’t forget the backticks and cpp to make it display correctly on the forum).
Pete.
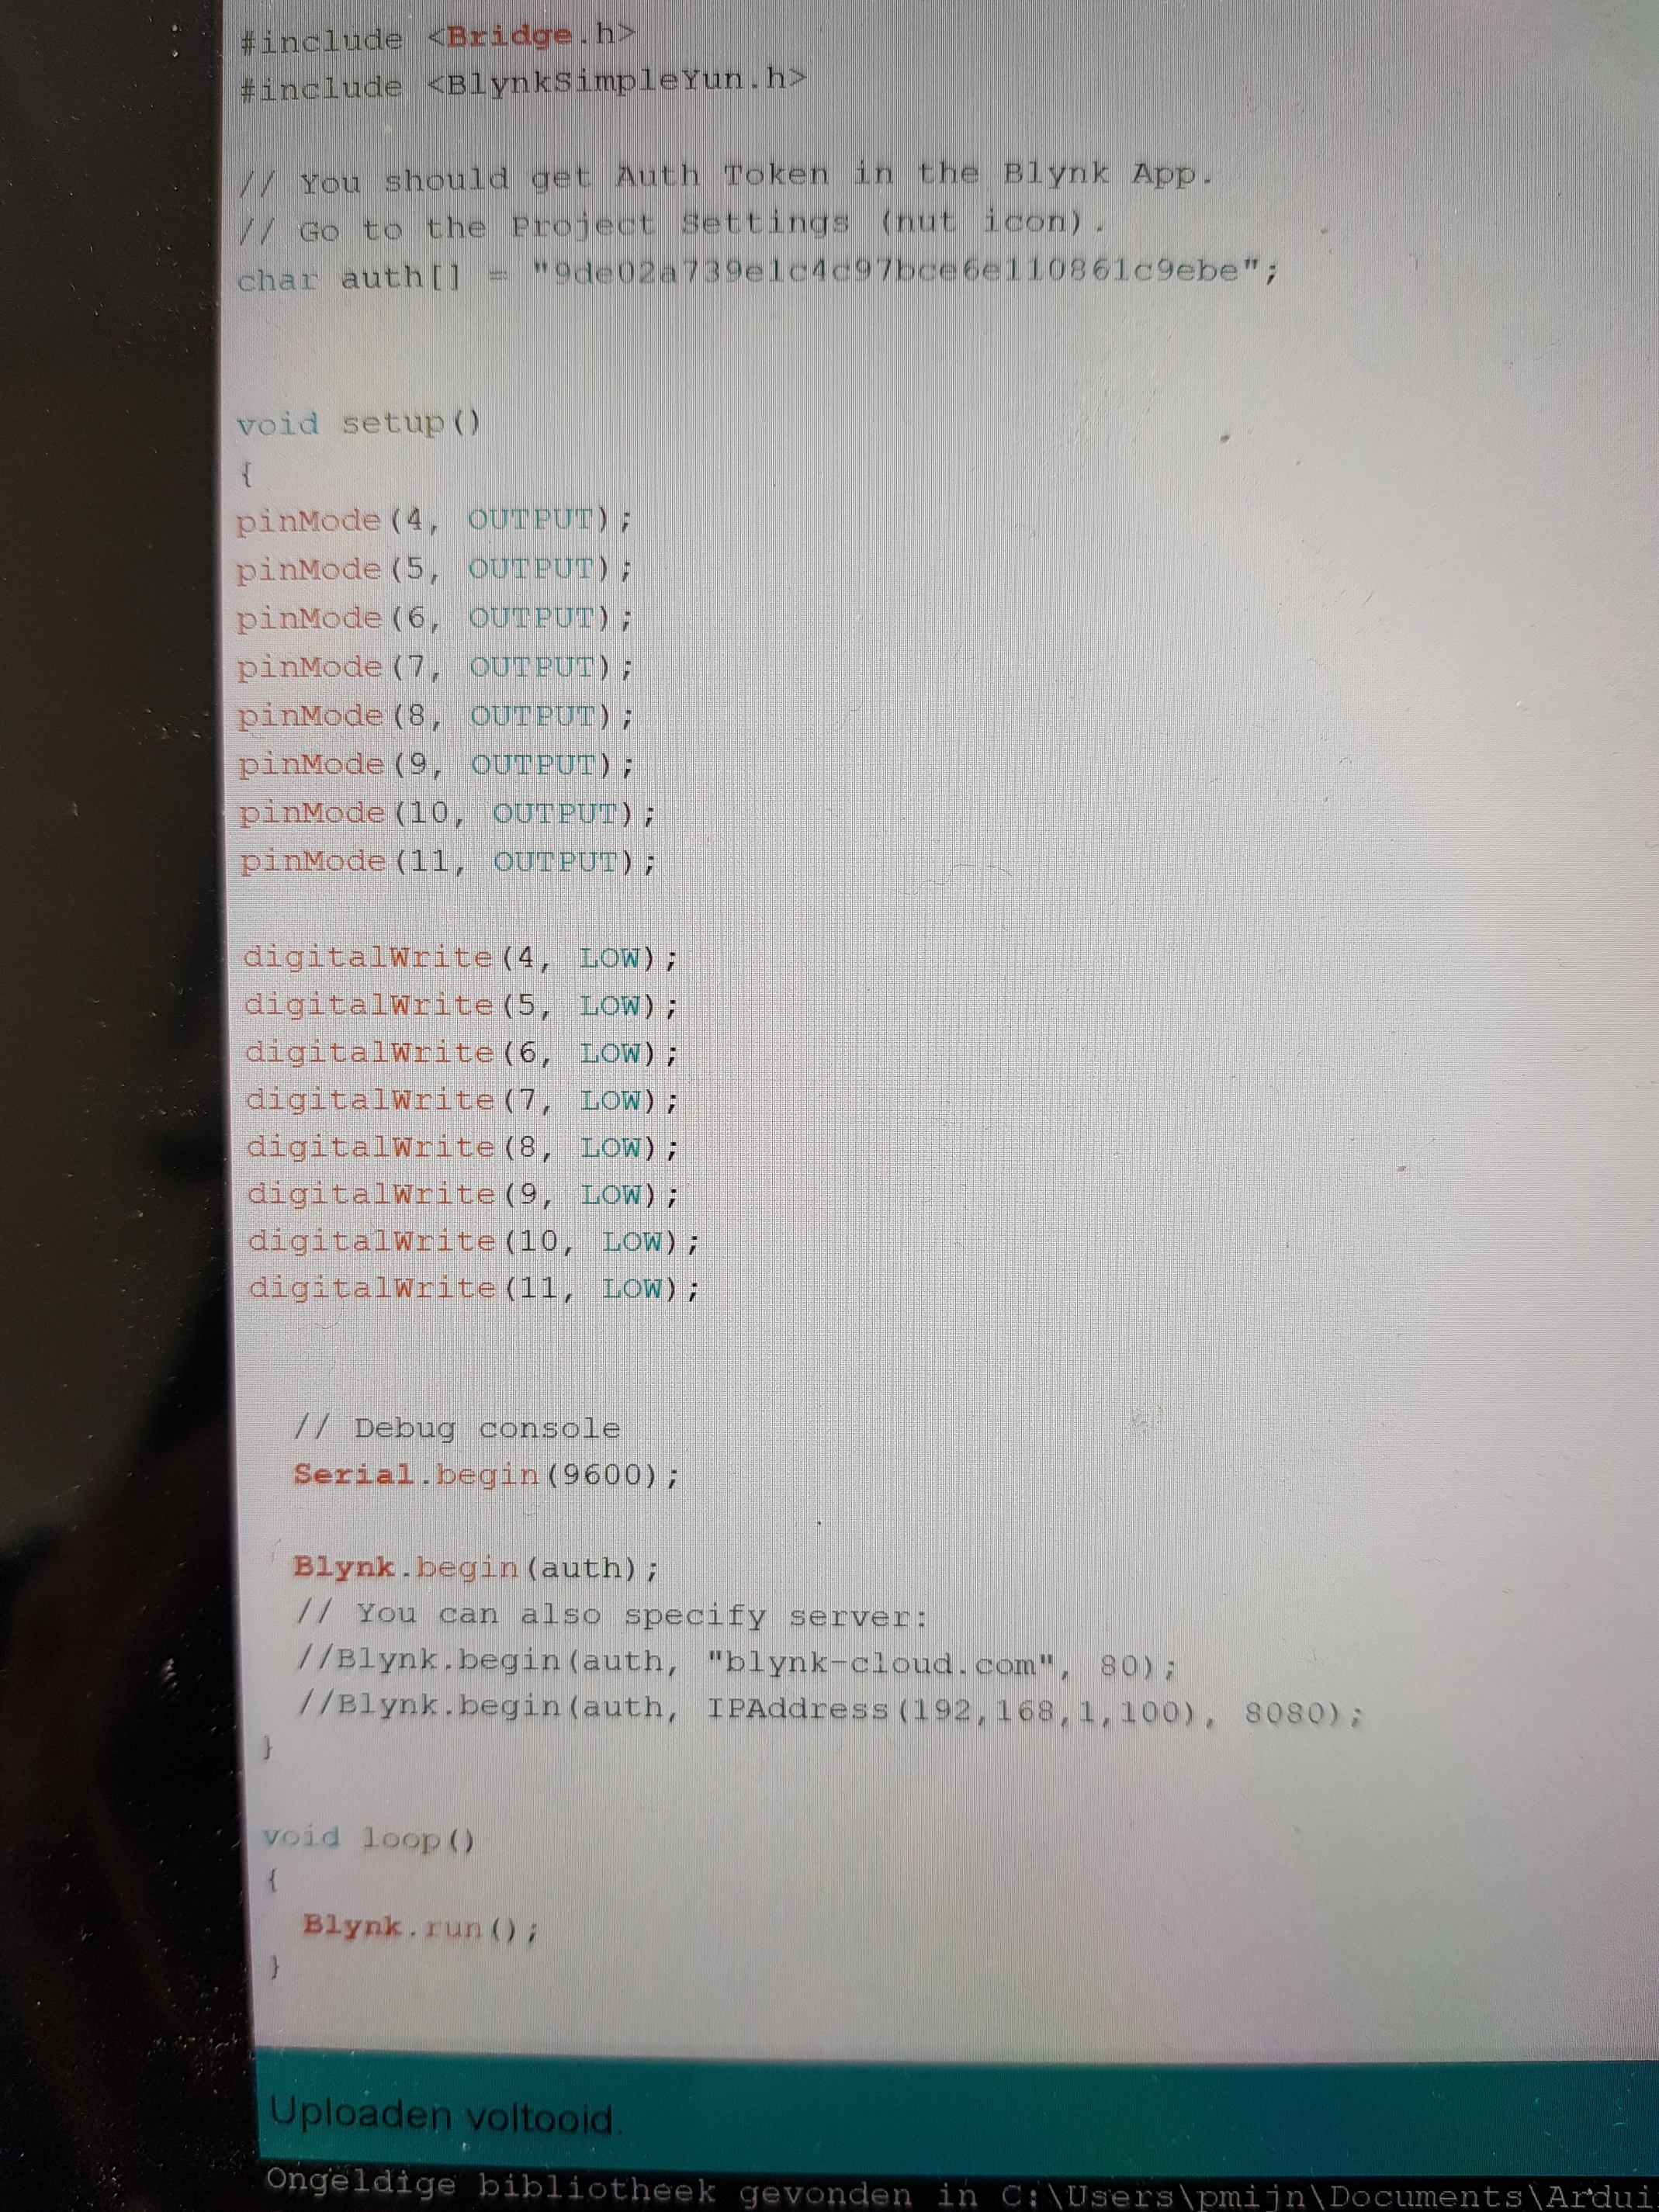
my arduino yun [code]
/*************************************************************

  Download latest Blynk library here:

  https://github.com/blynkkk/blynk-library/releases/latest

  Blynk is a platform with iOS and Android apps to control

  Arduino, Raspberry Pi and the likes over the Internet.

  You can easily build graphic interfaces for all your

  projects by simply dragging and dropping widgets.

    Downloads, docs, tutorials: http://www.blynk.cc

    Sketch generator:           http://examples.blynk.cc

    Blynk community:            http://community.blynk.cc

    Follow us:                  http://www.fb.com/blynkapp

                                http://twitter.com/blynk_app

  Blynk library is licensed under MIT license

  This example code is in public domain.

 *************************************************************

  This example shows how to use Arduino Yun Bridge

  to connect your project to Blynk.

  Feel free to apply it to any other example. It's simple!

 *************************************************************/

/* Comment this out to disable prints and save space */

#define BLYNK_PRINT Serial

#include <Bridge.h>

#include <BlynkSimpleYun.h>

// You should get Auth Token in the Blynk App.

// Go to the Project Settings (nut icon).

char auth[] = "xxxxxxxxxxxxxxxxxxxxxxxxxx";

void setup()

{

  // Debug console

  Serial.begin(9600);

  Blynk.begin(auth);

  // You can also specify server:

  //Blynk.begin(auth, "blynk-cloud.com", 8442);

  //Blynk.begin(auth, IPAddress(192,168,1,100), 8442);


}

void loop()

{  Blynk.run();

}

So, you’re doing something we call ‘direct pin manipulation’. This means that in the app, your switch widgets are set-up to control digital rather than virtual pins.
I only use virtual pins, so I’m not 100% sure that what I’m about to say is actually correct…
To set your relay pins LOW at power-on, you’ll first of all need to define each of the pins that you’re using as an OUTPUT pin, then set each pin to LOW. These new lines of code will go at the end of the the void setup() section of your existing code. Void setup() is executed once when the device powers-up.
The code will look like this:
pinMode(1, OUTPUT);
pinMode(2, OUTPUT);
pinMode(3, OUTPUT);
// repeat this for the other pins...

digitalWrite(1, LOW);
digitalWrite(2, LOW);
digitalWrite(3, LOW);
// repeat this for the other pins...
This assumes that you’re using digital pins 1,2,3 etc. If you’re not then change the pin numbers above.
Pete.
Hallo Pete,
I tried what u suggested, it is not working.
Here is a the code.
I need to know where my code is generated so I can edit the code. Or tell me how I can change the Principe from direct pin manipulation to something i can edit.
gr.Paul.
Hi Paul,
I do t really understand what you mean by “I need to know where my code is generated so I can edit the code”.
I assume that you’re using the Arduino IDE to edit/compile code and upload it to your board. This is where your code is written/edited and where the machine code that the Yun uses to run is generated by the compile process.
Pete.
Hi Pete,
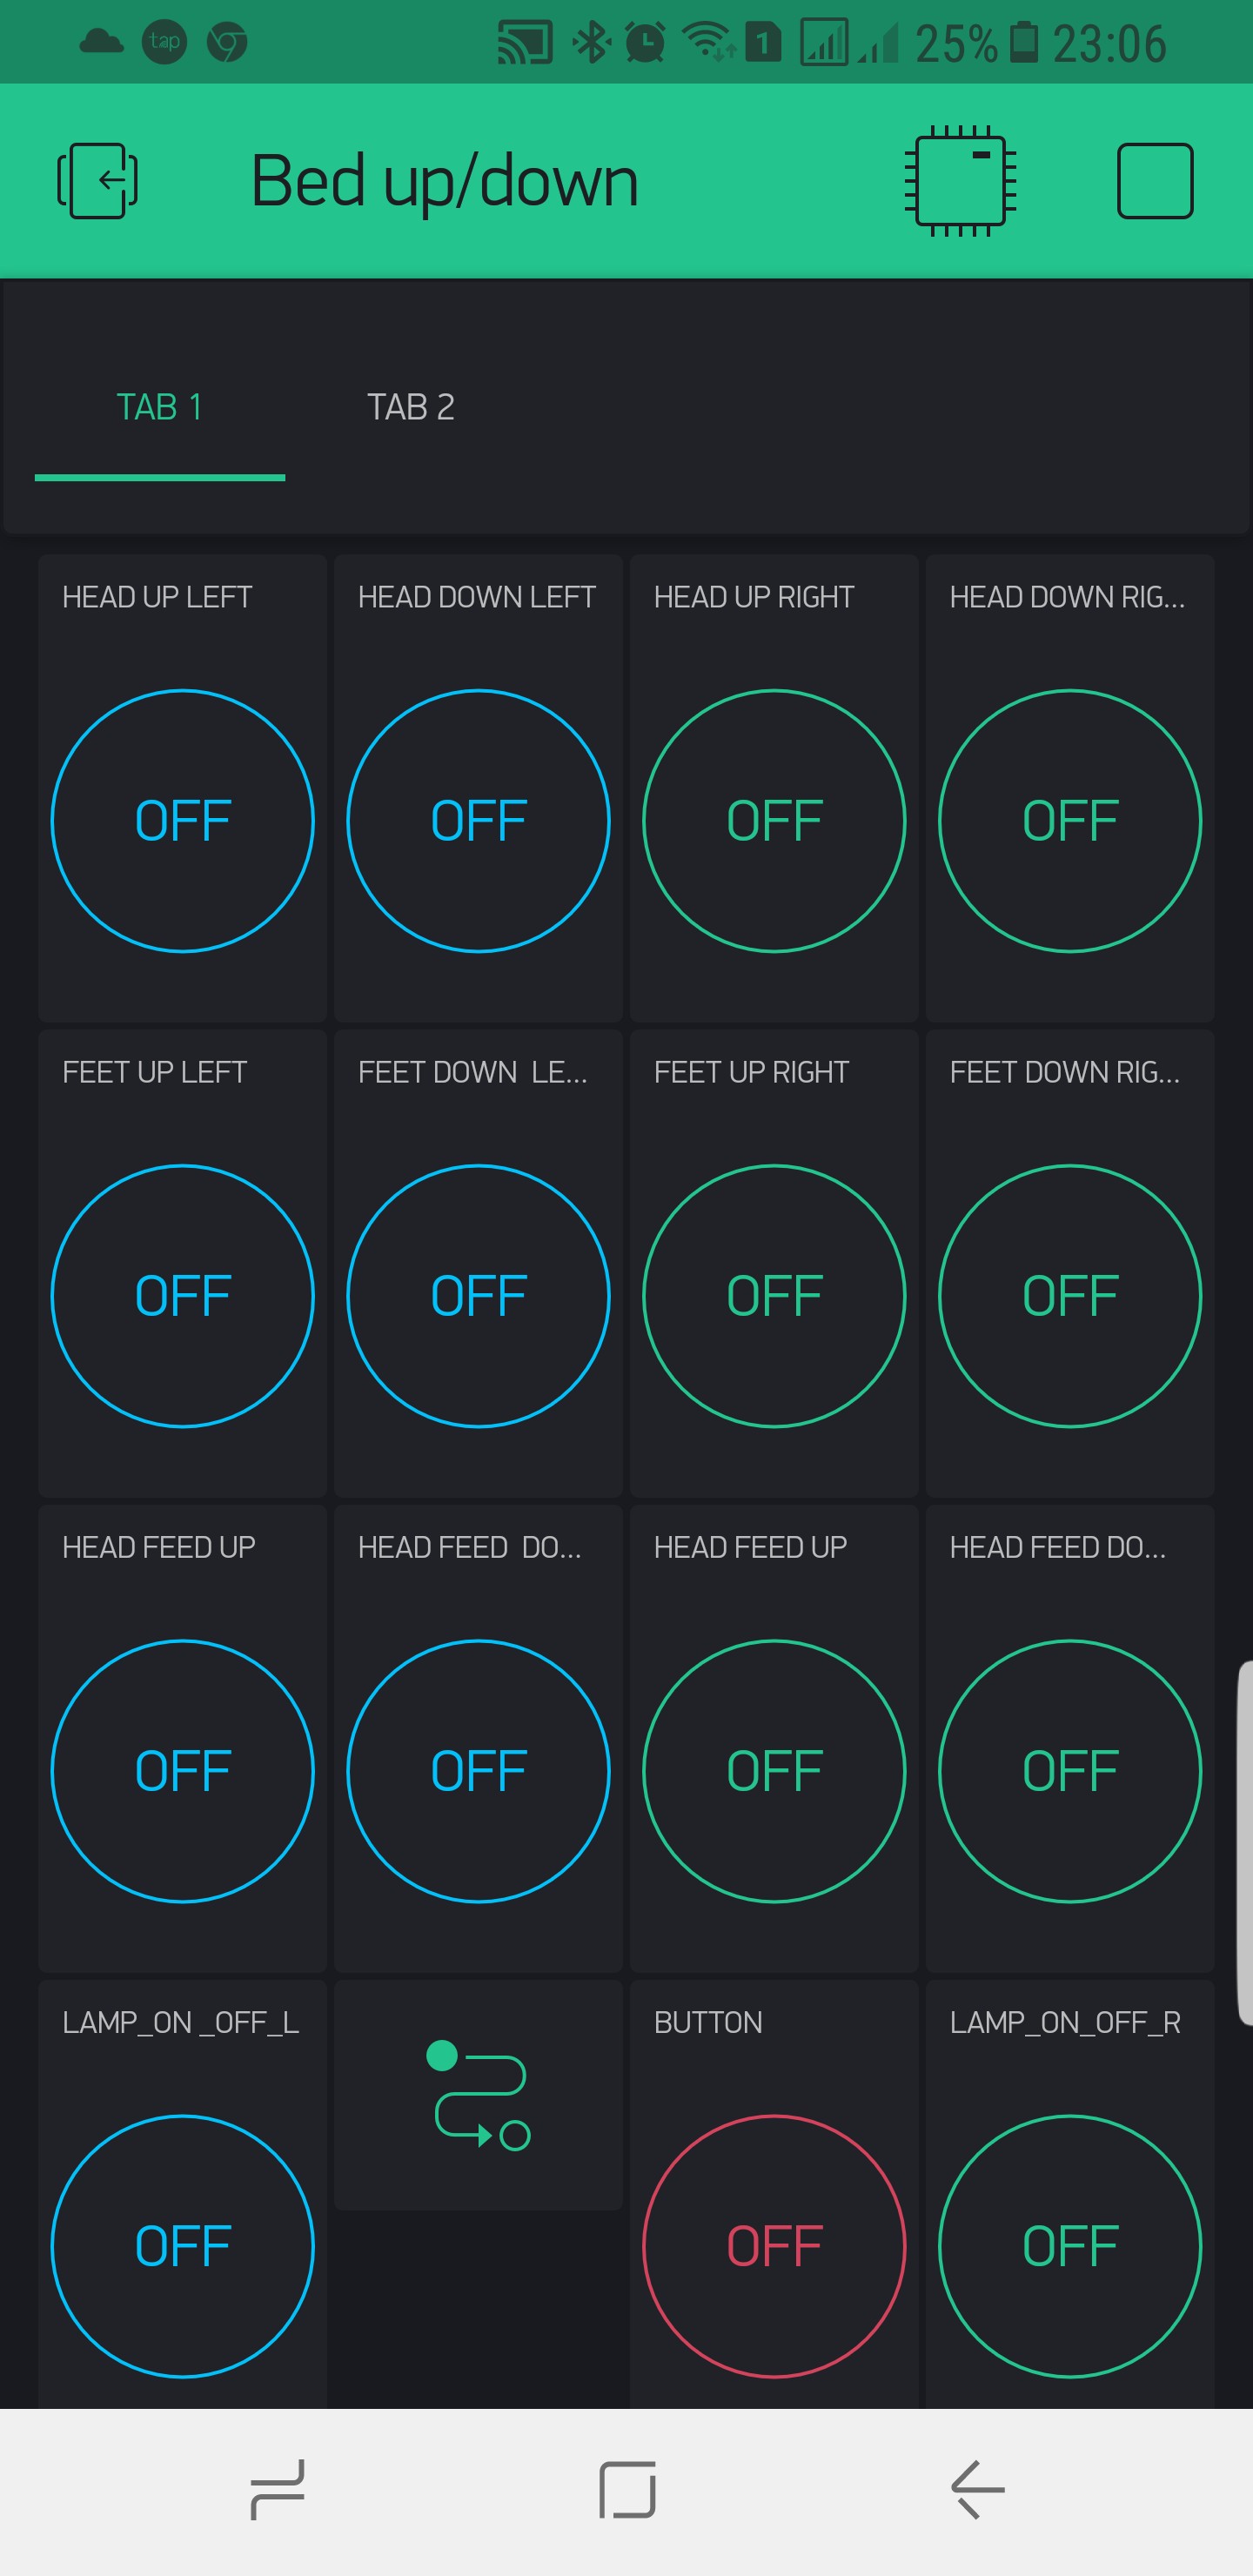
i have use the blynk app. (samsung galaxy note 8)
there i selected divice : arduino yun , connected type : wifi
i edit 14 switcheches. D4 --> D11 see printscreen (push button)
arduino side.

put my Token into the code
upload.
thats all.
The switches are working.
for some reason D4 and D6 are not working???.
when i change from switch to push in the app. the function change. i dont have to upload the someting in de arduino.
but ther shuld by a code somewhere.
MY QUESTION:
WHERE CAN I SEE THE CODE WHER THE SWITCH ARE GENERATED FROM THE APP.
i am unexperiance with blynk and arduino
i am a service engineer and know a litle about siemens code Tia portal
thanks Pete,
The App is NOT open source so you can NOT see any code for it, assuming that is what you are asking… your questions are very unclear ![]()
The App talks to the server which in turn talks to the Device, which you code yourself using the Arduino IDE… the screen you took a picture of ![]()
Perhaps spend some time reading all the help and documentation?
http://help.blynk.cc/getting-started-library-auth-token-code-examples
1 Like
i give up
i try to find a differend app.
blynk is to difficult for my
thanks you guys
gr paul.
I tried many “simple” Apps before Blynk… but it was Blynk that got me restarted with Arduino and even learning to code with multiple languages (a bit).
Everything is possible with some time and efforts… even for me, without any engineering background.
Hope you find what you need.
I’m sorry we weren’t able to help you.
It seems that the Arduino Yun works in a rather different way to most of the boards that are in use, and although I have lots of experience of some of the other boards I’ve never felt the need to go down the Yun route.
I seriously doubt that you’ll find a better app, maybe a different choice of board would be a better move.
Good luck!
Pete.