Hi @StefanL38
I guess that everyone has their own learning style, and comes to Blynk via a totally different journey through life. A large number of people seem to start with an Arduino board, that has no internet connectivity, then want to get started with that hardware without learning any programming skills.
More experienced programmers are usually happy to read the documentation and look at the Sketch Builder examples, but that’s clearly not working for you.
I’ll try to give you a quick overview. I’ll assume that your using something like a NodeMCU board, a WiFi connection and that you’ll be using C++ to write your code…
Blynk has 3 cloud servers dotted around the world. You can use these for free, but you’re only given 2000 units of free ‘energy’. Adding widgets to your project uses-up this energy, and if you want to use more widgets in your project then you’ll need to buy more energy. The energy is recyclable, so if you add a widget to your project then delete it you get the energy back again.
If you wish, you can create your own local server, and give yourself unlimited energy.
I’d recommend using the free cloud energy as a staring point.
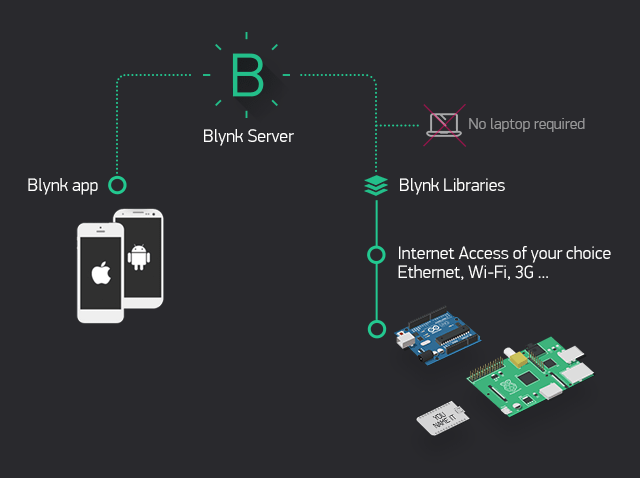
The Blynk app talks to the (cloud or local) Blynk server, as does your NodeMCU device - via the Blynk libraries.
The NodeMCU and the Blynk server need to be in constant communication with each other. This is achieved by having the Blynk.run() command in the void loop of your sketch. Each time this void loop executes (which should be tens if not hundreds of times per second) the NodeMCU and the server do a handshake and exchange any necessary data.
Widgets in the app can mostly be connected to digital or virtual pins.
A digital pin will (via the Blynk library) directly control the corresponding hardware pin on the NodeMCU.
My advice would be not to use digital pins. Virtual pins are much more powerful, and versatile, so use them instead.
When you use Virtual Pins you get access to a number of callback functions within your code. This is where the documentation is a bit lacking in my opinion. I’ll demonstrate how they work with an example, even though you don’t like examples 
In the app, attach a Button widget to pin V1 and set it to Switch (latching) mode. By default, when you press the button it will send a “1” when it’s on, and a “0” when it’s off. This data is sent from the app to the server.
When the NodeMCU does it’s handshake with the server then it will be told about the new value for pin V1. However, to make use of this you need to add a callback function to your sketch, like this:
BLYNK_WRITE(V1)
{
  // This code will execute when the value of V1 changes
}}
So, every time the value of the widget attached to V1 changes, the BLYNK_WRITE(V1) callback function will ‘fire’ and the code inside that function will be executed. If you’re familiar with hardware interrupts then this is a similar principal, but executed in software.
Just knowing that the V1 widget has changed state isn’t normally much use, instead you want to know if it is now On or Off. You do this with the param.as...() command. There are three flavours of this:
param.asInt()
param.asFloat()
param.asStr()
which return integer, float or string versions of the data. As we are dealing with just 0’s and 1’s we’ll use the param.asInt() version…
BLYNK_WRITE(V1)
{
 if(param.asInt())
  {
    Serial.println("The button widget on V1 was turned ON");
  }
  else
  {
    Serial.println("The button widget on V1 was turned OFF");
  }
}
Widgets can be updated from code using the Blynk.virtualWrite(vPin,value) command, so this:
Blynk.virtualWrite(V1,0);
would turn our button widget attached to V1 off.
It’s worth noting that this won’t trigger the BLYNK_WRITE(V1) callback, because if it did you could easily create an endless loop within your code.
There are other callbacks that can be added to your code, such as BLYNK_CONNECTED which will trigger every time the NodeMCU connects to the Blynk server and BLYNK_APP_CONNECTED and its sister BLYNK_APP_DISCONNECTED which trigger when the app connects or disconnects from the server, but all of these are covered quite well in the documentation.
Does this help to give an overview and get you started using widgets to control your device?
Pete.