How to use TASMOTA inside BLYNK and HOME ASSISTANT [Work in Progress]

Another strong Tool you can find in Tasmota is

Rules

(more details can be found in Examples section)

Summary

Introduction

Rules expand the available functionality in Sonoff-Tasmota with user flexibility. It allows for different actions on different button, switch or power responses. Rules are stored in flash and therefore will survive a reboot. Rules act on triggers initiated by events like a System Boot or a Timer being activated.

Using rules many issues can be resolved.

Rules can be added directly from the Tasmota Console or By MQTT or by HTTP as any other Tasmota Command.

A great introduction to Home Assistant

1 Like

Best of Mireille Mathieu ?:joy::joy:

2 Likes

@Blynk_Coeur

You can find all your Favorite songs on Spotify and they are displayed (Album Cover) on Home Assistant UI as long as you are hearing them on your Home Mini Speakers.
this service is free on Home Mini without Advertisement

same with Pandora on Echo Dot

1 Like

I’ll try to find Lana del Rey’s albums. :joy::joy:

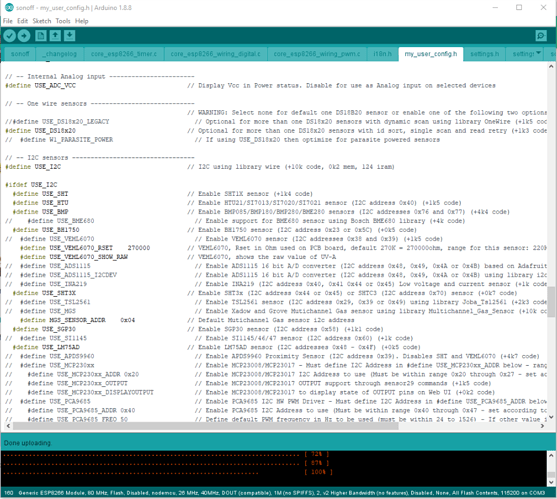
How to setup and configure Arduino IDE for Tasmota compilation and upload.

this is a very good wiki written with care, so try to follow the instructions for good results

Tasmota with " Arduino IDE "

IMPORTANT: For Windows users, before executing arduino.exe add an empty folder called portable in the known folder.

Serial Monitor

after enabling Home Assistant

you need to add this line in your configuration.yaml

mqtt:
  discovery: true

for auto discovery

15:32:53.216 -> 00:00:00 Project sonoff Sonoff Version 6.4.1(sonoff)-2_5_0
15:32:53.633 -> 00:00:00 WIF: Connecting to AP1 xxxxx in mode 11N as sonoff-2644...
15:32:58.133 -> 00:00:04 WIF: Connected
15:32:58.133 -> 00:00:04 DNS: Initialized
15:32:58.202 -> 00:00:04 HTP: Web server active on sonoff-2644.local with IP address 192.168.xxx.xxx
15:32:59.390 -> 15:32:58 MQT: Attempting connection...
15:32:59.538 -> 15:32:58 MQT: Connected
15:32:59.538 -> 15:32:58 MQT: sonoff/tele/LWT = Online (retained)
15:32:59.538 -> 15:32:58 MQT: sonoff/cmnd/POWER = 
15:32:59.591 -> 15:32:58 MQT: sonoff/tele/INFO1 = {"Module":"Sonoff Basic","Version":"6.4.1(sonoff)","FallbackTopic":"cmnd/DVES_F12A5454_fb/","GroupTopic":"sonoffs"}
15:32:59.591 -> 15:32:58 MQT: sonoff/tele/INFO2 = {"WebServerMode":"Admin","Hostname":"sonoff-2644","IPAddress":"192.168.xxx.xxx"}
15:32:59.591 -> 15:32:58 MQT: sonoff/tele/INFO3 = {"RestartReason":"External System"}
15:32:59.591 -> 15:32:58 MQT: sonoff/stat/RESULT = {"POWER":"OFF"}
15:32:59.591 -> 15:32:58 MQT: sonoff/stat/POWER = OFF
15:32:59.591 -> 15:32:58 MQT: homeassistant/light/F12A54_LI_1/config =  (retained)
15:32:59.640 -> 15:32:58 MQT: homeassistant/switch/F12A54_RL_1/config = {"name":"Sonoff","cmd_t":"~cmnd/POWER","stat_t":"~tele/STATE","val_tpl":"{{value_json.POWER}}","pl_off":"OFF","pl_on":"ON","avty_t":"~tele/LWT","pl_avail":"Online","pl_not_avail":"Offline","uniq_id":"F12A54_RL_1","device":{"identifiers":["F12A54"],"name":"Sonoff","model":"Sonoff Basic","sw_version":"6.4.1(sonoff)","manufacturer":"Tasmota"}, "~":"sonoff/"} (retained)
15:32:59.640 -> 15:32:58 MQT: homeassistant/light/F12A54_LI_2/config =  (retained)
15:32:59.640 -> 15:32:58 MQT: homeassistant/switch/F12A54_RL_2/config =  (retained)
15:32:59.690 -> 15:32:58 MQT: homeassistant/light/F12A54_LI_3/config =  (retained)
15:32:59.690 -> 15:32:58 MQT: homeassistant/switch/F12A54_RL_3/config =  (retained)
15:32:59.690 -> 15:32:58 MQT: homeassistant/light/F12A54_LI_4/config =  (retained)
15:32:59.690 -> 15:32:58 MQT: homeassistant/switch/F12A54_RL_4/config =  (retained)
15:32:59.690 -> 15:32:58 MQT: homeassistant/light/F12A54_LI_5/config =  (retained)
15:32:59.690 -> 15:32:58 MQT: homeassistant/switch/F12A54_RL_5/config =  (retained)
15:32:59.690 -> 15:32:58 MQT: homeassistant/light/F12A54_LI_6/config =  (retained)
15:32:59.690 -> 15:32:58 MQT: homeassistant/switch/F12A54_RL_6/config =  (retained)
15:32:59.690 -> 15:32:58 MQT: homeassistant/light/F12A54_LI_7/config =  (retained)
15:32:59.690 -> 15:32:58 MQT: homeassistant/switch/F12A54_RL_7/config =  (retained)
15:32:59.737 -> 15:32:58 MQT: homeassistant/light/F12A54_LI_8/config =  (retained)
15:32:59.737 -> 15:32:58 MQT: homeassistant/switch/F12A54_RL_8/config =  (retained)
15:33:07.674 -> 15:33:06 MQT: sonoff/tele/STATE = {"Time":"2019-02-25T15:33:06","Uptime":"0T00:00:14","Vcc":3.014,"SleepMode":"Dynamic","Sleep":50,"LoadAvg":19,"POWER":"OFF","Wifi":{"AP":1,"SSId":"xxxx","BSSId":"48:F8:B3:xx:xx:xx","Channel":10,"RSSI":68}}
15:33:33.802 -> 15:33:32 MQT: sonoff/tele/STATE = {"Time":"2019-02-25T15:33:32","Uptime":"0T00:00:40","Vcc":3.014,"SleepMode":"Dynamic","Sleep":50,"LoadAvg":19,"POWER":"ON","Wifi":{"AP":1,"SSId":"xxxx","BSSId":"48:F8:B3:xx:xx:xx","Channel":10,"RSSI":70}}
15:33:33.802 -> 15:33:32 MQT: sonoff/stat/RESULT = {"POWER":"ON"}
15:33:33.802 -> 15:33:32 MQT: sonoff/stat/POWER = ON
15:33:35.862 -> 15:33:34 MQT: sonoff/tele/STATE = {"Time":"2019-02-25T15:33:34","Uptime":"0T00:00:42","Vcc":3.015,"SleepMode":"Dynamic","Sleep":50,"LoadAvg":19,"POWER":"OFF","Wifi":{"AP":1,"SSId":"xxxx","BSSId":"48:F8:B3:xx:xx:xx","Channel":10,"RSSI":72}}
15:33:35.862 -> 15:33:34 MQT: sonoff/stat/RESULT = {"POWER":"OFF"}
15:33:35.862 -> 15:33:34 MQT: sonoff/stat/POWER = OFF

Information Menu

Program Version 6.4.1(sonoff)
Build Date & Time 2019-02-25T15:26:12
Core/SDK Version 2_5_0/3.0.0-dev(c0f7b44)
Uptime 0T00:56:05
Flash write Count 11 at 0xF9000
Boot Count 1
Restart Reason External System
Friendly Name 1 Sonoff
AP1 SSId (RSSI) xxxx (72%)
Hostname sonoff-2644
IP Address 192.168.xxx.xxx
Gateway 192.168.xxx.xxx
Subnet Mask 255.255.255.0
DNS Server 192.168.xxx.xxx
MAC Address 5C:CF:7F:F1:2A:54
MQTT Host 192.168.xxx.xxx
MQTT Port 1883
MQTT User xxxx
MQTT Client DVES_F12A5454
MQTT Topic sonoff
MQTT Group Topic sonoffs
MQTT Full Topic sonoff/cmnd/
MQTT Fallback Topic cmnd/DVES_F12A5454_fb/
Emulation None
mDNS Discovery Enabled
mDNS Advertise Web Server
ESP Chip Id 15805012
Flash Chip Id 0x1640EF
Flash Size 4096kB
Program Flash Size 1024kB
Program Size 548kB
Free Program Space 452kB
Free Memory 22kB
1 Like

How to setup and configure PlatformIO for Tasmota compilation and upload.

Tasmota with " PlatformIO "

PIO Building firmware

PIO Uploading firmware

Over-the-Air ESP8266 programming using PlatformIO for MAC PC

Templates

Sonoff-Tasmota Templates Wiki

Starting with version 6.4.1.16 Sonoff-Tasmota Modules can be extended by users using a Template . Version 6.4.1.17 introduced a menu to configure templates.

These are intended to be an easy way for users to create and share configurations for devices that are unsupported in Sonoff-Tasmota but have common characteristics with existing modules. We encourage everyone who creates a template for a new unknown device to add it to the database with an image of the device, links to the manufaturer or where it can be found and, of course, the template for it.

here is Tasmota Development version 6.4.1.19

almost daly development changelog can be found in “sonoff /_changelog.ino”

How to Install Platform IO and Build Tasmota

This is a great video ( Live Stream ~1:30 h ) for Platform IO on Windows 10 showing how you can reduce the size of your .bin file by removing sensors that you don’t actually use or are not available in your country.

Did anyone ever tried to use the Blynk protocol directly from Tasmota? So, I would like Tasmota to talk Blynk directly to the Blynk server. I read that it seems difficult, but I don’t know what the problem is.

for the moment I think MQTT is our solution unless the Blynk stuff can find a better solution

A HA video on Lovelace and Floorplan

Home Assistant is always updating to make things easier, you may find little difference between videos and actual HA.

Home Assistant working with all my devices “Official Firmware”

  • WeMo (Belkin latest ver)
  • Magic Home (fw ver 1.2.7 Build 25)
  • Sonoff POW R2 (fw ver 2.8.0)
  • Sonoff Basic (fw ver 2.6.1)
  • Sonoff Slampher RF (fw ver 3.0.0)

All Devices also working with Alexa & Google Home (Natural Speech Commands)


GRAFANA


HA on my phone 9 March

2 Likes

You’ve been busy!

The “Bedroom Strip” with a bit of Tina’s ‘Private Dancer’ playing in the background certainly sounds interesting! :rofl::rofl::rofl:

Pete.

1 Like

Device ID & RSSI are shown here


HA Components are growing every day All (1310)


Components for:

WeMo

Magic Home

ONVIF Camera

For Sonoff there is “No component yet”

I am using a custom component that works fine.

Home Assistant component for original firmware Sonoff / eWeLink smart devices

I am receiving warnings from HA but every thing is OK

You are using a custom component for sonoff.switch which has not been tested by Home Assistant. This component might cause stability problems, be sure to disable it if you do experience issues with Home Assistant.

3:21 PM loader.py (WARNING)

You are using a custom component for sonoff.sensor which has not been tested by Home Assistant. This component might cause stability problems, be sure to disable it if you do experience issues with Home Assistant.

3:21 PM loader.py (WARNING)

Compatibility list

Model Supported 1.6 1.8.1 2.6 2.6.1 2.7.1 3.0.0 Remarks
Sonoff Basic yes yes yes yes yes
Sonoff Dual yes
Sonoff RF yes yes yes
Sonoff G1 ?
Sonoff 4CH Pro yes yes yes
Sonoff 4CH Pro R2 yes yes
Sonoff S20 yes yes yes
Sonoff S31 yes
Sonoff S26 yes yes yes version: Euro
Sonoff T1 1C yes yes
Sonoff T1 EU 2C yes yes
Sonoff T1 UK 3C yes yes yes
Sonoff T1 US 3C yes
Sonoff Pow yes + power sensor
Sonoff Pow R2 yes + power/current/voltage sensors
Sonoff TH10/TH16 yes + temp/humidity sensors
Sonoff iFan02 yes it creates 4 switches, 1 for the light and 3 for the various fan speeds
Sonoff HT-TH31 ?
Sonoff Slampher RF yes yes yes
3 Gang Generic Wall Switch yes yes Manfufacturer: pro-sw, Model: PS-15-ES (according to ewelink app)
1 Gang Generic Wall Switch yes yes yes manfufacturer: KingART, model: KING-N1 (according to ewelink app), Chip: PSF-B85 (ESP8285)
WHDTS WiFi Momentary Inching Relay yes displayed as a switch button
MHCOZY WiFi Wireless 5V/12V yes
Geekcreit 2 Channel AC 85V-250V yes yes
Smart Wi-Fi Outlet yes

yes = confirmed version, [empty] = unknown for sure

As we see all components are using .py extension to work with HA

HASS-sonoff-ewelink/sensor/ sonoff.py

HASS-sonoff-ewelink/switch/ sonoff.py


@PeteKnight
@Emilio

Here I am asking if there is anyone on this forum having a good knowledge of python programming language to help us translating this to BLYNK without the need to change the SONOFF firmware to TASMOTA to be able to use MQTT publish and subscribe message protocol.

Continuing the discussion from Hacking the new ITEAD Studio - Sonoff S31

Today I think I knew how Peter Buga can control Sonoff / eWeLink smart devices.

Download and install Python 2.x or 3.x from https://www.python.org/downloads

Go to sonoff-debug.py
To run this just, cd to the location of the script and:

python sonoff-debug.py -u 'email or phone-number username' -p 'password' > devices.json

you will get a file named “devices.json”

this is one of my Sonoff POW R2 but the file contain all Sonoffs in my Home.
if you take a close look to the file you will find all the variables power, voltage, current, rssi, device id, and more…

[
  {
    "__v": 0, 
    "_id": "[hidden]", 
    "apikey": "xxxxxxxx-xxxx-xxxx-xxxx-xxxxxxxxxxxx", 
    "brandLogoUrl": "", 
    "brandName": "Sonoff", 
    "createdAt": "xxxx-xx-xxxxx:xx:xx.xxx", 
    "deviceStatus": "", 
    "deviceUrl": "", 
    "deviceid": "[hidden]", 
    "devicekey": "xxxxxxxx-xxxx-xxxx-xxxx-xxxxxxxxxxxx", 
    "extra": {
      "_id": "[hidden]", 
      "extra": {
        "apmac": "xx:xx:xx:xx:xx:xx", 
        "brandId": "58e5f344baeb368720e25469", 
        "description": "WO1881982", 
        "mac": "xx:xx:xx:xx:xx:xx", 
        "manufacturer": "\u6df1\u5733\u677e\u8bfa\u6280\u672f\u6709\u9650\u516c\u53f8", 
        "model": "PSC-B67-GL", 
        "modelInfo": "5a2e1ae50cf772f92c342ef6", 
        "ui": "\u529f\u7387\u68c0\u6d4b\u63d2\u5ea7\u8fc7\u8f7d\u544a\u8b66", 
        "uiid": 32
      }
    }, 
    "group": "", 
    "groups": [], 
    "ip": "[hidden]", 
    "location": "", 
    "name": "[hidden]",, 
    "offlineTime": "xxxx-xx-xxxxx:xx:xx.xxx", 
    "online": true, 
    "onlineTime": "xxxx-xx-xxxxx:xx:xx.xxx", 
    "params": {
      "alarmCValue": [
        -1, 
        10
      ], 
      "alarmPValue": [
        -1, 
        -1
      ], 
      "alarmType": "pcv", 
      "alarmVValue": [
        -1, 
        240
      ], 
      "bindInfos": {
        "alexa": [
          "xxxxxx-xxxx-xxxxx-xxxxx-xxxxxxxxxxxxx_26ca1996a20e8bd63617axxxxxxxxxxxxxxxxxxxx"
        ], 
        "gaction": [
          "xxxxxxxxxx-xxxxx-xxxxxx-xxxxxxxxxxx_ewelink-google-home-v1"
        ]
      }, 
      "current": "0.28", 
      "endTime": "xxxx-xx-xxxxx:xx:xx.xxx", 
      "fwVersion": "2.8.0", 
      "hundredDaysKwh": "get", 
      "init": 1, 
      "oneKwh": "stop", 
      "partnerApikey": "xxxxxxxx-xxxx-xxxx-xxxx-xxxxxxxxxxxx", 
      "power": "59.81", 
      "rssi": -71, 
      "sledOnline": "on", 
      "staMac": "xx:xx:xx:xx:xx:xx", 
      "startTime": "xxxx-xx-xxxxx:xx:xx.xxx", 
      "startup": "stay", 
      "switch": "on", 
      "timeZone": 2, 
      "voltage": "234.57"
    }, 
    "productModel": "Pow_R2", 
    "settings": {
      "alarmNotify": 1, 
      "opsHistory": 1, 
      "opsNotify": 0
    }, 
    "sharedTo": [
      {
        "nickname": "Pico", 
        "note": "", 
        "permit": 15, 
        "phoneNumber": "[hidden]",, 
        "shareTime": 1551282301502
      }
    ], 
    "showBrand": true, 
    "type": "10", 
    "uiid": 32
  }, 

to remove all hidden information in this file go to sonoff-debug.py and comment

data = re.sub(r'"phoneNumber": ".*"', '"phoneNumber": "[hidden]",', data)
data = re.sub(r'"name": ".*"', '"name": "[hidden]",', data)
data = re.sub(r'"ip": ".*",', '"ip": "[hidden]",', data)
data = re.sub(r'"deviceid": ".*",', '"deviceid": "[hidden]",', data)
data = re.sub(r'"_id": ".*",', '"_id": "[hidden]",', data)
data = re.sub(r'"\w{2}:\w{2}:\w{2}:\w{2}:\w{2}:\w{2}"', '"xx:xx:xx:xx:xx:xx"', data)
data = re.sub(r'"\w{8}-\w{4}-\w{4}-\w{4}-\w{12}"', '"xxxxxxxx-xxxx-xxxx-xxxx-xxxxxxxxxxxx"', data)
data = re.sub(r'"\d{4}-\d{2}-\d{2}T\d{2}:\d{2}:\d{2}\.\d+Z"', '"xxxx-xx-xxxxx:xx:xx.xxx"', data)

before running the script .


at end I think https://community.home-assistant.io/u/peterbuga has done a great job
and here is what he wrote:
the data that you see/get, it’s exactly what I get from eWeLink API and nothing more.
I recently found out that sensor data is propagated over websocket messages too, not just basic requests (as it now), when I do find the time I’ll update the component to take advantage of this and hopefully an overall better output :crossed_fingers:

Back to “MQTT”

Understanding MQTT: How Smart Home Devices Communicate


Add a door sensor to any door with a Sonoff basic.


Fix Random Switching in Tasmota by Adjusting Retain Settings

Effectively, he recommends :

  1. Make sure you have set the retain to false in Home Assistant Configuration.

  2. Restart the Home Assistant server .

  3. Send these commands to the Sonoff in the console menu.

    switchretain off
    buttonretain on
    buttonretain off
    poweronstate 3
    powerretain on

IF you don’t have a Raspberry PI to install Mosquitto broker and need an MQTT that works with BLYNK here is the cheapest and easiest solution.

The “ESP uMQTT Broker”

MQTT Broker/Bridge on the ESP8266


the CODE works on any ESP8266 NodeMCU, Wemo D1 ,Sonoff Basic (Tested)

// uMQTTBroker for Sonoff
// 
// The program simply starts a broker and waits for any client to connect.
// maximal 10 Client possible
// 
///////////////////////////////////////////////////////////////////////////////

#include "ESP8266WiFi.h"
#include "uMQTTBroker.h"
#include "espconn.h"

// Your WiFi config here //////////////////////////////////////////////////////
char host[] = "ESP-MQTT";           // Hostname
char ssid[] = "ssid";               // your network SSID (name)
char pass[] = "password";           // your network password
bool STATIC = false;                // Static IP for STA Mode?   [false/true]
IPAddress ip(192,168,1,200);        // Static IP
IPAddress gw(192,168,1,1);          // Gateway
IPAddress su(255,255,255,0);        // Subnet
bool WiFiAP = false;                // Do yo want the ESP as AP? [false/true]
bool EXAMPL = true;                 // Example Progamm on/off?   [false/true]
// Example need rule in Test_1
// rule1 on power1#state=1 do publish stat/TEST_1/POWER TRUE endon on power1#state=0 do publish stat/TEST_1/POWER FALSE endon

// Declare Variable ///////////////////////////////////////////////////////////
String RECEIVE;                     // Received Topic for logical operations
String RECEVAL;	                    // Received Topic for logical operations
int GPIO0 = 0;                      // GPIO0  -> Sonoff Basic - Button
int GPIO12 = 12;                    // GPIO12 -> Sonoff Basic - Relais
int GPIO13 = 13;                    // GPIO13 -> Sonoff Basic - green LED
int GPIO14 = 14;                    // GPIO14 -> Sonoff Basic - Optional Sensor
int BSTAT1;                         // State Button GPIO0	
int RSTAT1;                         // State Relais GPIO12	
int TRIGG1 = LOW;

class myMQTTBroker: public uMQTTBroker
{
public:
    virtual bool onConnect(IPAddress addr, uint16_t client_count) {
      Serial.println(addr.toString()+" connected");
      return true;
    }
    
    virtual bool onAuth(String MQTTUSER, String MQTTPASS) {
      Serial.println("Username/Password: "+MQTTUSER+"/"+MQTTPASS);
      return true;
    }
    
    virtual void onData(String topic, const char *data, uint32_t length) {
      char data_chr[length+1];
      os_memcpy(data_chr, data, length);
      data_chr[length] = '\0';
      String data_str = (String)data_chr; 
      data_str.toUpperCase();
      
      RECEVAL = topic+" "+data_str;
      Serial.println("received: "+RECEVAL);
    }
};

void MQTT_Server_cleanupClientCons();

myMQTTBroker myBroker;

// WiFi init stuff ////////////////////////////////////////////////////////////
void startWiFiClient()
{
  if (STATIC) {
	WiFi.config(ip, gw, gw, su);
  }
  WiFi.softAPdisconnect(true);
  WiFi.hostname(host);
  Serial.println("Connecting to "+(String)ssid);
  WiFi.begin(ssid, pass);
  
  while (WiFi.status() != WL_CONNECTED) {
    delay(500);
    Serial.print(".");
  }
  Serial.println("");
  
  Serial.println("WiFi connected");
  Serial.println("IP address: " + WiFi.localIP().toString());
}

void startWiFiAP()
{
  WiFi.softAP(ssid, pass);
  Serial.println("AP started");
  Serial.println("IP address: " + WiFi.softAPIP().toString());
}

void setup()
{
  //  Configure GPIO //////////////////////////////////////////////////////////
  pinMode(GPIO0, INPUT_PULLUP);
  pinMode(GPIO12, OUTPUT);
  pinMode(GPIO13, OUTPUT);
  pinMode(GPIO14, OUTPUT);
  
  // Serial Interface  
  Serial.begin(115200);
  Serial.println();
  Serial.println();

  // Start WiFi
  espconn_tcp_set_max_con(10);
  if (WiFiAP) {
    startWiFiAP();
  } else {
    startWiFiClient();
  }

  // Start the broker
  Serial.println("Starting MQTT broker");
  myBroker.init();

  // Subscribe to anything ////////////////////////////////////////////////////
  myBroker.subscribe("#");
}

void loop()
{
  RECEIVE = RECEVAL;

  // Example Programm /////////////////////////////////////////////////////////  
  if (EXAMPL) {
  if (RECEIVE.equals("stat/TEST_1/POWER FALSE")) {
    myBroker.publish("cmnd/TEST_2/POWER", "ON");
  }
  if (RECEIVE.equals("stat/TEST_1/POWER TRUE")) {
    myBroker.publish("cmnd/TEST_2/POWER", "OFF");
  }
  }
  
  if (RECEIVE.equals("cmnd/"+(String)host+"/STATUS 1")) {
    myBroker.publish("cmnd/TEST_1/POWER", "(null)");
    myBroker.publish("cmnd/TEST_2/POWER", "(null)");
    if (RSTAT1 == LOW) {
      myBroker.publish("stat/"+(String)host+"/POWER", "OFF");
    } else {
      myBroker.publish("stat/"+(String)host+"/POWER", "ON");
    }
  }
  
  /////////////////////////////////////////////////////////////////////////////
  // Basic Function Button/MQTT ///////////////////////////////////////////////
  BSTAT1 = digitalRead(GPIO0);
  RSTAT1 = digitalRead(GPIO12);
  
  // Button event /////////////////////////////////////////////////////////////
  if (BSTAT1 == LOW and RSTAT1 == LOW and TRIGG1 == LOW) {
     digitalWrite(GPIO12, HIGH);
     TRIGG1 = HIGH;
     Serial.println("GPIO0 POWER ON");
     myBroker.publish("stat/"+(String)host+"/POWER", "ON");
  }
  if (BSTAT1 == LOW and RSTAT1 == HIGH and TRIGG1 == LOW) {
     digitalWrite(GPIO12, LOW);
     TRIGG1 = HIGH;
     Serial.println("GPIO0 POWER OFF");
     myBroker.publish("stat/"+(String)host+"/POWER", "OFF");
  }
  
  if (BSTAT1 == HIGH) { TRIGG1 = LOW; }
  
  // MQTT event ///////////////////////////////////////////////////////////////
  if (RECEIVE.equals("cmnd/"+(String)host+"/POWER ON")) {
    digitalWrite(GPIO12, HIGH);
    Serial.println("stat/"+(String)host+"/POWER ON");
    myBroker.publish("stat/"+(String)host+"/POWER", "ON");
    delay(50);
  }
  if (RECEIVE.equals("cmnd/"+(String)host+"/POWER OFF")) {
    digitalWrite(GPIO12, LOW);
    Serial.println("stat/"+(String)host+"/POWER OFF");
    myBroker.publish("stat/"+(String)host+"/POWER", "OFF");
    delay(50);
  }
  if (RECEIVE.equals("cmnd/"+(String)host+"/POWER ")) {
    if (RSTAT1 == LOW) {
      myBroker.publish("stat/"+(String)host+"/POWER", "OFF");
    } else {
      myBroker.publish("stat/"+(String)host+"/POWER", "ON");
    }
  }

  // LED STATUS ///////////////////////////////////////////////////////////////
  if (RSTAT1 == LOW) {	
   digitalWrite(GPIO13, HIGH);
  } else {
   digitalWrite(GPIO13, LOW);
  }
}

you can test it with

IoT MQTT Dashboard

https://play.google.com/store/apps/details?id=com.thn.iotmqttdashboard

another Link


I even test “uMQTT broker” with HA and it works OK

==============================================================================

MQTT-Explorer for Windows


4 Likes

TASMOTA running on NodeMCU controlled by “BLYNK” and Home Assistant through MQTT


23:53:24 MQT: stairs/Distance = {"Distance":40.842}
23:53:24 MQT: stairs/tele/STATE = {"Time":"2019-03-19T23:53:24","Uptime":"0T01:11:57","Vcc":2.973,"SleepMode":"Dynamic","Sleep":50,"LoadAvg":43,"POWER1":"ON","POWER2":"OFF","POWER3":"ON","Wifi":{"AP":1,"SSId":"BLYNK","BSSId":"48:F8:B3:84:AB:22","Channel":10,"RSSI":70,"LinkCount":1,"Downtime":"0T00:00:04"}}
23:53:24 MQT: stairs/tele/SENSOR = {"Time":"2019-03-19T23:53:24","Switch1":"OFF","DS18B20-1":{"Id":"000006F242B1","Temperature":21.5},"DS18B20-2":{"Id":"000006F2B80A","Temperature":21.6},"DS18B20-3":{"Id":"00000789E508","Temperature":21.5},"DS18B20-4":{"Id":"8000001F18D8","Temperature":21.5},"AM2301":{"Temperature":21.3,"Humidity":69.5},"SR04":{"Distance":40.404},"TempUnit":"C"}
23:53:24 MQT: stairs/tele/STATE = {"Time":"2019-03-19T23:53:24","Uptime":"0T01:11:57","Vcc":2.980,"SleepMode":"Dynamic","Sleep":50,"LoadAvg":77,"POWER1":"ON","POWER2":"OFF","POWER3":"ON","Wifi":{"AP":1,"SSId":"BLYNK","BSSId":"48:F8:B3:84:AB:22","Channel":10,"RSSI":68,"LinkCount":1,"Downtime":"0T00:00:04"}}
23:53:24 MQT: stairs/stat/RESULT = {"POWER2":"OFF"}
23:53:24 MQT: stairs/stat/POWER2 = OFF
23:53:26 RUL: SR04#DISTANCE>%VAR2% performs "backlog  publish stairs/Distance {"Distance":40.456};power2 off"

00:03:06 MQT: stairs/stat/RESULT = {"POWER1":"ON"}
00:03:06 MQT: stairs/stat/POWER1 = ON
00:03:06 MQT: stairs/stat/RESULT = {"T1":30,"T2":0,"T3":0,"T4":0,"T5":0,"T6":0,"T7":0,"T8":0}
00:03:06 RUL: SR04#DISTANCE<%VAR2% performs "backlog  publish stairs/Distance {"Distance":17.298};power2 on"
00:03:06 MQT: stairs/Distance = {"Distance":17.298}

“BLYNK” Tasmota Project _# 1

controlling NodeMCU flashed by a recent Tasmota bin.file or (sketch) as explained in post #2

  • 4x DS18B20 Temperature Sensor
  • 1x DHT22 (DHT21, AM2301, AM2302, AM2321)Temperature and Humidity Sensor
  • 1x HC-SR501 PIR Motion Sensor
  • 1x HC-SR04 Ultrasonic Sensor
  • 1x SSD1306 I2C OLED Display

BLYNK is running on another NodeMCU or simply an ESP8266-01 because in this example we don’t need hardware pins.

before we continue the most important is to send our Rules to Tasmota and be sure it is acting as we plan.

  1. My project is Stair lights (Power1) will turn on if PIR detects a motion (Auto Mode) and lights will remain on for 30 sec. if PIR is triggered again before the 30 sec counter finish the lights will remain on for another 30 sec and so on until there is no more movement .
  2. The ability to stop the PIR (Manual Mode)
  3. Stair lights can also be controlled by the SR04 ultrasonic sensor (Distance change)
  4. Also the ability to stop the US sensor.
  5. Porch lights (Power2) turns OFF with sunrise and ON at sunset.
  6. Reading of all Temperature and Humidity sensors.
  • In this project I set Telemetry Period to 30 sec the default is 300 sec or 5 minutes


Open Tasmota main Menu then go to Console menu and send Backlog then Rules

  • Backlog

Backlog PowerRetain 1; module 18; gpio00 17; gpio01 04; gpio2 29; gpio3 02; gpio4 06; gpio5 05; gpio12 73; gpio13 74; gpio14 82; gpio15 00; gpio16 30; setoption8 0; teleperiod 30

  • RULES

    mem1 30
    switchmode1 1
    Rule1 on switch1#state do publish stairs/PIR_stairs/state %value% endon
    rule1 1
    
    Rule2 on Switch1#state=1 do backlog event AutoMotion=%mem2%; publish stairs/mem2/state %mem2% endon on event#AutoMotion==1 do backlog power1 on; ruletimer1 %mem1% endon on rules#timer=1 do power1 off endon on event#AutoMotion==0 do RuleTimer1 0 endon
    
    Rule3  on SR04#Distance<%var2% do backlog  publish stairs/Distance {"Distance":%value%};power1 on; ruletimer2 %mem1% endon on rules#timer=2 do power1 off endon on SR04#Distance do backlog  publish stairs/Distance {"Distance":%value%} endon
    
  • Be sure to write each Rule on one line.

  • After sending a rule you must turn it on by
    Rule(x) 1
    (x) is 1 or 2 or 3

  • To turn OFF a Rule.
    Rule1 0

  • for Tasmota to be discovered by Home Assistant.
    setoption19 1