How to turn LED on after a certain anolog signal is reached

Hi guys,
I need some help out there. I’m trying to turn an LED on once a certain analogue signal has been reached (that being a value of 150). Firstly though I have to scale the analogue signal shown below. I want the LED to come on after a certain value. Please help me, I cant figure it out for the life of me. Thanks in advance

Please remember, I’m new to this stuff…

WidgetLED led1 (V7);
int val = 0;

BLYNK_WRITE (V7)
{
int val = analogRead(0);
val = map(val, 210, 1080, 0, 145);
if (val > 100){
led1.on();
} else {
led1.off();
}
}

can you use:

Blynk.virtualWrite(7, 1023); // turns on LED
Blynk.virtualWrite(7, 0); // turns off LED

instead of:

led1.on();

(but i dunno - that’s just how i do it!)

maybe like this:

int val = 0;

void checkSignal()
{
  val = analogRead(0);
  val = map(val, 210, 1080, 0, 145);
  if (val > 100)
  {
    Blynk.virtualWrite(7, 1023); // turns on LED
  }
  else
  {
    Blynk.virtualWrite(7, 0); // turns off LED
  }
}

you have to call the checkSignal function somehow - how often do you want to check the analogue value?

@Dave1829 I think the LED’s are 0 to 255 not 0 to 1023 and I prefer to see the pin number prefixed with V.

So ON

Blynk.virtualWrite(V7, 255); // turns on LED

and OFF

Blynk.virtualWrite(V7, 0); // turns off LED

makes no difference to my stuff! if it is 1023 LED is on, if it is 0 LED is off :slight_smile:

but wondering what i have confused it with? is anything 1023 for on?

Yes some things do run to 1023. I guess as 1023 is above 255 it probably works but the brightness is 0 to 255.

1 Like

hi dave, thanks for the reply. I tried that and it didnt work. but i didnt have it in its own void (im new to coding) how do you make it check often?

/**************************************************************

  • Blynk is a platform with iOS and Android apps to control
  • Arduino, Raspberry Pi and the likes over the Internet.
  • You can easily build graphic interfaces for all your
  • projects by simply dragging and dropping widgets.
  • Downloads, docs, tutorials: http://www.blynk.cc
  • Blynk community: http://community.blynk.cc
  • Social networks: http://www.fb.com/blynkapp
  •                           http://twitter.com/blynk_app
    
  • Blynk library is licensed under MIT license
  • This example code is in public domain.

  • Button Outs

**************************************************************/

#define BLYNK_PRINT Serial
#include <SPI.h>
#include <Ethernet2.h>
#include <BlynkSimpleEthernet2.h>

// You should get Auth Token in the Blynk App.
// Go to the Project Settings (nut icon).
char auth[] = “eaf3405a376f4c05911261432f50c6a5”;

WidgetLED led1(V7);

int Up = 2;
int Down = 3;
int Left = 4;
int Right = 5;
int Fire = 6;
int Pressure = A0;
int val = 0;
int val1 = 0;
int val2 = 0;

void setup()
{
Serial.begin(9600); // See the connection status in Serial Monitor
Blynk.begin(auth, IPAddress(192, 168, 1, 101));
pinMode(Up, OUTPUT); // sets the digital pin 2 as output
pinMode(Down, OUTPUT); // sets the digital pin 3 as output
pinMode(Left, OUTPUT); // sets the digital pin 4 as output
pinMode(Right, OUTPUT); // sets the digital pin 5 as output
pinMode(Fire, OUTPUT); // sets the digital pin 6 as output
pinMode(Pressure, INPUT); // sets the analogue pin 1 as input
}

BLYNK_WRITE(V1) //up
{
int val = param.asInt();
digitalWrite(Up, val);
}

BLYNK_WRITE(V2) //down
{
int val = param.asInt();
digitalWrite(Down, val);
}

BLYNK_WRITE(V3) //left
{
int val = param.asInt();
digitalWrite(Left, val);
}

BLYNK_WRITE(V4) //right
{
int val = param.asInt();
digitalWrite(Right, val);
}

BLYNK_WRITE(V5) //fire
{
int val = param.asInt();
digitalWrite(Fire, val);
}

BLYNK_READ(V6)//pressure reading
{
int val = analogRead(0);
val = map(val, 210, 1080, 0, 145);
Blynk.virtualWrite(6, val);
}

BLYNK_READ(V7)//Ready to fire
{
int val = analogRead(0);
val = map(val1, 210, 1080, 0, 145);
if (val > 100){
led1.off();
} else {
led1.on();
}
}

void loop()
{
Blynk.run();
}

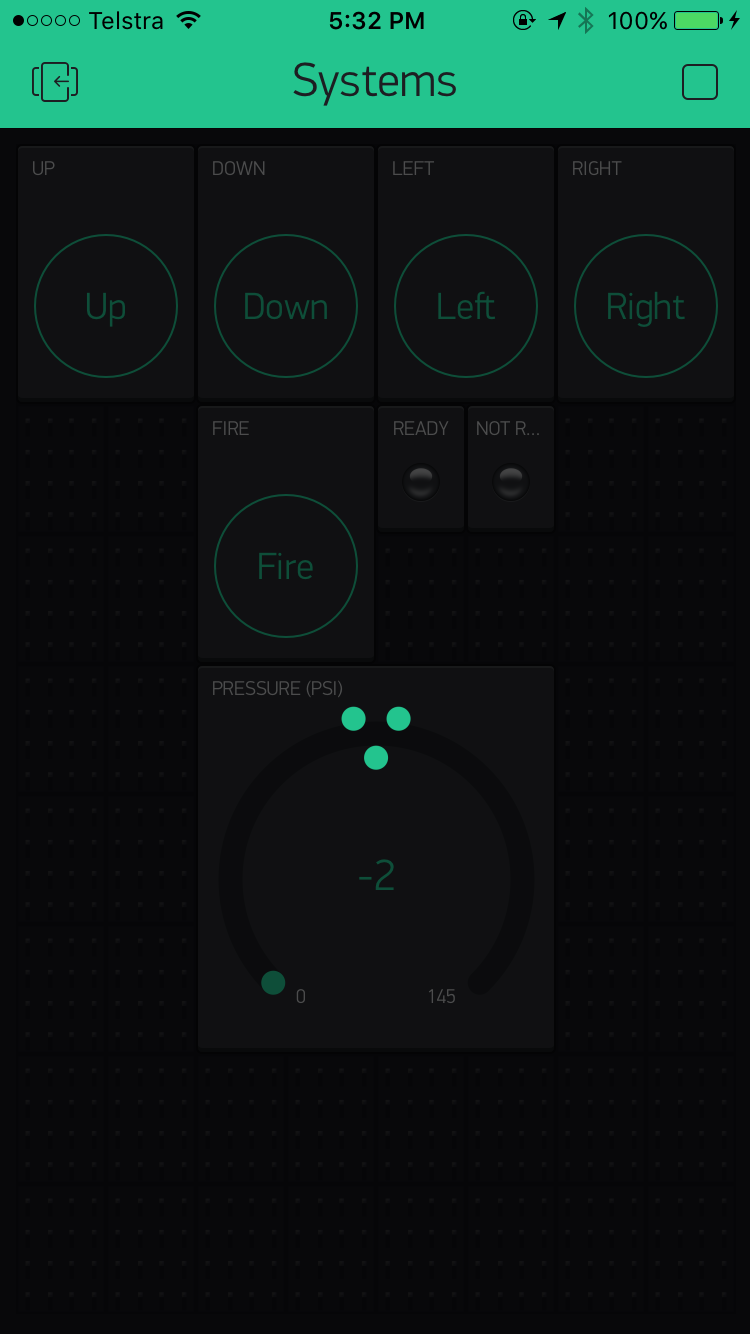
this is my complete code

you include the simpleTimer library and put this in your setup():

timer.setInterval(500L, checkSignal);

and the 500 = half a second (500 miliseconds)

also:

\/**************************************************************
 * Blynk is a platform with iOS and Android apps to control
 * Arduino, Raspberry Pi and the likes over the Internet.
 * You can easily build graphic interfaces for all your
 * projects by simply dragging and dropping widgets.
 *
 *   Downloads, docs, tutorials: http://www.blynk.cc
 *   Blynk community:            http://community.blynk.cc
 *   Social networks:            http://www.fb.com/blynkapp
 *                               http://twitter.com/blynk_app
 *
 * Blynk library is licensed under MIT license
 * This example code is in public domain.
 *
 **************************************************************
 * Button Outs
 *
 **************************************************************/

#define BLYNK_PRINT Serial
#include <SPI.h>
#include <Ethernet2.h>
#include <BlynkSimpleEthernet2.h>

// You should get Auth Token in the Blynk App.
// Go to the Project Settings (nut icon).
char auth[] = "eaf3405a376f4c05911261432f50c6a5";

WidgetLED led1(V7);

int Up = 2;
int Down = 3;
int Left = 4;
int Right = 5;
int Fire = 6;
int Pressure = A0;
int val = 0;
int val1 = 0;
int val2 = 0;

void setup()
{
  Serial.begin(9600); // See the connection status in Serial Monitor
  Blynk.begin(auth, IPAddress(192, 168, 1, 101));
  pinMode(Up, OUTPUT);      // sets the digital pin 2 as output
  pinMode(Down, OUTPUT);      // sets the digital pin 3 as output
  pinMode(Left, OUTPUT);      // sets the digital pin 4 as output
  pinMode(Right, OUTPUT);      // sets the digital pin 5 as output
  pinMode(Fire, OUTPUT);      // sets the digital pin 6 as output
  pinMode(Pressure, INPUT);      // sets the analogue pin 1 as input
}

BLYNK_WRITE(V1) //up
{
  int val = param.asInt();
  digitalWrite(Up, val);
}

BLYNK_WRITE(V2) //down
{
  int val = param.asInt();
  digitalWrite(Down, val);
}

BLYNK_WRITE(V3) //left
{
  int val = param.asInt();
  digitalWrite(Left, val);
}

BLYNK_WRITE(V4) //right
{
  int val = param.asInt();
  digitalWrite(Right, val);
}

BLYNK_WRITE(V5) //fire
{
  int val = param.asInt();
  digitalWrite(Fire, val);
}

BLYNK_READ(V6)//pressure reading
{
  int val = analogRead(0);
  val = map(val, 210, 1080, 0, 145);
  Blynk.virtualWrite(6, val); 
}

BLYNK_READ(V7)//Ready to fire 
{
  int val = analogRead(0);
  val = map(val1, 210, 1080, 0, 145);
  if (val > 100){
    led1.off();
  } else {
    led1.on();
  }  
}

void loop()
{  
  Blynk.run();
}


can you describe what your code does? there are not enough comments! (what are you firing lol!)

what is the error you get?

Haha Hi Dave,
Believe it or not its a remote control “tennis ball launcher” air powered might I add. It uses blynk as a remote, up, down, left, right and fire. But I use a air pressure sensor to get an analogue input to tell me how much pressure is in the tank and correspond on the app with a gauge. What I’m trying to do is use that analogue signal to turn two LED’s on and off. led1 to turn on when the air pressure is over 150 psi which will be a green “ready” light, and another red “not ready” light that is when the pressure is below 150psi. Everything else works except for the LED’s, I cannot get them on for the life of me. Hope that helps! thanks Dave.

what are you using as the controller?

post a screen shot of you Blynk app

Thats my screen, sorry about the loading thingo, local server isnt up

It may be more simple to use the SimpleTimer to fire up a sequence to read the analog sensor, say, every 5 seconds. In the Blynk PushData example it’s described how to do that, it’s not very difficult and good practice to do timed things. BLYNK_READ and BLYNK_WRITE can be a bit tricky to understand at first, so that’s why I would go with the SimpleTimer solution.

I basically use the same method for lighting virtual LEDs ( I think they can change color now too, so you only need one LED!).

Does the pressure reading work fine? Because it probably set to Pull frequency of some time to get the value from the sensor, but the LED’s don’t do that.

Another solution would be to put the LED on/off sequence in the same VPin as the Gauge reading. It saves a Vpin that way anyway :slight_smile: And that should definitely work better. Come to think of it, this is what I would do :slight_smile:

Hi Lichtsignaal,
This is the first time doing any means of coding so in other words what ever you wrote in your comment I really have no idea. I learn best by looking at heaps of different example code, and learning what each step does (well trying to) then I apply it on how I want it to work. And yes the gauge does work, and really well, tells me fairly accurate readings. Could you give me an example of the code you mean? I had a look at the SimpleTimer example and it literally went straight over my head… no idea.

Lol, np. What you have now for pressure is this:

BLYNK_READ(V6)//pressure reading
{
  int val = analogRead(0);
  val = map(val, 210, 1080, 0, 145);
  Blynk.virtualWrite(6, val); 
}

BLYNK_READ(V7)//Ready to fire 
{
  int val = analogRead(0);
  val = map(val1, 210, 1080, 0, 145);
  if (val > 100){
    led1.off();
  } else {
    led1.on();
  }  
}

I’d change that into:

BLYNK_READ(V6)//pressure reading
{
  int val = analogRead(0);
  val = map(val, 210, 1080, 0, 145);
  Blynk.virtualWrite(6, val); 

 if (val > 100){
    led1.off();
  } else {
    led1.on();
  }
}

You can do the LED’s and Gauge in one go.

Ahhh okay I understand now, but is the simple timer still required like you said, as the LED don’t have a frequency but the gauge has a frequency setting in the app

Yes, but if you control the LED within the function that also reads the analog sensor for the pressure it’s fine. The gauge widget will act as the “timer”. All code therein will be executed.

I see! that’s awesome, and hopefully should work, does the led1 matter with the BLYNK_READ (V6)? It wont interfere will it?