Not sure why you need to use Blynk to see this info… just check your router to see what IP it has assigned to the NodeMCU. Then you can also set it as static in the router to keep it from changing.
This ability to make changes to your sketch remotely is done using your IDE (or webpage, if setup that way), but connecting to the NodeMCU via OTA (Over the Air) instead of a COM port… again not a Blynk function, just a normal ESP one.
Thanks, however I have a number of devices on my network nothing really pops out as to which one is the nodemcu. I have tried typing in the all the ip addresses to see if I can hit the nodemcy interface/webpage, but I think I need to know the port also - becauseI am not connecting to the nodemcu - even if I had the right address I am not getting a response.
It’s definitely connected over the wifi, because it does what it’s supposed to do via blynk.
Even if you knew the address, you could NOT simply connect to it and do anything to your sketch that way… that is not how it works.
And knowing the port is a function of connecting to an internal device’s IP from the public side of your router, not from the the private side… the IP is generally sufficient for that.
another thing I want to do is have it email me my external IP address when that happens to change. (It’s static now but it can change from time to time)
But first I just want to connect OTA rather than usb directly into it.
This is done by editing your sketch in the IDE and uploading it to the device… as normal, but via OTA instead of via the USB connection (once OTA is setup on the device).
Once you have setup a static IP in your router, this will become irrelevant… but if you really want this info, then Google how to acquire a devices IP address via Arduino code and send the results to a display widget or email or whatever.
As for the OTA part… You need to read up on that link I already provided… and even Google OTA as well as searching this forum for further discussions… but the basics are as follows…
Each and every sketch that you load needs to have this info in it (based on what works for me)…
#include <ESP8266mDNS.h>  // For OTA
#include <WiFiUdp.h>  // For OTA
#include <ArduinoOTA.h>  // For OTA
void setup()
{
  // whatever your usual stuff is, plus adding these lines at the end

  ArduinoOTA.setHostname("Your device specific name or designation - for ease of use");  // For OTA
  ArduinoOTA.begin();  // For OTA
}
void loop()
{
  Blynk.run();
  timer.run();

  ArduinoOTA.handle();  // For OTA
}
Then after programming your sketch into your device… with the added info above, reset your device! (or just simply unplug it and locate it to it’s remote location - preferably AFTER confirming the rest works )
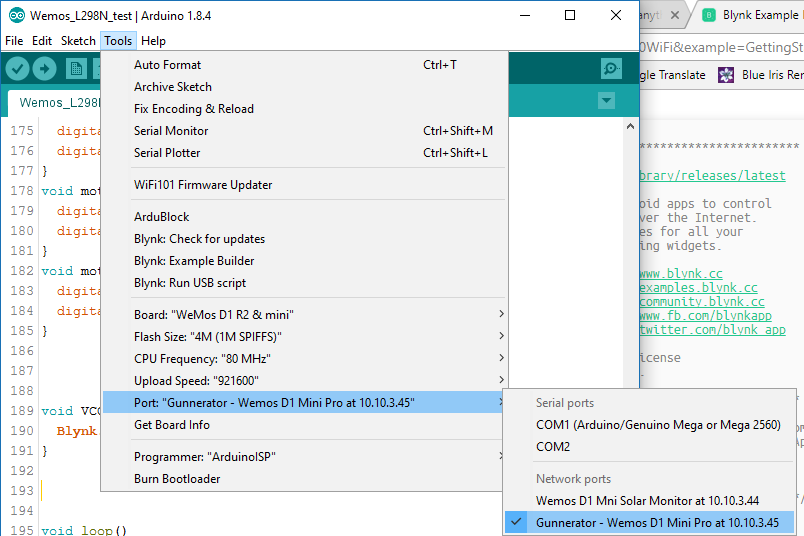
And after a few minutes you should see the device listed in your IDE under the PORT setting (you may need to close and reopen your IDE).
Then simply chose the correct device based on the hostname you set in the sketch and it will program the device OTA
Remember if you do NOT include the required info, then after programming the device via OTA, it will NOT be available for the next time, and you will have to use the normal USB connection to program.
Yes, as long as you include those minimal files in each sketch you upload, you should be able to reconnect OTA the next time (you can test this on the “bench” but you MUST reset the device first!)… and so on, and so on. Forget one time and you need to reconnect via USB
There is a “known” issue where a device needs to be reset after programming it with an OTA sketch… or else it will fail the next programming attempts via USB. This only really applies when testing on the “workbench” where one may keep programming, testing, changing, reprogramming, etc…
Whereas as the act of unplugging from USB power to change locations and repower it there effectively does the same thing.
There may be more to it, and it may be dependent on the ESP/Arduino core version? but if all else fails, reset and try again
 )
)