Hi all I want Control servo with button This project can you all help me thanks you all.
For sure, look up the Button in the docs and read all the servo posts on this site.
i don’t know control servo by button
i control it slide same.
So… look up Slider in the docs and read all the servo posts on this site. ![]()
https://community.blynk.cc/search?q=control%20servo%20with%20slider
plese you printscreen app blynk button preview
I don’t know what you are asking.
If you already know how to control a servo with a Slider Widget, then you should also understand how to get some limited control from a Button Widget.
E.g. setting a Button’s MIN/MAX at 0 and 180 respectively, and linking it to a Virtual Pin and BLYNK_WRITE() routine, set for servo control, means that Button OFF moves servo to 0 position, Button ON moves servo to 180 position… simple… just experiment and learn ![]()
And don’t forget to do some searching for ideas and code that has already been posted…

i’am don’t use buttom naver
you have a code buttom servo .
now use control servo slider
this my code
#define BLYNK_PRINT Serial
#include <ESP8266WiFi.h>
#include <BlynkSimpleEsp8266.h>

// You should get Auth Token in the Blynk App.
// Go to the Project Settings (nut icon).
char auth[] = "YOUR_AUTH_ID";
// Your WiFi credentials.
// Set password to "" for open networks.
char ssid[] = "WIFI_SSID";
char pass[] = "WIFI_PASSWORD";

void setup()
{
// Debug console
Serial.begin(115200);
Blynk.begin(auth, ssid, pass);
// You can also specify server:
//Blynk.begin(auth, ssid, pass, "blynk-cloud.com", 8442);
//Blynk.begin(auth, ssid, pass, IPAddress(192,168,1,100), 8442);
}
void loop()
{
Blynk.run();
}
i’m not control via switch help me…
If you want to use a simple button, then you need to use virtual pins, a servo library and some basic code.
https://www.arduino.cc/en/Reference/Servo
http://docs.blynk.cc/#blynk-firmware-virtual-pins-control-blynk_writevpin
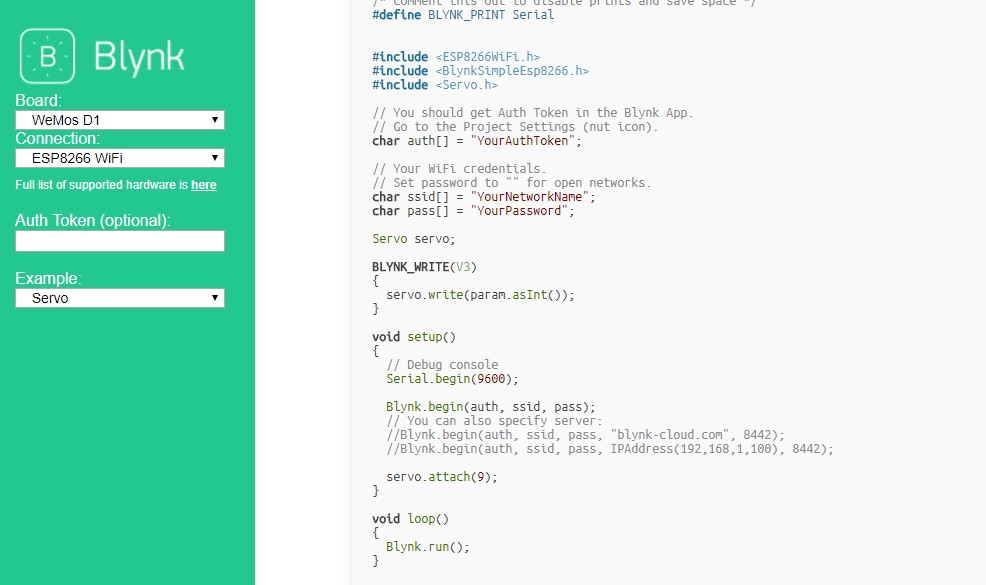
https://examples.blynk.cc/?board=ESP8266&shield=ESP8266%20WiFi&example=GettingStarted%2FVirtualPinRead (Use Button Widget instead of slider).
BLYNK_WRITE(V0) // This function gets called everytime the Virtual Button on V0 changes state
{
  int value = param.asInt(); // Get value of button as integer

// Place servo control code here based on value data.

}
you have code control 1 servo with switch ?
I have code to do lots of things… and I learned how to write them much the same way I am trying to assist you in learning.
Ok . i wait for learning , i’m rookie arduino and C++ I’am age13old ,i want to learn arduino and C++ for study thx.
what to do next,this my code
 #define BLYNK_PRINT Serial  // Comment this out to disable prints and save space
 #include <ESP8266WiFi.h>
 #include <BlynkSimpleEsp8266.h>
 #include <Servo.h>
 Servo myservo;
 int button;
 int pos;
 // You should get Auth Token in the Blynk App.
 char auth[] = "authtoken";
 void setup() {
  Serial.begin(9600);
  Blynk.begin(auth, "ssid", "pass");
  myservo.attach(5); // D1 physical pin
 }
 BLYNK_WRITE(V0) {
  button = param.asInt();
 }
 BLYNK_WRITE(V1) {
  pos = param.asInt();
 }
 void loop() {
  Blynk.run();
  if ( button == 1 ) {
   myservo.write(pos);
  }
  else
   myservo.write(10);
 }
For starters… take this OUT of the main loop and put it in one of the proper BLYNK_WRITE() functions where it will do it’s job.
i.e
BLYNK_WRITE(V0) {  // This function gets called every state change of the Button Widget
  button = param.asInt();  // This assigns the Button state to a variable
  if ( button == 1 ) {  // This checks the value of the variable and if equals 1, does something like...
    myservo.write(pos);  // ... move the servo to position based on another variable
  }
  else
    myservo.write(10);  // If variable doesn't equal 1 then set servo to this default position
}
}
use code where
BLYNK_WRITE(V0) { // This function gets called every state change of the Button Widget
button = param.asInt(); // This assigns the Button state to a variable
if ( button == 1 ) { // This checks the value of the variable and if equals 1, does something like…
myservo.write(pos); // … move the servo to position based on another variable
}
else
myservo.write(10); // If variable doesn’t equal 1 then set servo to this default position
}
}
I just showed you… I “moved” it into your pre-existing BLYNK_WRITE(V0) function… and I commented it so that you can see how the whole function works.