How to automatically dual SSIDs for redundancy

Before creating the topic

  1. Search forum for similar topics
  2. Check http://docs.blynk.cc and http://help.blynk.cc/
  3. Add details :
    • Hardware model + communication type. For example: Arduino UNO with Ethernet Shield
    • Smartphone OS (iOS or Android) + version
    • Blynk server or local server
    • Blynk Library version
    • Add your sketch code. :point_up:Code should be formatted as example below.

Simply paste your code between ``` If you don’t format your code, your topic can be deleted by moderators.

#define BLYNK_PRINT Serial
#include <ESP8266WiFi.h>
#include <BlynkSimpleEsp8266.h>
////////////////////////////////////////////////////

char auth[] = "4bf59a2fddc046cea78ec8de6cba7831";
////////////////////////////////////////////////////
char ssid1[] = "ssid1";
char pass1[] = "pass1";
char ssid2[] = "ssid2";
char pass2[] = "pass2";
/////////////////////////////////////////////////////


void setup()
{
  // Debug console
  Serial.begin(9600);

  Blynk.begin(auth, ssid1, pass1);
 while(Blynk.connect()==false){
  delay(500);
  Blynk.begin(auth, ssid2, pass2);
 }
}

void loop()
{
  Blynk.run();
}

Take a cue from this sketch

#define BLYNK_PRINT Serial
#include <ESP8266WiFi.h>
#include <BlynkSimpleEsp8266.h>

// You should get Auth Token in the Blynk App.
// Go to the Project Settings (nut icon).

char auth[] = "YourAuthToken"; //Put Your Auth Token Here

//Array to store Network Credentials for different WiFi Networks
const char* KNOWN_SSID[] = {"Nucleus", "Factory Forward", "SSID3"}; //Put all Your WiFi Network Names
const char* KNOWN_PASSWORD[] = {"", "1234567809", "Pass3"}; //Put the WiFi Passwords in same order. For Open networks leave the password blank inside the double quotes.

const int KNOWN_SSID_COUNT = sizeof(KNOWN_SSID) / sizeof(KNOWN_SSID[0]); // number of known networks

void setup() {
boolean wifiFound = false;
int i, n;

Serial.begin(9600);

// ----------------------------------------------------------------
// Set WiFi to station mode and disconnect from an AP if it was previously connected
// ----------------------------------------------------------------
WiFi.mode(WIFI_STA);
WiFi.disconnect();
delay(100);
Serial.println("Setup done");

// ----------------------------------------------------------------
// WiFi.scanNetworks will return the number of networks found
// ----------------------------------------------------------------
Serial.println(F("Scan start"));
int nbVisibleNetworks = WiFi.scanNetworks();
Serial.println(F("Scan Completed"));
if (nbVisibleNetworks == 0) {
Serial.println(F("No networks found. Reset to try again"));
while (true); // no need to go further, hang in there, will auto launch the Soft WDT reset
}

// ----------------------------------------------------------------
// if you arrive here at least some networks are visible
// ----------------------------------------------------------------
Serial.print(nbVisibleNetworks);
Serial.println(" network(s) found");

// ----------------------------------------------------------------
// check if we recognize one by comparing the visible networks
// one by one with our list of known networks
// ----------------------------------------------------------------

for (i = 0; i < nbVisibleNetworks; ++i) {
Serial.println(WiFi.SSID(i)); // Print current SSID
for (n = 0; n < KNOWN_SSID_COUNT; n++) { // walk through the list of known SSID and check for a match
if (strcmp(KNOWN_SSID[n], WiFi.SSID(i).c_str())) {
Serial.print(F("\tNot matching "));
Serial.println(KNOWN_SSID[n]);
} else { // we got a match
wifiFound = true;
break; // n is the network index we found
}
} // end for each known wifi SSID
if (wifiFound) break; // break from the "for each visible network" loop
}

if (!wifiFound) {
Serial.println(F("No Known Network identified. Reset to try again"));
while (true);

}

const char* ssid = (KNOWN_SSID[n]);
const char* pass = (KNOWN_PASSWORD[n]);
Serial.println(WiFi.localIP());
Blynk.begin(auth, ssid, pass);
Serial.println("Blynk Connected"); //Connected and Authenticated with Blynk Server
}

void loop()
{
Blynk.run();
}
3 Likes

thanks for prompt reply only one ssid connected other than.

You with this code can put in array two or more ssid

#define BLYNK_PRINT Serial


#include <ESP8266WiFi.h>
#include <BlynkSimpleEsp8266.h>


char auth1[] = "";


char ssid1,ssid2[] = "ssid1,ssid2";
char pass1,pass2[] = "pass1,pass2";


void setup()
{
  
  Serial.begin(9600);
Blynk.begin(auth1,auth2, ssid1,ssid2, pass1,pass2);

}
void loop()
{
  Blynk.run();
}

Please do not create multiple topics for same issue… I merged your 2nd topic Titled (Hi dears blynker can you all help me to add 2 ssid and 2 passwords i mean mukti ssid & passwords) here.

Please also format all posted code properly as required in the Welcome Topic or your posts will be deleted.

1 Like

@amran Since you didn’t seem to listen, I fixed your code posting this time.

Next time follow the recommended formatting method please.

Blynk%20-%20FTFC

Oh, and use your words to supply details in the posts instead of simply posting code.

We can help you learn to properly format posted code in this forum… as per the Welcome Topic :wink:

Blynk%20-%20FTFC

And again… please do NOT create multiple topics for same issue.

1 Like

That character doesn’t exist on the Italian keyboard, damn it! You could have chosen a different one though! Every time I have to do copy&paste :stuck_out_tongue_winking_eye: :joy:

Hold down the ALT key and use the numeric keypad to type the number 96

Another option is that in the Arduino IDE, when you select code then right-click you get this option:
image

When you paste in the forum you’dll see that teh IDE has added these code tags:
image

which displays correctly.

Pete.

1 Like

And another option:

Just copy and paste the following and then paste your code between the lines.
```cpp
```

It appears that @saddys is already aware of that option and finds it a bit tiresome, hence my alternative suggestions.

Pete.

1 Like

Mine was a joke, it was never an insurmountable or tiresome problem. But having the [code] alternative for me will be very useful.
Thanks :slight_smile:

1 Like

Another option:
If you have a spare Arduino board that’s compatible with the Keyboard library, and a spare pushbutton, wire the pushbutton between the defined pin and ground, and load the following sketch. With the board plugged into a USB port on your PC, you can push the button to generate the required characters. :wink:

#include <Keyboard.h>

#define BUTTON 2 // pin for button

void setup() {
  pinMode(BUTTON, INPUT_PULLUP);
  Keyboard.begin();
}

void loop() {
  if (digitalRead(BUTTON) == LOW) {
    Keyboard.print("```cpp\n```\n");
    delay(200); // delay for button debounce
    while (digitalRead(BUTTON) == LOW) {} // wait for button release
  }
}
2 Likes

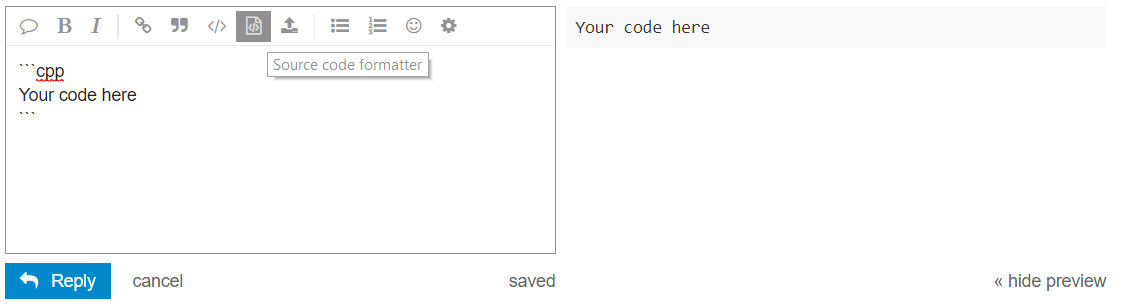
The “elegant” solution to “source code formatting” would be this :wink:
I’ve only spent a couple of hours working on this little plugin, but it would save a lot of posts for moderators. :smiley:

2 Likes

This forum already has those characters sitting there ready for the initial post… just create a new topic and chose the category… bingo… Copy/Paste for further posting.

I had never seen this feature for new topics :slight_smile:
New users have no excuse to format the code :smiley:
Maybe this new button for those who reply would also be comfortable

1 Like

Good point… I have no idea why your plugin idea never moved forward :thinking:

As I say, mine was only a joke, I have always write a formatted code.