Hi there, I’m totally new here.
I have plenty experience in electronics and absolutely nothing in coding, but trying my best to learn.
I am attempting to get the Blynk app to recognise an analogue AC voltage sensor. The issue is that it need some code to calculate the correct values.
I’m using the Arduino UNO with Ethernet Shield on the Blynk Server.
From what I’ve learnt so far from:
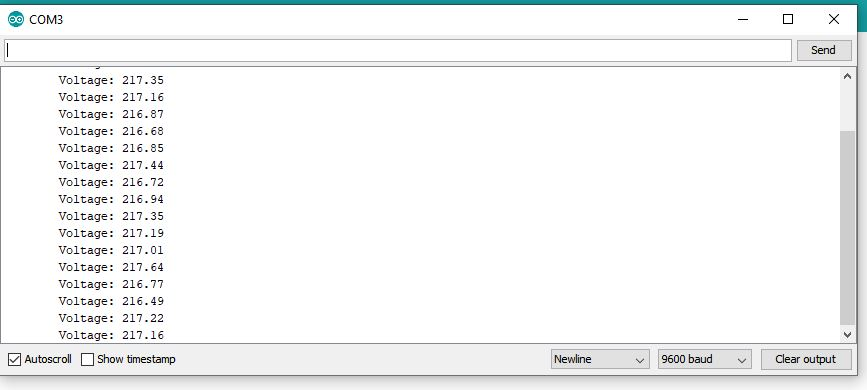
Is that I need to insert the code below in the Blynk simple Ethernet code and set it as a virtual pin, Simple right? well maybe for someone experienced. I’ve been struggling for two days with this and the best I have managed is to get the correct values displayed in “Serial Monitor” while the Arduino remains online but cannot get it to display the correct voltage values in the App.
This is the code needed for the Voltage sensor
#include <Filters.h> //Easy library to do the calculations
#include <SPI.h>     //Libraries for the OLED display
#include <Wire.h>


float testFrequency = 50;                     // test signal frequency (Hz)
float windowLength = 40.0/testFrequency;     // how long to average the signal, for statistist

int Sensor = 0; //Sensor analog input, here it's A0

float intercept = -0.04; // to be adjusted based on calibration testing
float slope = 0.0430; // to be adjusted based on calibration testing
float current_Volts; // Voltage

unsigned long printPeriod = 1000; //Refresh rate
unsigned long previousMillis = 0;


void setup() {
  Serial.begin( 9600 );    // start the serial port


}

void loop() {

  RunningStatistics inputStats;                //Easy life lines, actual calculation of the RMS requires a load of coding
  inputStats.setWindowSecs( windowLength );

  while( true ) {
    Sensor = analogRead(A0);  // read the analog in value:
    inputStats.input(Sensor);  // log to Stats function

    if((unsigned long)(millis() - previousMillis) >= printPeriod) {
      previousMillis = millis();   // update time every second

      Serial.print( "\n" );

      current_Volts = intercept + slope * inputStats.sigma(); //Calibartions for offset and amplitude
      current_Volts= current_Volts*(40.3231);                //Further calibrations for the amplitude
And this is the code I’m attempting to insert it into
#define BLYNK_PRINT Serial


#include <SPI.h>
#include <Ethernet.h>
#include <BlynkSimpleEthernet.h>

// You should get Auth Token in the Blynk App.
// Go to the Project Settings (nut icon).
char auth[] = "vN_i4iz0BP9K7NGz3qI4h8qaKDVH-uUV";

#define W5100_CS  10
#define SDCARD_CS 4

void setup()
{
  // Debug console
  Serial.begin(9600);

  pinMode(SDCARD_CS, OUTPUT);
  digitalWrite(SDCARD_CS, HIGH); // Deselect the SD card

  Blynk.begin(auth);
  // You can also specify server:
  //Blynk.begin(auth, "blynk-cloud.com", 80);
  //Blynk.begin(auth, IPAddress(192,168,1,111), 8080);
  // For more options, see Boards_Ethernet/Arduino_Ethernet_Manual example
}

void loop()
{
  Blynk.run();
}
I Have managed to use the timed function and link A1 to a virtual pin V1, but the values displayed in the Blynk app jump between 335VAC and 750VAC. this is the code that I used.
#include <SPI.h>
#include <Ethernet.h>
#include <BlynkSimpleEthernet.h>

// You should get Auth Token in the Blynk App.
// Go to the Project Settings (nut icon).
char auth[] = "vN_i4iz0BP9K7NGz3qI4h8qaKDVH-uUV";

#define W5100_CS  10
#define SDCARD_CS 4
int sensorValue = A1; //Sensor analog input, here it's A0
BlynkTimer timer; // Announcing the timer

void setup()
{
  // Debug console
  Serial.begin(9600);

  pinMode(SDCARD_CS, OUTPUT);
  digitalWrite(SDCARD_CS, HIGH); // Deselect the SD card

  Blynk.begin(auth);
  // You can also specify server:
  //Blynk.begin(auth, "blynk-cloud.com", 80);
  //Blynk.begin(auth, IPAddress(192,168,1,111), 8080);
  // For more options, see Boards_Ethernet/Arduino_Ethernet_Manual example

  timer.setInterval(1000L, sensorDataSend); //timer will run every sec
}

void sensorDataSend()
{
  sensorValue = analogRead(A1);         // reading sensor from analog pin
  Blynk.virtualWrite(V1, sensorValue);  // sending sensor value to Blynk app
}

void loop()
{
  Blynk.run();
  timer.run();        // run timer every second
}
I would seriously appreciate some help or guidance in the right direction please.