Hello, i have discover this apps, and I’m amazed by this but can i add Grove LCD RGB Backlight on blynk app with i2c ?
Thank
I use LCD and a button, in real life, i connect Grove LCD on i2c port on base shield on arduino uno.
I can’t find a pin for i2c.
I have a another question, i can see my program on blynk on language C ? (i am a beginner, and french so sorry for my english >< )
@Sam37 is the “base shield” a Grove shield for the Grove LCD or an ESP WiFi shield?
Ca you perhaps provide a link to the shield you are using.
How is your Arduino connected to the internet (ESP shield, Ethernet, USB etc)?
You don’t need a specific pin in Blynk for i2c. Whatever you did in a regular Arduino sketch you can continue to do in Blynk (there are a few exceptions to this but not many).
Can you post your regular Arduino sketch for controlling the Grove LCD.
Yes Blynk uses regular Arduino “C” language sketches.
Is grove shield v2: https://www.seeedstudio.com/Base-Shield-V2-p-1378.html#
Arduino is connected via USB.
I have no arduino sketch, I’m nil in programming, that’s why I use this apps.
My project is to make a human / machine interface to which the person must input a weight by clicking on buttons, all the most basic, so a button +10, +100 and a reset button, all its Connect to a screen that gives the information. I had already done this program on flowcode but not on arduino because it is for the moment a bit too complicated.
And for my last question, I would like to know if it was possible to convert my program on blynk into a program with the arduino language (the basic language, C) to see what it would look like, and to understand how it works.
Thank for all ^^
@Sam37 I think this is the GitHub for the LCD library https://github.com/Seeed-Studio/Grove_LCD_RGB_Backlight
There are lots of examples with the library and if you haven’t already used the LCD without Blynk you should work through the examples.
Perhaps start with the Hello World example at https://github.com/Seeed-Studio/Grove_LCD_RGB_Backlight/blob/master/examples/HelloWorld/HelloWorld.ino
Once you have it running without Blynk we can indicate how you can merge the Blynk USB connection with the regular Arduino LCD sketch.
I have already make this a day, and work perfectly.
@Sam37 and have you made a successful connection to Blynk via USB with something like this sketch https://github.com/blynkkk/blynk-library/blob/master/examples/Boards_USB_Serial/Arduino_Serial_USB/Arduino_Serial_USB.ino
Also do you happen to have a spare USB-Serial adapter for the Uno as it makes debugging the sketches easier but it will work without if you are very careful with your coding? Perhaps a little difficult as you say you have nil programming skills but we will see how this goes.
Yes, no problem with the connection, i don’t think that i have this, have a picture or link ?
One of these?

@Sam37 knocked up a sketch for you below. Add a Blynk virtual LCD to your project on V1 and set as advanced mode. USB sketches were changed by Blynk 25 days ago. If you have the latest library switch the 2 Blynk.begin() statements around i.e. uncomment the first one and comment out the second one.
Let me know how it goes.
/**************************************************************
 *   BlynkUSBwithLCD.ino by Costas 11 Dec 2016
 *   USB HOWTO: http://tiny.cc/BlynkUSB
 **************************************************************/

// You could use a spare Hardware Serial on boards that have it (like Mega)
// 3 lines below can only be used if you have a USB-Serial adapter for the Uno
#include <SoftwareSerial.h>
SoftwareSerial DebugSerial(2, 3); // RX, TX
#define BLYNK_PRINT DebugSerial
#include <BlynkSimpleStream.h>
#include <SimpleTimer.h>
#include <Wire.h>
#include "rgb_lcd.h"

SimpleTimer timer;
WidgetLCD lcdb(V1);  // lcdb is the Blynk virtual LCD
char auth[] = "xxxxxxxxx";

rgb_lcd lcd;

const int colorR = 255;
const int colorG = 0;
const int colorB = 0;

void setup()
{
  lcd.begin(16, 2); // set up the LCD's number of columns and rows:
  lcd.setRGB(colorR, colorG, colorB);
  lcd.print("hello, world!"); // Print a message to the LCD.
  delay(1000);

  DebugSerial.begin(9600); // Debug console, requires a USB-Serial adapter for the Uno

  // Blynk will work through Serial, do not read or write this serial manually in your sketch
  Serial.begin(9600);
  //Blynk.begin(Serial, auth); // use if you have latest Blynk libriaries, changed around 16th Nov 2016, see line below
  Blynk.begin(auth, Serial);   // prior to https://github.com/blynkkk/blynk-library/commit/f60c55f34cf6d849d311a2b7f421e07b6e2c4db2
  timer.setInterval(1000L, write2LCD); // call write2LCD() function every 1000ms (every second)
}

void write2LCD(){  // write uptime to physical LCD every second
  // set the cursor to column 0, line 1 (line 1 is the second row, since counting begins with 0):
  lcd.setCursor(0, 1);
  lcd.print(millis()/1000);   // print the number of seconds since Uno was rebooted

  lcdb.clear(); //Use it to clear the LCD Widget
  lcdb.print(4, 0, "Hello"); // use: (position X: 0-15, position Y: 0-1, "Message you want to print")
  lcdb.print(4, 1, "World");
}

void loop()
{
  Blynk.run();
  timer.run(); // used by SimpleTimer library
}
How it work ? It important for this ? (USB-Serial adapter) and so, with your sketch i can use grove lcd ? But i must add module lcd on blynk app ? I must configure this ? Or not add module and configure on arduino apps ?
Not important, just keep Serial Monitor closed whilst running the USB script.
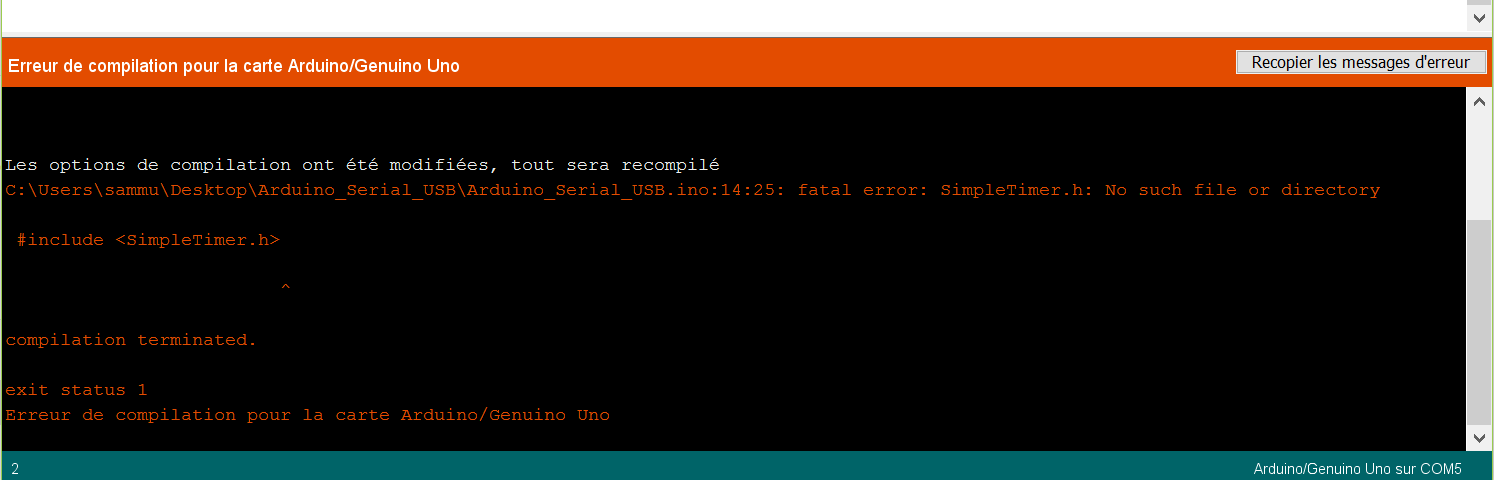
I think that i have a problem with my library, but i am not sure
Okay i add simpletimer librairie but i must add one by one each librairie, there are not a librairies for all function ?
Yes you do. There are 6 libraries required for Blynk including SimpleTimer.
They must all be added to your system manually, not through the IDE as zip files.
See the section marked ATTENTION! at https://github.com/blynkkk/blynk-library/releases/tag/v0.4.1
For virtual LCD change lines in setup() to:
  //lcdb.clear(); //Use it to clear the Blynk LCD Widget
  lcdb.print(1, 0, "Hello World"); // use: (position X: 0-15, position Y: 0-1, "Message you want to print")
Then add a button on V0 in switch mode to the project and add this code.
  BLYNK_WRITE(V0){  // button to test Blynk virtual LCD
      int ledcontrol = param.asInt();
      if(ledcontrol == 1){
        lcdb.print(1, 1, "LED ON ");  // Blynk virtual LCD
      }
      else{
        lcdb.print(1, 1, "LED OFF"); // Blynk virtual LCD
      }
    }
Extract above is for the virtual LCD, i’ll leave it to you to add the code for the physical LCD.
If you study how the Terminal widget works you can send any text you like from Blynk to the physical LCD.