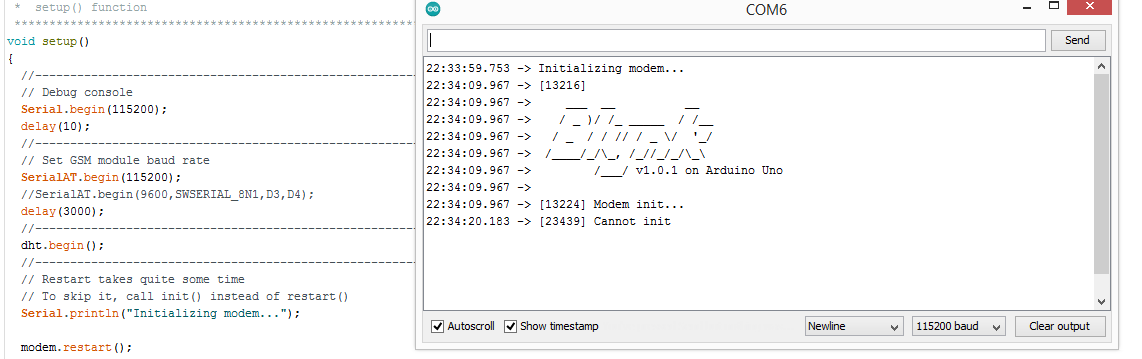
I am facing an issue “Cannot init” messaage in Serial Monitor when I tried to connect DHT11 sensor with Arduino UNO + GSM 800 C module and Blynk app. I changed the baud rate to 19200 and still same error. Can you please help?
I have posted the code below
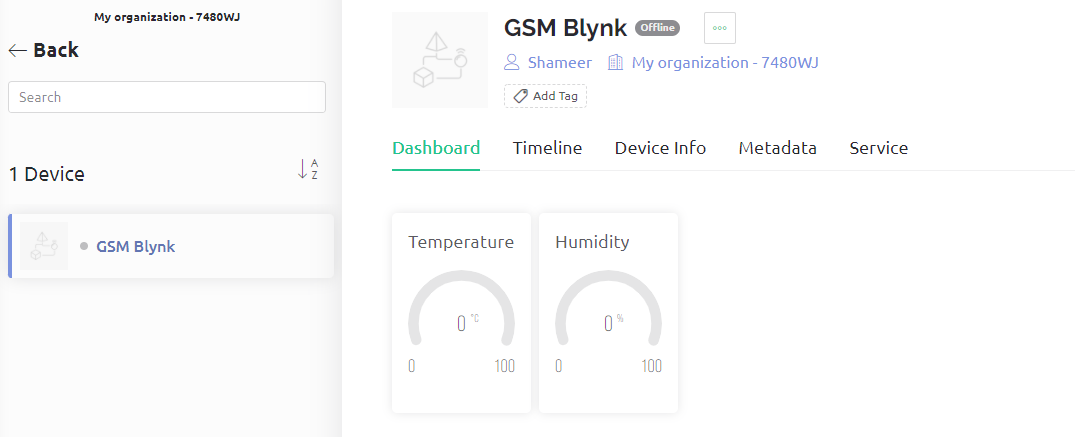
I created the template in Blynk.Cloud and copied the auth code to the program.
//-----------------------------------------------------------------------
/* Comment this out to disable prints and save space */
#define BLYNK_PRINT Serial
//-----------------------------------------------------------------------
/* Fill-in your Template ID (only if using Blynk.Cloud) */
#define BLYNK_TEMPLATE_ID "TMPLE-OB8GVE"
#define BLYNK_DEVICE_NAME "GSM Blynk"
#define BLYNK_AUTH_TOKEN "5lRz70tm-E9VVE68I5D9yphxm_4lsomQ"
//-----------------------------------------------------------------------
// Select your modem:
#define TINY_GSM_MODEM_SIM800
//#define TINY_GSM_MODEM_SIM900
//#define TINY_GSM_MODEM_M590
//#define TINY_GSM_MODEM_A6
//#define TINY_GSM_MODEM_A7
//#define TINY_GSM_MODEM_BG96
//#define TINY_GSM_MODEM_XBEE
//-----------------------------------------------------------------------
// Default heartbeat interval for GSM is 60
// If you want override this value, uncomment and set this option:
//#define BLYNK_HEARTBEAT 30
//-----------------------------------------------------------------------
#include <TinyGsmClient.h>
#include <BlynkSimpleTinyGSM.h>
//-----------------------------------------------------------------------
// You should get Auth Token in the Blynk App.
// Go to the Project Settings (nut icon).
char auth[] = BLYNK_AUTH_TOKEN;
//-----------------------------------------------------------------------
// Your GPRS credentials
// Leave empty, if missing user or pass
char apn[]  = "internet";
char user[] = "";
char pass[] = "";
//-----------------------------------------------------------------------
// Hardware Serial on Mega, Leonardo, Micro
//#define SerialAT Serial1
//-----------------------------------------------------------------------
// or Software Serial on Uno, Nano
#include <SoftwareSerial.h>
SoftwareSerial SerialAT(2, 3); // RX, TX
TinyGsm modem(SerialAT);
//-----------------------------------------------------------------------
#include <DHT.h>
#define DHT11_PIN 4
#define DHTTYPE DHT11
DHT dht(DHT11_PIN, DHTTYPE);
//-----------------------------------------------------------------------
BlynkTimer timer;
#define INTERVAL 1000L
//-----------------------------------------------------------------------


/************************************************************************************
 *  This function sends Arduino's up time every second to Virtual Pin.
 *  In the app, Widget's reading frequency should be set to PUSH. This means
 *  that you define how often to send data to Blynk App.
 **********************************************************************************/
void SendDhtData()
{
  //-----------------------------------------------------------------------
  //Sensor readings may also be up to 2 seconds 'old' (its a very slow sensor)
  float h = dht.readHumidity();
  //-----------------------------------------------------------------------
  //Read temperature as Celsius (the default)
  float t = dht.readTemperature();
  //-----------------------------------------------------------------------
  // Check if any reads failed and exit early (to try again).
  if (isnan(h) || isnan(t)) {
    Serial.println(F("Failed to read from DHT sensor!"));
    return;
  }
  //-----------------------------------------------------------------------
  //Compute heat index in Celsius (isFahreheit = false)
  float hic = dht.computeHeatIndex(t, h, false);
  //-----------------------------------------------------------------------
  Serial.print("Temperature: ");
  Serial.println(t);
  Serial.print("Humidity: ");
  Serial.println(h);
  Serial.println("------------------------------------------");
  //-----------------------------------------------------------------------
  // You can send any value at any time.
  // Please don't send more that 10 values per second.
  Blynk.virtualWrite(V0, t);
  Blynk.virtualWrite(V1, h);
  //-----------------------------------------------------------------------
}


/************************************************************************************
 *  setup() function
 **********************************************************************************/
void setup()
{
  //-----------------------------------------------------------
  // Debug console
  Serial.begin(115200);
  delay(10);
  //-----------------------------------------------------------
  // Set GSM module baud rate
  SerialAT.begin(115200);
  //SerialAT.begin(9600,SWSERIAL_8N1,D3,D4);
  delay(3000);
  //-----------------------------------------------------------
  dht.begin();
  //-----------------------------------------------------------
  // Restart takes quite some time
  // To skip it, call init() instead of restart()
  Serial.println("Initializing modem...");

  modem.restart();
  // Unlock your SIM card with a PIN
  //modem.simUnlock("1234");
  //-----------------------------------------------------------
  Blynk.begin(auth, modem, apn, user, pass);
  //-----------------------------------------------------------
  // Setup a function to be called every second
  timer.setInterval(INTERVAL, SendDhtData);
  //-----------------------------------------------------------
}


/************************************************************************************
 *  loop() function
 **********************************************************************************/
void loop()
{
  Blynk.run();
  timer.run();
}
SoftwareSerial on the Uno doesn’t work reliably at baud rates above 9600.
You need to configure your SIM800 to work at that speed, then change your sketch to match.
I changed the line SoftwareSerial SerialAT(2, 3); to SoftwareSerial SerialAT(3, 2);
Now the cannot init problem is solved. But another one problem now.
When click the button ON/OFF from the blynk app, the Relay turns ON/OFF, but the bulb is not glowing.
Well, none of the code you’ve posted so far has any virtual pin button handlers in it, or any pinMode declarations for a relay, or any digitalWrite commands to turn a relay on or off. None of your dashboard screenshots include any button/switch widgets, and there are no screenshots of datastreams suitable for an on/off command.
So, it’s a bit of a stretch of the imagination to expect that we will have any clues about where the issue lies.
I’d suggest that you start your troubleshooting by ensuring that you have a sufficiently beefy power supply to fully energise the relay coils (not powering them via the Arduino), and test your relay contacts with a multimeter.
Sorry, I confused you with two projects. Here is the final code
//-----------------------------------------------------------------------
/* Comment this out to disable prints and save space */
#define BLYNK_PRINT Serial
//-----------------------------------------------------------------------
/* Fill-in your Template ID (only if using Blynk.Cloud) */
#define BLYNK_TEMPLATE_ID "TMPLyQmE6D1f"
#define BLYNK_DEVICE_NAME "GSM Blynk"
#define BLYNK_AUTH_TOKEN "s1F6dplkDWLo4sT582x7_ZI4ABmFzlB4"
//-----------------------------------------------------------------------
// Select your modem:
#define TINY_GSM_MODEM_SIM800
//#define TINY_GSM_MODEM_SIM900
//#define TINY_GSM_MODEM_M590
//#define TINY_GSM_MODEM_A6
//#define TINY_GSM_MODEM_A7
//#define TINY_GSM_MODEM_BG96
//#define TINY_GSM_MODEM_XBEE
//-----------------------------------------------------------------------
// Default heartbeat interval for GSM is 60
// If you want override this value, uncomment and set this option:
//#define BLYNK_HEARTBEAT 30
//-----------------------------------------------------------------------
#include <TinyGsmClient.h>
#include <BlynkSimpleTinyGSM.h>
//-----------------------------------------------------------------------
// You should get Auth Token in the Blynk App.
// Go to the Project Settings (nut icon).
char auth[] = BLYNK_AUTH_TOKEN;
//-----------------------------------------------------------------------
// Your GPRS credentials
// Leave empty, if missing user or pass
char apn[]  = "internet";
char user[] = "";
char pass[] = "";
//-----------------------------------------------------------------------
// Hardware Serial on Mega, Leonardo, Micro
//#define SerialAT Serial1
//-----------------------------------------------------------------------
// or Software Serial on Uno, Nano
#include <SoftwareSerial.h>
SoftwareSerial SerialAT(3, 2); // RX, TX
TinyGsm modem(SerialAT);
//-----------------------------------------------------------------------
#include <DHT.h>
#define DHT11_PIN 4
#define DHTTYPE DHT11
DHT dht(DHT11_PIN, DHTTYPE);
//-----------------------------------------------------------------------
BlynkTimer timer;
#define INTERVAL 1000L
//-----------------------------------------------------------------------


/************************************************************************************
 *  This function sends Arduino's up time every second to Virtual Pin.
 *  In the app, Widget's reading frequency should be set to PUSH. This means
 *  that you define how often to send data to Blynk App.
 **********************************************************************************/
void SendDhtData()
{
  //-----------------------------------------------------------------------
  //Sensor readings may also be up to 2 seconds 'old' (its a very slow sensor)
  float h = dht.readHumidity();
  //-----------------------------------------------------------------------
  //Read temperature as Celsius (the default)
  float t = dht.readTemperature();
  //-----------------------------------------------------------------------
  // Check if any reads failed and exit early (to try again).
  if (isnan(h) || isnan(t)) {
    Serial.println(F("Failed to read from DHT sensor!"));
    return;
  }
  //-----------------------------------------------------------------------
  //Compute heat index in Celsius (isFahreheit = false)
  float hic = dht.computeHeatIndex(t, h, false);
  //-----------------------------------------------------------------------
  Serial.print("Temperature: ");
  Serial.println(t);
  Serial.print("Humidity: ");
  Serial.println(h);
  Serial.println("------------------------------------------");
  //-----------------------------------------------------------------------
  // You can send any value at any time.
  // Please don't send more that 10 values per second.
  Blynk.virtualWrite(V0, t);
  Blynk.virtualWrite(V1, h);
  //-----------------------------------------------------------------------
}


/************************************************************************************
 *  setup() function
 **********************************************************************************/
void setup()
{
  //-----------------------------------------------------------
  // Debug console
  Serial.begin(9600);
  delay(10);
  //-----------------------------------------------------------
  // Set GSM module baud rate
  SerialAT.begin(9600);
  //SerialAT.begin(9600,SWSERIAL_8N1,D3,D4);
  delay(3000);
  //-----------------------------------------------------------
  dht.begin();
  //-----------------------------------------------------------
  // Restart takes quite some time
  // To skip it, call init() instead of restart()
  Serial.println("Initializing modem...");

  modem.restart();
  // Unlock your SIM card with a PIN
  //modem.simUnlock("1234");
  //-----------------------------------------------------------
  Blynk.begin(auth, modem, apn, user, pass);
  //-----------------------------------------------------------
  // Setup a function to be called every second
  timer.setInterval(INTERVAL, SendDhtData);
  //-----------------------------------------------------------
}


/************************************************************************************
 *  loop() function
 **********************************************************************************/
void loop()
{
  Blynk.run();
  timer.run();
}
Failed to read from DHT sensor!
Failed to read from DHT sensor!
Failed to read from DHT sensor!
Failed to read from DHT sensor!
Failed to read from DHT sensor!
Failed to read from DHT sensor!
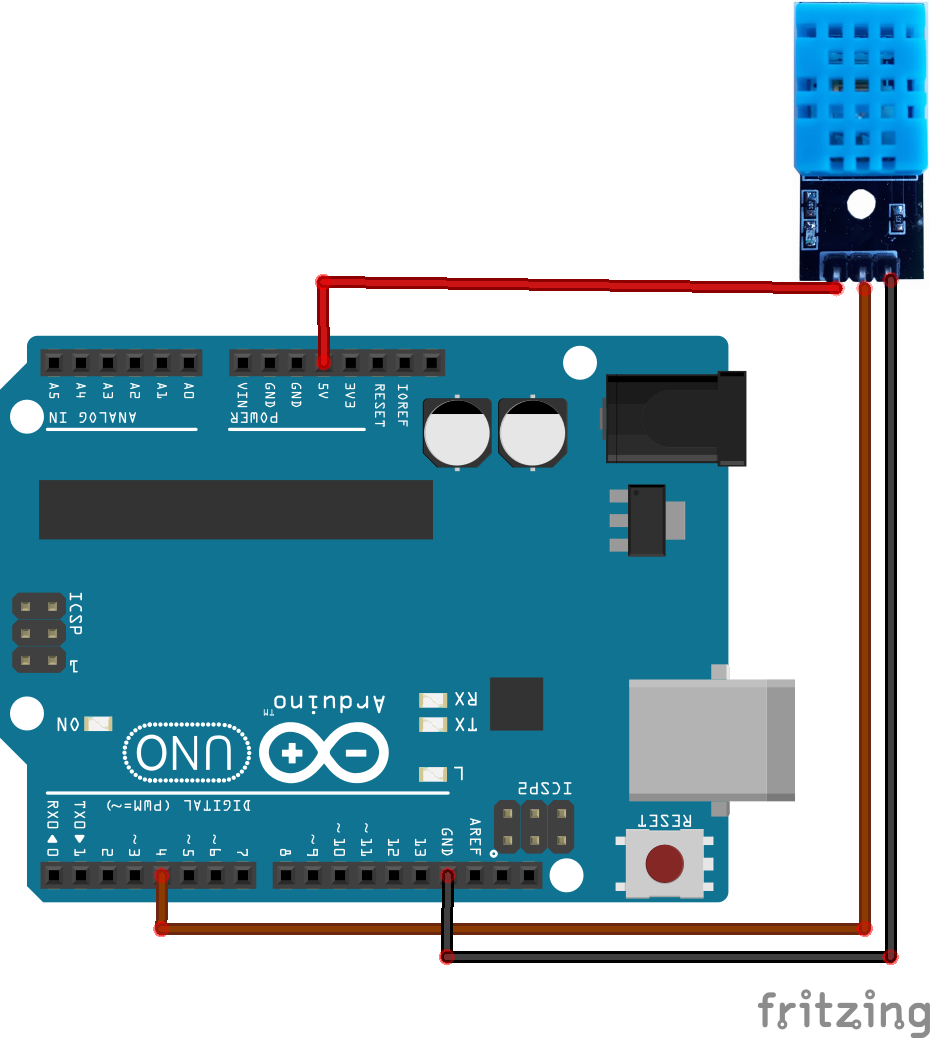
I am using GSM 800 C+ Arduino + DHT 11.
I am not getting the diagram for GSM 800 C. SO I am posting this. Its a shield and I am placing that GSM Shield on top of Arduino Uno and connecting DHT 11 to GSM Shield.
I’d suggest that you look-up the specifications for the shield you are using and work-out which pins the shield uses.
I think you’ll probably find that pin 4 is already in use by the shield.