Unless waitForConversion is set to false, the requestTemperatures() returns when the conversion is good ready
BTW, the sensor has a built in alarm function and supported in the standard DallasTemperature-library. Perhaps that’s something to implement in a distant future
Flexible User-Definable Nonvolatile (NV) Alarm Settings with Alarm Search Command Identifies Devices with Temperatures Outside Programmed Limits
Antagonist… who, me Actually I wasn’t paying attention when I posted that, so no, I wasn’t trying to undermine your much better implemented methods, just showing the index method.
It was just test code and not meant for any active project.
Hmmm, good to know… I think I needed to add the delay, way back when, because as I added more sensors I noticed that the return value was the error -127 without the delay. I can’t remember what I had in the setup.
Woups, turns I did still have that code in an active project (and no waitForConversion() command anywhere )… but it was set for a manual button reading.
So I changed it to this, and it works just fine without the delay. Not that I could notice a quarter second delay on a manually called reading anyhow
You don’t have to set it and default is true afaik. Therefore the use of that function is easily overlooked or even notice its existence. In many standalone applications, some delays here and there isn’t that crucial for the overall performance. But with Blynk there is always the heartbeat/connection issues to consider. But you know all that already.
I’m just trying to give others some pointers and learn from my mistakes.
Yes, I know that, but I only read the sensor every 30 seconds anyway. By using an “absolutely safe in all cases” 800ms, I don’t have to worry about forgetting to change it if I were to increase the resolution in the future. There’s no down side to a long delay. The sensor isn’t going to “forget” the reading any time after it’s been acquired.
I’m not saying you’re doing it wrong, just that there is another way to do it Don’t take it as criticism, I think this is one of the best presented, complete and easy to follow projects I’ve seen here But I’ve grown allergic to unnecessary delays when working with Blynk and it all started with those 800 ms the temp sensors gave me
With my sometimes shaky 4G/LTE internet, the delays made me loose the connection to the Blynk cloud from time to time so I needed to write “better” code to avoid it. Today I’m using a local server so I probably wouldn’t have that problem now.
I’ve never heard of a DS18B20 to fail due to too many EEPROM writes but bear in mind that they “only” guarantee 50.000 writes. Twice a minute makes 2880 writes per day and after just 2,5 weeks you hit that 50k mark!
How long have you been running this project? Would be interesting to know if or when they actually start to fail
I didn’t, and my response was only intended to inform you that I was aware that a shorter acquisition wait time could be used, and to give my reason for making it a bit longer than required.
I don’t use a delay. I use a timer. Blynk.run() is called continually while the acquisition wait timer is waiting to time out. I could make the timeout 20 seconds and the sketch would still run fine (other than the time stamp, that the server records for each reading, being 20 seconds later than when the reading was actually taken).
My code doesn’t write to any EEPROM in either the sensor or the ESP8266. I only read from the sensor and send the results to the Blynk server, so nothing is being “worn out”.
It seems like the motherloving scratchpad is actually SRAM, not EEPROM!
The DS18B20’s memory is organized as shown in Figure 9. The memory consists of an SRAM scratchpad with nonvolatile EEPROM storage for the high and low alarm trigger registers (TH and TL) and configuration register.
I can either retract one gazillion posts and forever be in shame, or pretend like nothing has happened and silently delete my account! Well… It’s been nice knowing y’all !
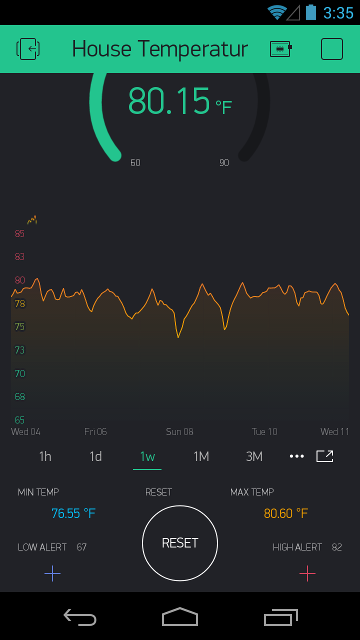
I’ve updated my project to use the SuperChart instead of the now deprecated History Graph. I also changed the temperature read interval from 30 to 60 seconds.
Hi! great work! I’m new with arduino and blynk, I’m trying to test this code with a Wemos D1 R2, for the moment I’ve tryed to put my token and my wifi ssd and pass, also I’ve changed the DS18B20 pin to D4 pin. The DS18B20 it’s workin cause I’ve already tryed on a arduino mega.
The issue is that I cant get to connect Wemos with Blynk using this code. I’ve tryed with an example and it works, do you have any idea what i’m doing wrong?
@Marco_Viarengo,
It’s difficult to tell what your problem is with the information you’ve provided.
What can’t you get to connect? The Wemos to the Blynk server? The Wemos to the DS18B20?
If you can’t connect to the DS18B20, make sure you enter the device ID for the sensor you’re using. Every DS18B20 has a unique ID. The values I’ve provided are just “dummy” values and won’t work for any real DS18B20.
// Temperature sensor full ID, including family code and CRC
DeviceAddress tempSensor = { 0x01, 0x02, 0x03, 0x04, 0x05, 0x06, 0x07, 0x08 };
Love the project, gave me inspiration while building my own to let my dad monitor his dodgy heating system while he’s away on holiday (then he can send me to fix it!)
I integrated https://github.com/tzapu/WiFiManager into mine which avoids hard coding WiFi password and makes switching location easier… It’s a great library and I’d recommend it to anyone.
Also I’d strongly recommend avoiding any delay() statements when using Blynk! One at the end of my setup() method cost me about 2 hours of debugging
I assume you’re asking @terryspitz about this, since I haven’t integrated WifiManager into my project. Perhaps he will be notified by my mentioning him and respond.


 Well… It’s been nice knowing y’all !