ESP8266 with Dallas DS18B20 temperature sensor

I took a quick glance at it but haven’t verified it fully. It doesn’t exactly match mine but looks mostly correct.

I used GPIO4 for the sensor. It looks like you’re using GPIO2 (so remember to change the #define ONEWIRE_PIN in the code).

I see you’re using the ADC to monitor the input voltage.

Since my power is regulated 5V, I put a 1N4001 diode between the 5V adapter output and Vin of the regulator. This splits the power dissipation between the diode and the regulator. It also allows me to power the board from 5V placed on the Vin pin of the programming header (which is connected to Vin of the regulator) without worrying about feeding voltage into the adapter (since the adapter is hard wired and can’t be disconnected).

1 Like

A schematic and PDF of my hardware, created with KiCad, are now in the GitHub repository.

@Fettkeewl,

For an ESP8266-12, GPIO2 is connected to the on board LED, so you’re going to have a conflict. If you want to have the LED status indication that’s in my code, you’ll have to use an external LED on a different pin, or move the sensor to a different pin.

Thanks for the heads up, it’s alright for me this is meant to go inside a solar lamp so it will be hidden :stuck_out_tongue_winking_eye:

1 Like

Thank u very much sir

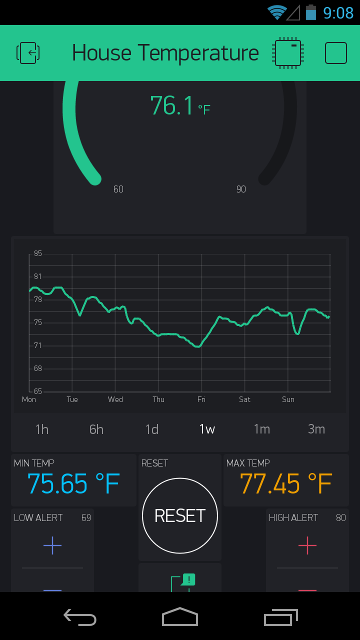
I’ve added tracking and display of the minimum and maximum temperatures and the ability to reset these.

1 Like

Hi, I like your work :slight_smile: Can you share the blynk project also? Thanks.

This project uses the History Graph widget, which I believe has been superseded by the SuperChart, but anyway:

1 Like

Thank you :wink: I’m a noobie dealing with blynk and your project is a good example how it should be done :slight_smile:

1 Like

I just wanted to say thanks for posting this - I’ve had Blynk, an ESP12e and a ds18b20 sitting around for a couple years wanting to do this exact thing…but never had the time to work on it. Now I’m up and running! I’m going to use this for making some freezer temp monitors. Thanks for sharing!

1 Like

How can i add more sensors ?? Need at least 3 sensors…

@Mauricio_Lima, Are you asking about the hardware or the software?


For the hardware, additional sensors can be added in parallel on the same wire. (That’s why the interface is called “1-Wire”.)


For the software, the startSensorRead() function already starts the conversion for all sensors connected to the bus, so no changes are required there.

You would have to expand and modify the sensorRead() function to read all the sensors, instead of just one, and add virtual pins for them. If you put the sensor device addresses in an array, you could use a loop and index to read them.

The initialisation for more than one sensor will have to be performed in setup(), as well. Essentially, anywhere where the tempSensor variable containing the device address is used.

What you have to consider is how to handle monitoring, alerts and errors for more than one sensor. Do you want separate maximum and minimum temperature tracking, and max/min alerts and notifications, for each sensor? What happens when one or more sensors fail but the others remain working, in terms of flashing the LED for status indication?

Very nice and complete presentation of your project! :+1:

Since I’m a self proclaimed DS18B20 wrangler :nerd_face: I have some input that might speed things up, even if not necessary :slight_smile:

// The number of bits of temperature resolution
// 9 = 0.5, 10 = 0.25, 11 = 0.125, 12 = 0.0625 degrees Celsius
#define TEMPERATURE_RES_BITS 10

// Temperature conversion wait time, in milliseconds
#define READ_CONV_WAIT 800

// We'll do the "wait for conversion" ourselves using a timer,
// to avoid the call to delay() that the library would use
sensors.setWaitForConversion(false);

The conversation time with 10 bit resolution is only 187.5 ms, so no need to wait for 800 ms. You don’t even have to wait for the 187.5 ms if you don’t want to. You could execute other code and come back after ~200 ms and just read the result of the conversation, which only takes about 30 ms.

I’m using two timers in my project to do this “hit-n-run” on the sensors :slight_smile:

@Mauricio_Lima There is examples of how to use multiple sensors hidden somewhere in the forum. I can’t remember where so you have to search for your self :slight_smile:

Each sensor can be accessed in one of two ways…

  1. Via its internal address (I recall finding some program that read the address of each sensor… Google for that)

This OPs project uses that method… eg.

// Temperature sensor full ID, including family code and CRC
DeviceAddress tempSensor = { 0x01, 0x02, 0x03, 0x04, 0x05, 0x06, 0x07, 0x08 };
  1. Via the index… which is basically the placement order on the bus… I think.

I have used this to test read the value of multiple (5) sensors at once.

void getTempData()
{
  DS18B20.requestTemperatures();
  delay(250);

  Blynk.virtualWrite(V45, DS18B20.getTempCByIndex(0));
  Blynk.virtualWrite(V46, DS18B20.getTempCByIndex(1));
  Blynk.virtualWrite(V51, DS18B20.getTempCByIndex(2));
  Blynk.virtualWrite(V52, DS18B20.getTempCByIndex(3));
  Blynk.virtualWrite(V53, DS18B20.getTempCByIndex(4));
}

As mentioned… search this forum (and Google) for other projects and how they do it.

My dear antagonist @Gunner, why the delay?

void getTempData()
{
  DS18B20.requestTemperatures();
  delay(250);
 /.../
}

Unless waitForConversion is set to false, the requestTemperatures() returns when the conversion is good ready :slight_smile:

BTW, the sensor has a built in alarm function and supported in the standard DallasTemperature-library. Perhaps that’s something to implement in a distant future :smiley:

Flexible User-Definable Nonvolatile (NV) Alarm Settings with Alarm Search Command Identifies Devices with Temperatures Outside Programmed Limits

Antagonist… who, me :innocent: Actually I wasn’t paying attention when I posted that, so no, I wasn’t trying to undermine your much better implemented methods, just showing the index method.

It was just test code and not meant for any active project.

Hmmm, good to know… I think I needed to add the delay, way back when, because as I added more sensors I noticed that the return value was the error -127 without the delay. I can’t remember what I had in the setup.

Woups, turns I did still have that code in an active project (and no waitForConversion() command anywhere :thinking:)… but it was set for a manual button reading.

So I changed it to this, and it works just fine without the delay. Not that I could notice a quarter second delay on a manually called reading anyhow :stuck_out_tongue:

  DS18B20.setWaitForConversion(true);
  DS18B20.requestTemperatures();
  //delay(250);

Thanks for the knowledgeable info @distans (seriously). I always knew you were full of something :smile: JK - the antagonist in me escaped briefly :wink:

1 Like

You don’t have to set it and default is true afaik. Therefore the use of that function is easily overlooked or even notice its existence. In many standalone applications, some delays here and there isn’t that crucial for the overall performance. But with Blynk there is always the heartbeat/connection issues to consider. But you know all that already.

I’m just trying to give others some pointers and learn from my mistakes.

CAREFUL!!! :joy:

1 Like

Yes, I know that, but I only read the sensor every 30 seconds anyway. By using an “absolutely safe in all cases” 800ms, I don’t have to worry about forgetting to change it if I were to increase the resolution in the future. There’s no down side to a long delay. The sensor isn’t going to “forget” the reading any time after it’s been acquired.

I’m not saying you’re doing it wrong, just that there is another way to do it :laughing: Don’t take it as criticism, I think this is one of the best presented, complete and easy to follow projects I’ve seen here :+1: But I’ve grown allergic to unnecessary delays when working with Blynk and it all started with those 800 ms the temp sensors gave me :smiley:

With my sometimes shaky 4G/LTE internet, the delays made me loose the connection to the Blynk cloud from time to time so I needed to write “better” code to avoid it. Today I’m using a local server so I probably wouldn’t have that problem now.

I’ve never heard of a DS18B20 to fail due to too many EEPROM writes but bear in mind that they “only” guarantee 50.000 writes. Twice a minute makes 2880 writes per day and after just 2,5 weeks you hit that 50k mark!

How long have you been running this project? Would be interesting to know if or when they actually start to fail :face_with_monocle: