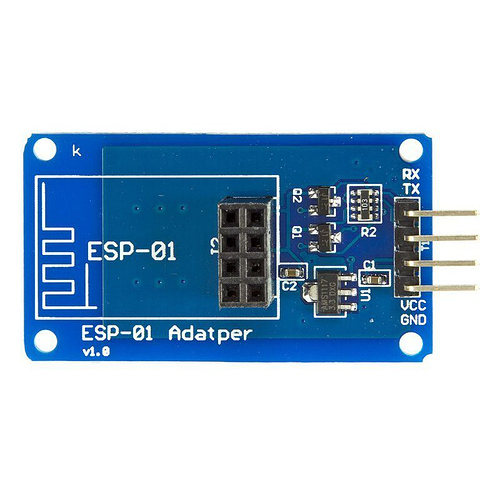
Hey! I’m currently using an Arduino UNO with an esp8266 and this esp8266 adapter
and I’m trying to control servo motors via blynk. For now, I´m using code from a youtube tutorial which is proven to work. Although, when I’m booting up the Arduino with the provided code I get the error: esp not responding. When I control the esp8266 via AT commands through serial monitor I can connect to wifi and get IP. Therefore I’m assuming the esp8266 works fine with the following wirering. Do you guys have any ideas as to why this occurs?// Ekan

vcc adapter --> 5V arudino
rx adapter --> prin 0 arduino
tx adapter --> pin 1 arudino
ground adapter --> ground arduino
/*************************************************************
  Download latest Blynk library here:
    https://github.com/blynkkk/blynk-library/releases/latest

  Blynk is a platform with iOS and Android apps to control
  Arduino, Raspberry Pi and the likes over the Internet.
  You can easily build graphic interfaces for all your
  projects by simply dragging and dropping widgets.

    Downloads, docs, tutorials: http://www.blynk.cc
    Sketch generator:           http://examples.blynk.cc
    Blynk community:            http://community.blynk.cc
    Follow us:                  http://www.fb.com/blynkapp
                                http://twitter.com/blynk_app

  Blynk library is licensed under MIT license
  This example code is in public domain.

 *************************************************************
  WARNING!
    It's very tricky to get it working. Please read this article:
    http://help.blynk.cc/hardware-and-libraries/arduino/esp8266-with-at-firmware

  This example shows how value can be pushed from Arduino to
  the Blynk App.

  NOTE:
  BlynkTimer provides SimpleTimer functionality:
    http://playground.arduino.cc/Code/SimpleTimer

  App project setup:
    Value Display widget attached to Virtual Pin V5
 *************************************************************/

/* Comment this out to disable prints and save space */
#define BLYNK_PRINT Serial


#include <ESP8266_Lib.h>
#include <BlynkSimpleShieldEsp8266.h>
#include <OneWire.h>
#include <DallasTemperature.h>
#include <Wire.h>
#define ONE_WIRE_BUS 38 //ds18b20 module attach to pin39
OneWire oneWire(ONE_WIRE_BUS);
// Pass our oneWire reference to Dallas Temperature.
DallasTemperature sensors(&oneWire);


// You should get Auth Token in the Blynk App.
// Go to the Project Settings (nut icon).
char auth[] = "secret.exe";

// Your WiFi credentials.
// Set password to "" for open networks.
char ssid[] = "iPhone";
char pass[] = "frickoff";

// Hardware Serial on Mega, Leonardo, Micro...
//#define EspSerial Serial

// or Software Serial on Uno, Nano...
#include <SoftwareSerial.h>
SoftwareSerial EspSerial(2, 3); // RX, TX

// Your ESP8266 baud rate:
#define ESP8266_BAUD 9600

ESP8266 wifi(&EspSerial);

BlynkTimer timer;

// This function sends Arduino's up time every second to Virtual Pin (5).
// In the app, Widget's reading frequency should be set to PUSH. This means
// that you define how often to send data to Blynk App.
void myTimerEvent()
{
  // You can send any value at any time.
  // Please don't send more that 10 values per second.
  Blynk.virtualWrite(V5, millis() / 1000);
}

void getTemp()
{
  sensors.requestTemperatures(); // Send the command to get temperatures
  Blynk.virtualWrite(V6, sensors.getTempCByIndex(0));
  Serial.print("Tem: ");
  Serial.println(sensors.getTempCByIndex(0));
}


void setup()
{
  // Debug console
  Serial.begin(9600);
  sensors.begin(); // initialize the bus

  // Set ESP8266 baud rate
  EspSerial.begin(ESP8266_BAUD);
  delay(10);

  Blynk.begin(auth, wifi, ssid, pass);
  // You can also specify server:
  //Blynk.begin(auth, wifi, ssid, pass, "blynk-cloud.com", 8442);
  //Blynk.begin(auth, wifi, ssid, pass, IPAddress(192,168,1,100), 8442);

  // Setup a function to be called every second
  timer.setInterval(1000L, myTimerEvent);
  timer.setInterval(6000L, getTemp);
}

void loop()
{
  Blynk.run();
  timer.run(); // Initiates BlynkTimer
}

