PROBLEM:
In the event I have to update my sketch on Arduino, this won’t work with the above connection as RX / TX (Ports 0/1) are connected. To upload a sketch I HAVE TO remove cables from ports 0/1…
On my project disconnecting these cables is extremely complicated… so in general not an option
NOT WORKING:
I found to a “solution” to bypass ports 0/1 to - as an example - to ports 5/6:
#include <SoftwareSerial.h>                     // to use pin 4 and 5 as RX and TX ports

#define sw_serial_rx_pin 4 //  Connect this pin to TX on the esp8266
#define sw_serial_tx_pin 5 //  Connect this pin to RX on the esp8266
Now uploading a sketch is working fine BUT now the connection between the App and Arduino ISN’T working anymore…
Any hints / tips / tricks are appreciated,
this is my complete sketch…
//#define BLYNK_DEBUG
#define BLYNK_PRINT Serial                      // Comment this out to disable prints and save space
#include <ESP8266_HardSer.h>
#include <Servo.h>                              // include the Servo library
#include <BlynkSimpleShieldEsp8266_HardSer.h>   // include Blynk ESP8266
#include <SoftwareSerial.h>                     // to use pin 4 and 5 as RX and TX ports

#define sw_serial_rx_pin 4 //  Connect this pin to TX on the esp8266
#define sw_serial_tx_pin 5 //  Connect this pin to RX on the esp8266

// Set ESP8266 Serial object
#define EspSerial Serial                        // serial output
Servo Motor;                                    // create the servo objects

ESP8266 wifi(EspSerial);

// You should get Auth Token in the Blynk App.
// Go to the Project Settings (nut icon).
char auth[] = "*****";

void setup()
{
  // Set console baud rate
  Serial.begin(9600);
  delay(10);
  // Set ESP8266 baud rate
  EspSerial.begin(115200);
  delay(10);
  Motor.attach(10);                                           // attaches the servo on pin 13 to a servo object
  Blynk.begin(auth, wifi, "WlanhomeU", "8302147849164771");  // Wifi connection
  Motor.write(90);                                            // 90 is neutral, so neither of the servos should turn

}

  BLYNK_WRITE(3)
  {
    Motor.write(param.asInt());
}


void loop()
{
  Blynk.run();

}
 ``` cpp <--put 3 backticks BEFORE your code starts  (cpp means C++ language)

   //Put your code here
   //..................
   //..................

 ``` <--insert 3 backticks AFTER your code
**This makes your code readable and with highlighted syntax, like this:**
First of all, 115200 is way too fast for software serial! Try and reduce that to 9600. I see you problem though, I have something similar going on, but I can reach my wires easily. Hence, can you build in maybe a little switch or jumper which you can use to set upload function or running function? That may be an option.
Hi Lichtsinaal,
thanks for your answer, to build in a switch to manually disconnect pins 0 and 1 is my last option and not easy to install.
found a small dip switch which will fit, will test it on my test config, but thats my last option…
@ Lichtsignaal
Sure, serial speed is set to 9600 baud and wiring is same when using HardSer config.
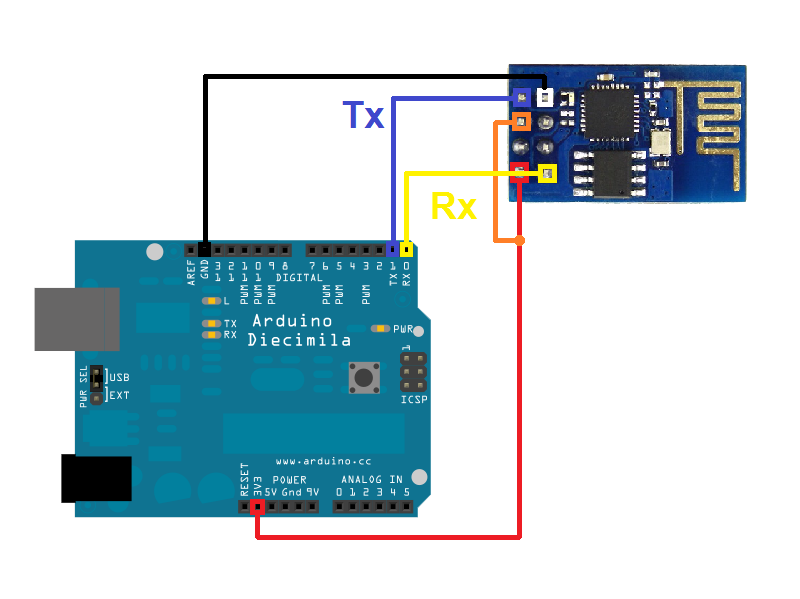
ESP8266 > Arduino:
CHPD > 3,3V (breadboard) VCC > 3.3V (breadboard) GRND > GRND RX > TX (in my last case Pin 8 in SoftSer config) TX > RX (in my last case Pin 7 in SoftSer config)
As I mentioned above, with this cabling and HardSer config its working brilliant… no problem at all, no issues like “… first start Arduino then ESP…” or similar tricks
And I tried it with first starting the Arduino and then ESP… same issue here…
And I’m using the example "ESP8266_Shield_SoftSer out of the box, just changing token and wifi credentials, that’s all.
Same with ESP8266_Shield_HardSer examlpe, NO additional changes, no code added etc…
I still recommend you to use an external power supply to power the ESP. The 01’s are notoriously instable powered by the Arduino. It may also be needed to pull the RST high for normal operation.
Do you mean arduino serial speed or esp?
You must change both for arduino and esp.
To change esp speed use AT command AT+UART_DEF=9600,8,1,0,0 from AT console
@vganin
first on Arduino only…
since I changed speed to 9600 ESP8266 doesn’t want to talk anymore…
will flash ESP8266 again, then try it again with my HardSer config which worked… and try it again…
I’ve had success with ESP+Arduino using hard serial and the 5V pin with a voltage regulator/voltage divider instead of using the 3.3V. The 3.3V often can’t handle the ESP.
@nolmath
yes, I know, but that’s the strange thing here, with the HardSer config its working fine without any issues and without regulator
Once I changed it to SoftSer config the ESP seems not to work properly… (with the same hardware config…)
really strange…
So re-flashed ESP8266 succesfully, uploaded sketch with HardSer. config and correct token to arduino, and BING it’s working …
Will try again with SoftSer config, still hope I’ll get it running …
Hi Chris,
no SoftSer does not work. For my project it rather would be the dot on the I… So I’m still running it with HardSer config without any problems.
I had to re-program arduino only once, when they changed the IP of the online Blynk Server… disassembled my project, did the re-programming and reassembled it. Working fine since then…
If you want to see it… https://www.youtube.com/watch?v=gi5bxf0agNc
keep in mind HardSer was with an older Blynk Library, so I adapted the code to run it with the actual Library. The arduino ESP8266 config as shown above is still the same and working…
#define BLYNK_PRINT Serial // Comment this out to disable prints and save space #include <Servo.h> // include the Servo library #include <ESP8266_Lib.h> #include <BlynkSimpleShieldEsp8266.h>
// Set ESP8266 Serial object #define EspSerial Serial // serial output
Servo Motor; // create the servo objects
ESP8266 wifi;
// You should get Auth Token in the Blynk App.
// Go to the Project Settings (nut icon).
char auth[] = “e921c0bc911e4c64915f2f41aaf3eccf”;
void setup()
{
// Set console baud rate
Serial.begin(9600);
delay(10);
// Set ESP8266 baud rate
EspSerial.begin(115200);
delay(10);
Motor.attach(10); // attaches the servo on pin 13 to a servo object
Blynk.begin(auth, wifi, “WlanhomeU”, “8302147849164771”); // Wifi connection
Motor.write(90); // 90 is neutral, so servo will not turn