Hi, I am doing a project using the ESP 8266 as a Sheild with the Arduino Uno. I am following the Blynk Docs Tutorial to connect it. After Setting the Baud Rate to 9600 and connecting the TX and RX pins in the Serial Monitor I got.
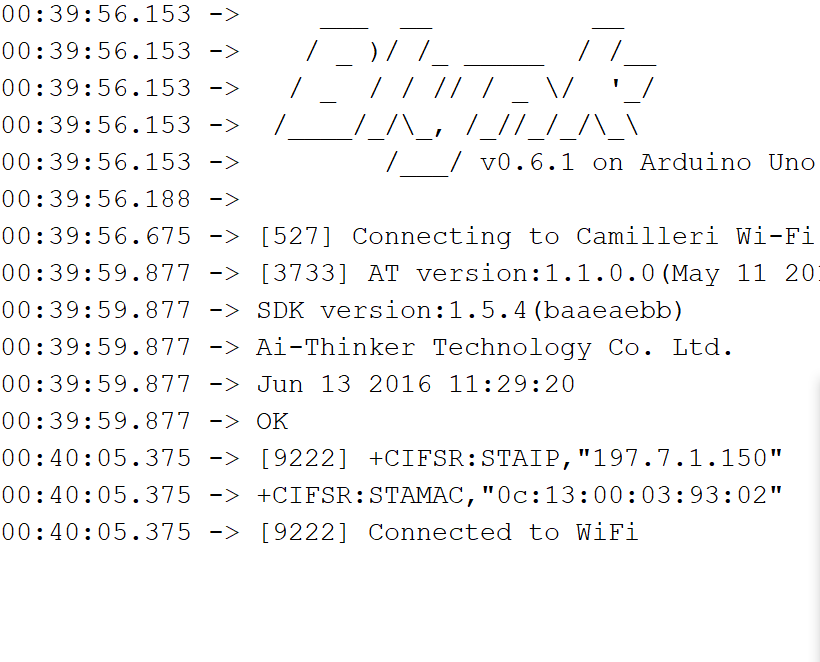
As you can see I get that the ESP is connected but I don’t get Ready and the App still shows as not connected. What can I do? I am using a 3.3V Regulator so I don’t think it is a Power Supply Issue. The Only Questionable thing is that I am using a breadboard to connect everything.
Has anyone ever got this error or is it just me. I am also using the 1.5.4 Firmware for the ESP-01. I also tried the same ESP as Standalone and it worked. This is the code I am using. What should I try next?
    /*************************************************************
  Download latest Blynk library here:
    https://github.com/blynkkk/blynk-library/releases/latest

  Blynk is a platform with iOS and Android apps to control
  Arduino, Raspberry Pi and the likes over the Internet.
  You can easily build graphic interfaces for all your
  projects by simply dragging and dropping widgets.

    Downloads, docs, tutorials: http://www.blynk.cc
    Sketch generator:           http://examples.blynk.cc
    Blynk community:            http://community.blynk.cc
    Follow us:                  http://www.fb.com/blynkapp
                                http://twitter.com/blynk_app

  Blynk library is licensed under MIT license
  This example code is in public domain.

 *************************************************************

  This example shows how to use ESP8266 Shield (with AT commands)
  to connect your project to Blynk.

  WARNING!
    It's very tricky to get it working. Please read this article:
    http://help.blynk.cc/hardware-and-libraries/arduino/esp8266-with-at-firmware

  Change WiFi ssid, pass, and Blynk auth token to run :)
  Feel free to apply it to any other example. It's simple!
 *************************************************************/

/* Comment this out to disable prints and save space */
#define BLYNK_PRINT Serial


#include <ESP8266_Lib.h>
#include <BlynkSimpleShieldEsp8266.h>

// You should get Auth Token in the Blynk App.
// Go to the Project Settings (nut icon).
char auth[] = "807ujcxxxxxxxxxxxxxxxxxxxxxxxxxx3f01";

// Your WiFi credentials.
// Set password to "" for open networks.
char ssid[] = "Cxxxxxxxxxxxxxxxi";
char pass[] = "cxxxxxxxxxxxxxxi";

// Hardware Serial on Mega, Leonardo, Micro...
//#define EspSerial Serial1

// or Software Serial on Uno, Nano...
#include <SoftwareSerial.h>
SoftwareSerial EspSerial(2, 3); // RX, TX

// Your ESP8266 baud rate:
#define ESP8266_BAUD 9600

ESP8266 wifi(&EspSerial);

void setup()
{
  // Debug console
  Serial.begin(115200);

  delay(10);

  // Set ESP8266 baud rate
  EspSerial.begin(ESP8266_BAUD);
  delay(10);

  Blynk.begin(auth, wifi, ssid, pass);
}

void loop()
{
  Blynk.run();
}