Hello I’m using Arduino uno to test wifi with Blynk… All AT commands are working but when I try to upload the code. It’s throwing compilation error.
Below is the code
/* Comment this out to disable prints and save space */
#define BLYNK_PRINT Serial
#include <ESP8266_Lib.h>
#include <BlynkSimpleShieldEsp8266.h>
// You should get Auth Token in the Blynk App.
// Go to the Project Settings (nut icon).
char auth[] = "yourAUTH";
// Your WiFi credentials.
// Set password to "" for open networks.
char ssid[] = "yourSSID";
char pass[] = "yourpassword";
// Hardware Serial on Mega, Leonardo, Micro...
//#define EspSerial Serial1
// or Software Serial on Uno, Nano...
//#include <SoftwareSerial.h>
//SoftwareSerial EspSerial(2, 3); // RX, TX
// Your ESP8266 baud rate:
#define ESP8266_BAUD 115200
ESP8266 wifi(&Serial);
void setup()
{
 // Debug console
 Serial.begin(9600);
 delay(10);
 // Set ESP8266 baud rate
 Serial.begin(ESP8266_BAUD);
 delay(10);
 Blynk.begin(auth, wifi, ssid, pass);
}
void loop()
{
 Blynk.run();
}
Well, the code compiles fine for me, under the Atdiono IDE 1.8.3 for board type “Arduino Mega or Mega 2560”.
It seems you are trying to compile this code for an Uno…
However, you didn’t heed my previous advice (no surprise there then!)…
Once you un-comment the first of these lines then you’ll have an object called EspSerial which you need to use in place of Serial in the other two lines of code.
Well, that won’t work unless you use the SoftwareSerial library, and if 115200 is the actual baud rate that your ESP is using then SoftwareSerial won’t work at that speed - so you’ll need to re-programme your ESP-01 via AT commands.
#include <Arduino.h>
#include <BlynkSimpleStream.h>
#include <ESP8266_Lib.h>
/* Comment this out to disable prints and save space */
#define BLYNK_PRINT Serial
// You should get Auth Token in the Blynk App.
// Go to the Project Settings (nut icon).
char auth[] = "bMLxyWbOlmDA-gMZ9YS";
// Your WiFi credentials.
// Set password to "" for open networks.
char ssid[] = "No Network";
char pass[] = "Nopassword";
// Hardware Serial on Mega, Leonardo, Micro...
//#define EspSerial Serial1
// or Software Serial on Uno, Nano...
#include <SoftwareSerial.h>
SoftwareSerial EspSerial(2, 3); // RX, TX
// Your ESP8266 baud rate:
#define ESP8266_BAUD 9600
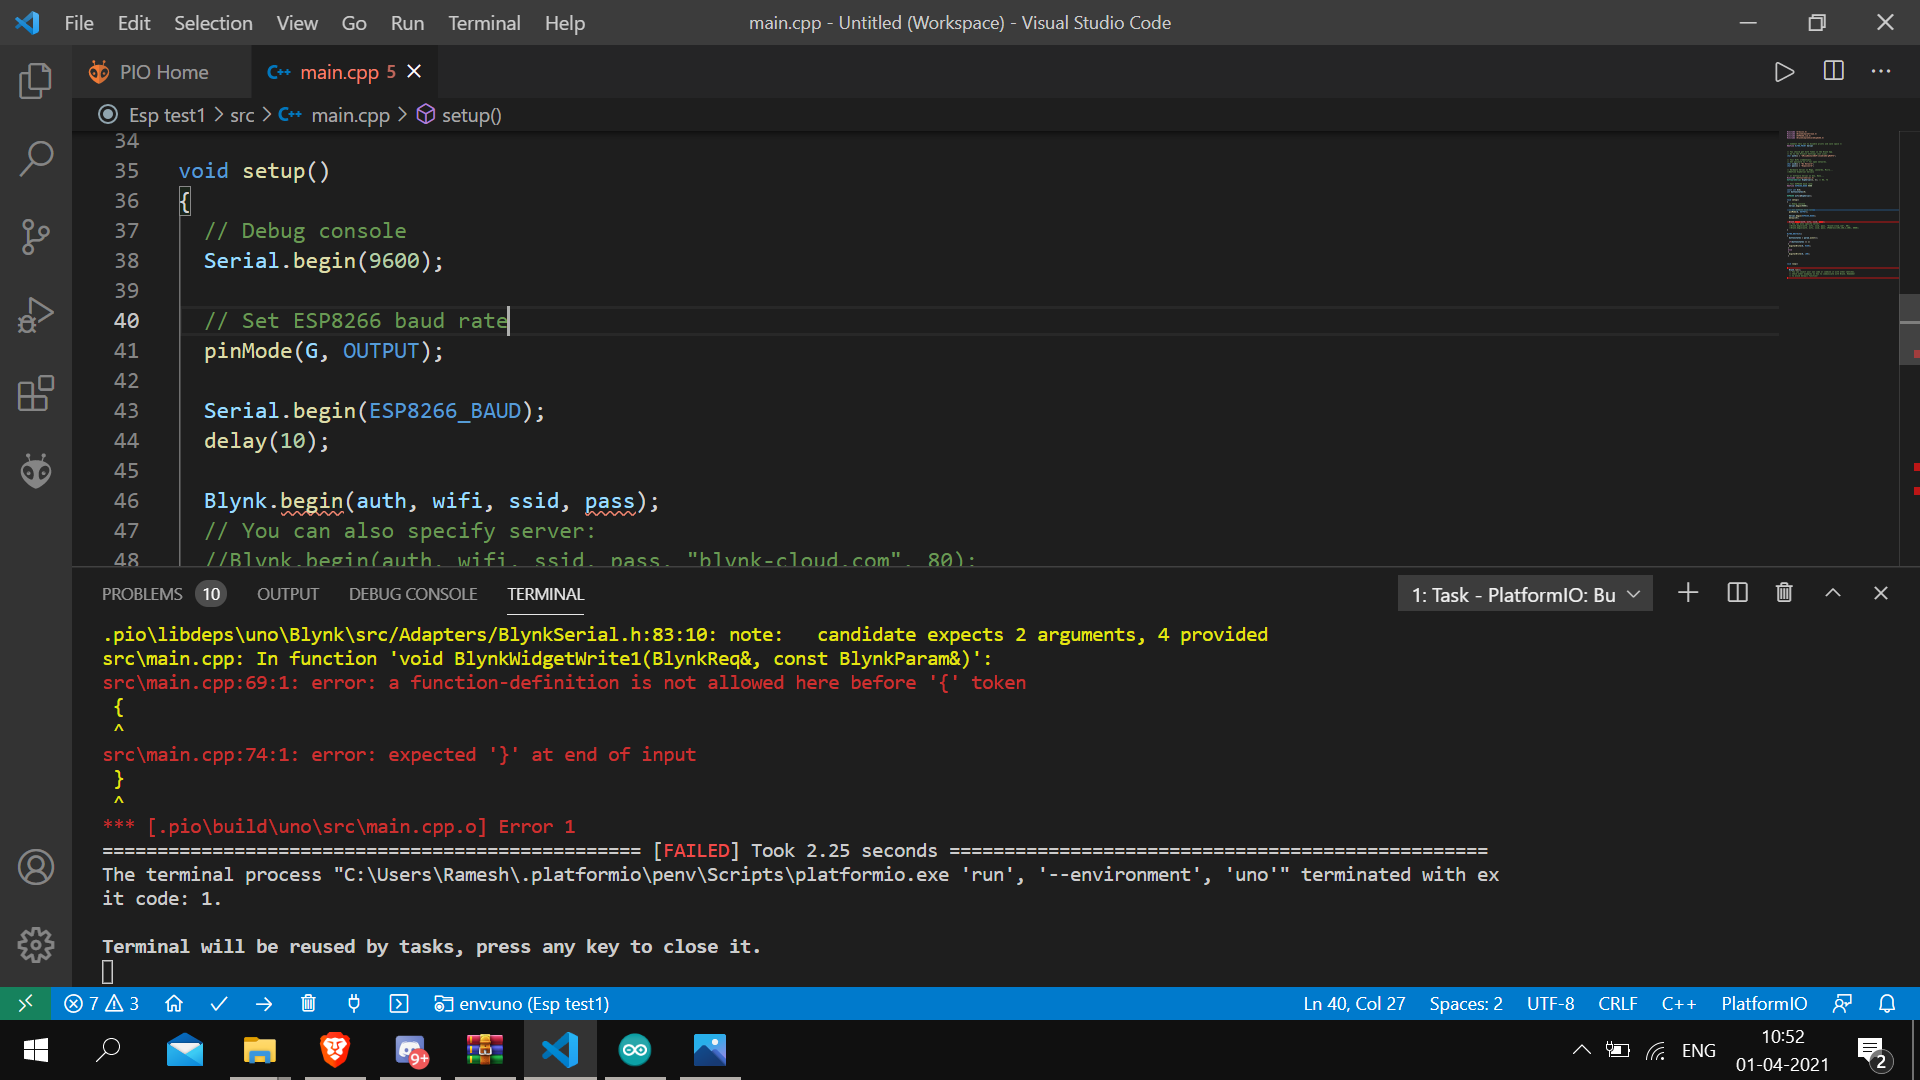
int G=8;
int buttonstate1=0;
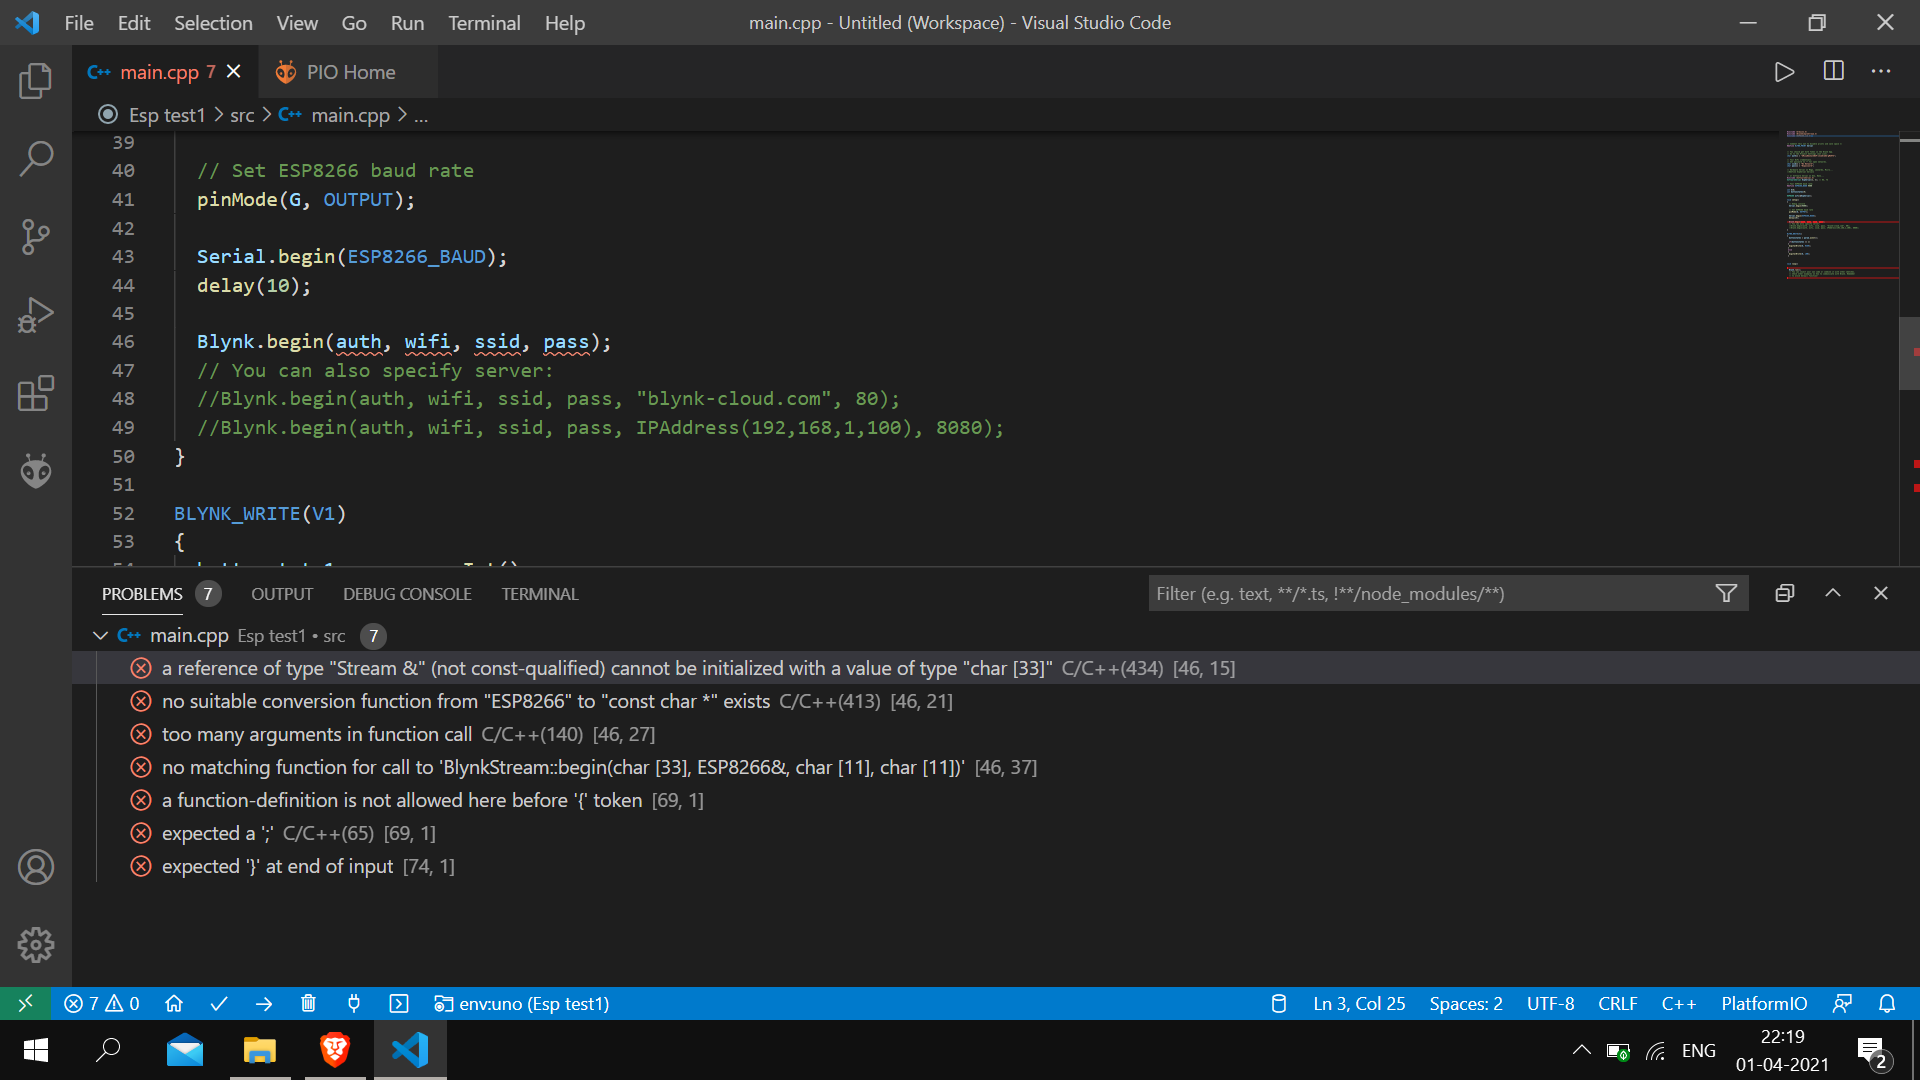
ESP8266 wifi(&EspSerial);
void setup()
{
// Debug console
Serial.begin(9600);
// Set ESP8266 baud rate
pinMode(G, OUTPUT);
Serial.begin(ESP8266_BAUD);
delay(10);
Blynk.begin(auth, wifi, ssid, pass);
// You can also specify server:
//Blynk.begin(auth, wifi, ssid, pass, "blynk-cloud.com", 80);
//Blynk.begin(auth, wifi, ssid, pass, IPAddress(192,168,1,100), 8080);
}
BLYNK_WRITE(V1)
{
buttonstate1 = param.asInt();
if(buttonstate1 == 1)
{
digitalWrite(G, HIGH);
}
else
{
digitalWrite(G, LOW);
}
void loop()
{
Blynk.run();
// You can inject your own code or combine it with other sketches.
// Check other examples on how to communicate with Blynk. Remember
// to avoid delay() function!
}
#include <Arduino.h>

#include <BlynkSimpleStream.h>

#include <ESP8266_Lib.h>

#include <BlynkSimpleShieldEsp8266.h>

/* Comment this out to disable prints and save space */

#define BLYNK_PRINT Serial

// You should get Auth Token in the Blynk App.

// Go to the Project Settings (nut icon).

char auth[] = "bMLxyWgMZ9YS";

// Your WiFi credentials.

// Set password to "" for open networks.

char ssid[] = "No Network";

char pass[] = "Nopassword";

// Hardware Serial on Mega, Leonardo, Micro...

//#define EspSerial Serial1

// or Software Serial on Uno, Nano...

#include <SoftwareSerial.h>

SoftwareSerial EspSerial(2, 3); // RX, TX

// Your ESP8266 baud rate:

#define ESP8266_BAUD 9600

int G=8;

int buttonstate1=0;

ESP8266 wifi(&EspSerial);

void setup()

{

  // Debug console

  Serial.begin(9600);

  // Set ESP8266 baud rate

  pinMode(G, OUTPUT);

  Blynk.begin(auth, wifi, ssid, pass);

  // You can also specify server:

  //Blynk.begin(auth, wifi, ssid, pass, "blynk-cloud.com", 80);

  //Blynk.begin(auth, wifi, ssid, pass, IPAddress(192,168,1,100), 8080);

}

BLYNK_WRITE(V1)

{

  buttonstate1 = param.asInt();

  if(buttonstate1 == 1)

 {

  digitalWrite(G, HIGH);

 }

 else

 {

  digitalWrite(G, LOW);

 }

}

void loop()

{

  Blynk.run();

  // You can inject your own code or combine it with other sketches.

  // Check other examples on how to communicate with Blynk. Remember

  // to avoid delay() function!

}
I have changed it… But now I want you to see… It’s regarding Blynk libraries…
#include <Arduino.h>
#include <BlynkSimpleStream.h>
#include <ESP8266_Lib.h>
#include <BlynkSimpleShieldEsp8266.h>

/* Comment this out to disable prints and save space */
#define BLYNK_PRINT Serial

// You should get Auth Token in the Blynk App.
// Go to the Project Settings (nut icon).
char auth[] = "bMLxyMZ9YS";

// Your WiFi credentials.
// Set password to "" for open networks.
char ssid[] = "No Network";
char pass[] = "Nopassword";

// Hardware Serial on Mega, Leonardo, Micro...
//#define EspSerial Serial1

// or Software Serial on Uno, Nano...
#include <SoftwareSerial.h>
SoftwareSerial EspSerial(2, 3); // RX, TX

// Your ESP8266 baud rate:
#define ESP8266_BAUD 9600

int G=8;
int buttonstate1=0;

ESP8266 wifi(&EspSerial);

void setup()
{
  // Debug console
  Serial.begin(9600);
  EspSerial.begin(9600);
  // Set ESP8266 baud rate
  pinMode(G, OUTPUT);


  Blynk.begin(auth, wifi, ssid, pass);
  // You can also specify server:
  //Blynk.begin(auth, wifi, ssid, pass, "blynk-cloud.com", 80);
  //Blynk.begin(auth, wifi, ssid, pass, IPAddress(192,168,1,100), 8080);
}

BLYNK_WRITE(V1)
{
  buttonstate1 = param.asInt();

  if(buttonstate1 == 1)
 {
  digitalWrite(G, HIGH);
 }
 else
 {
  digitalWrite(G, LOW);
 }
}


void loop()

{
  Blynk.run();
  // You can inject your own code or combine it with other sketches.
  // Check other examples on how to communicate with Blynk. Remember
  // to avoid delay() function!
}
Looks like it’s not finished yet…
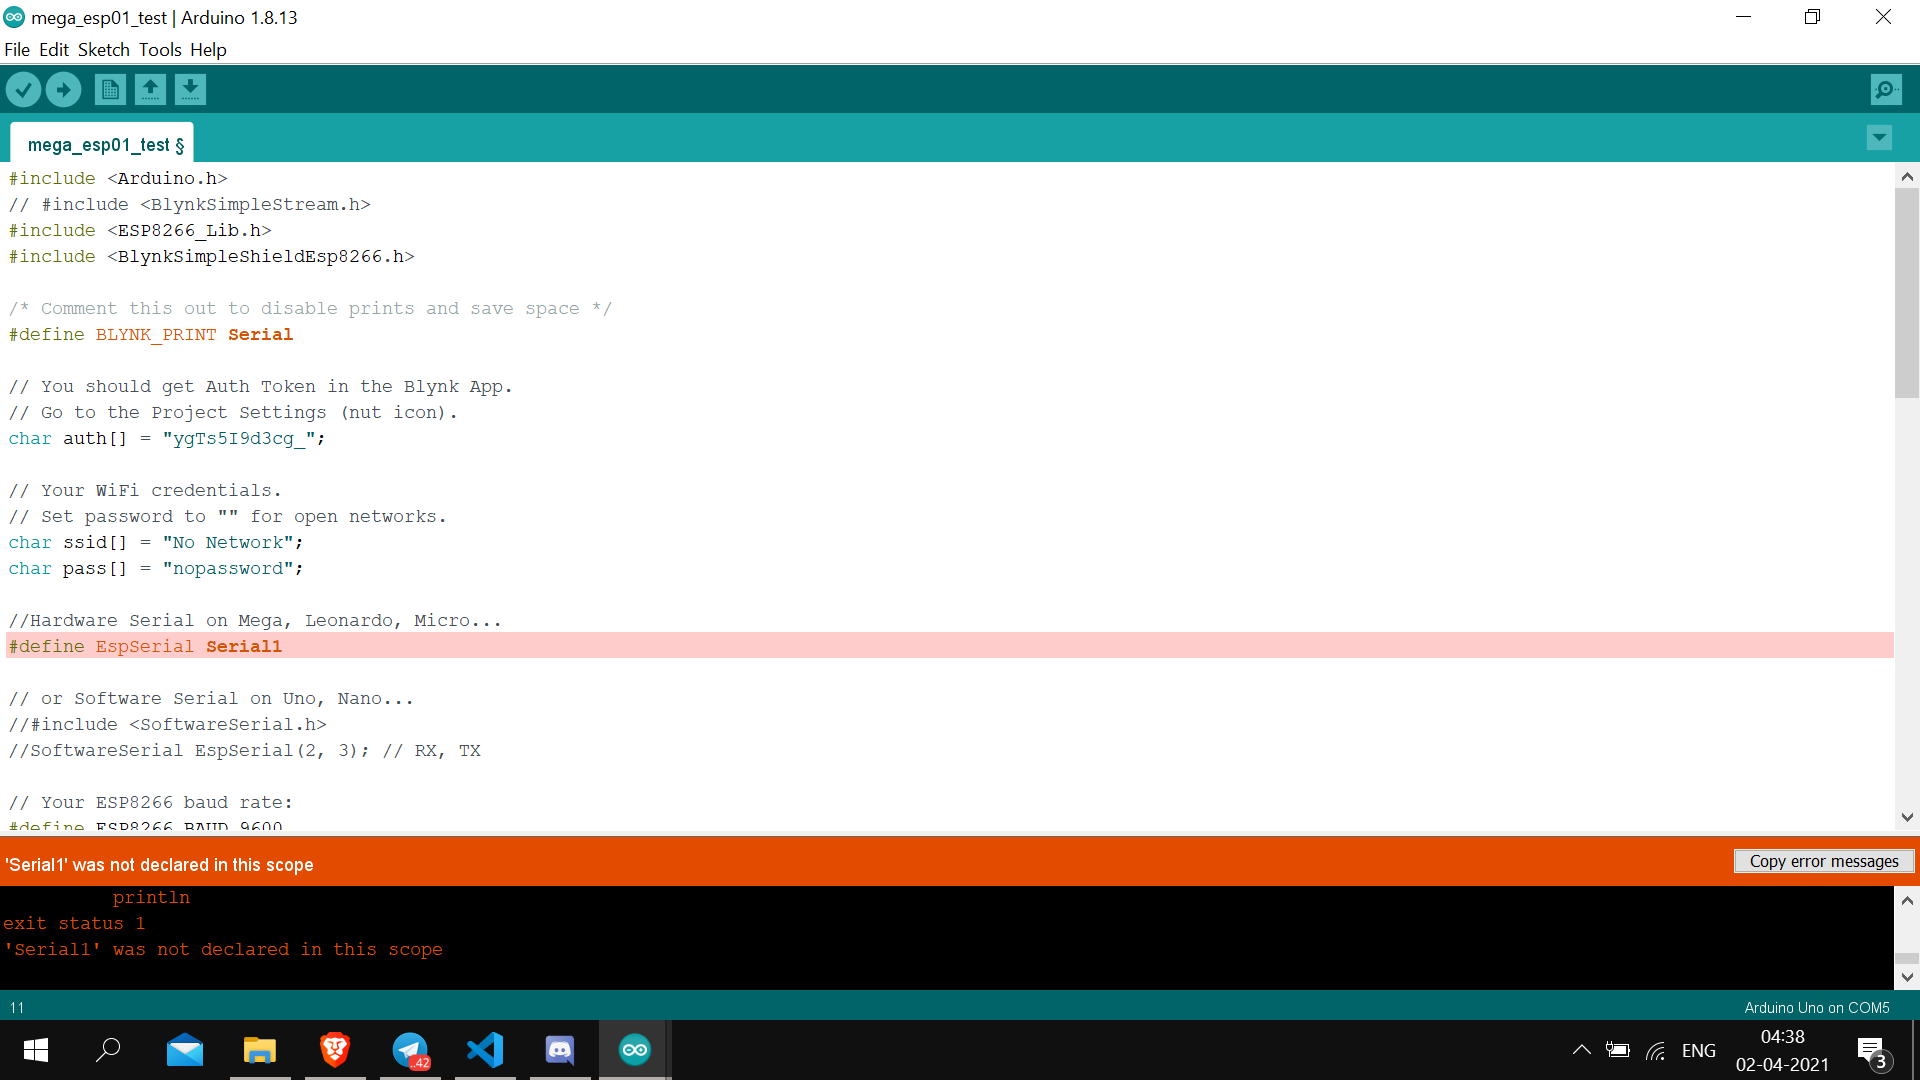
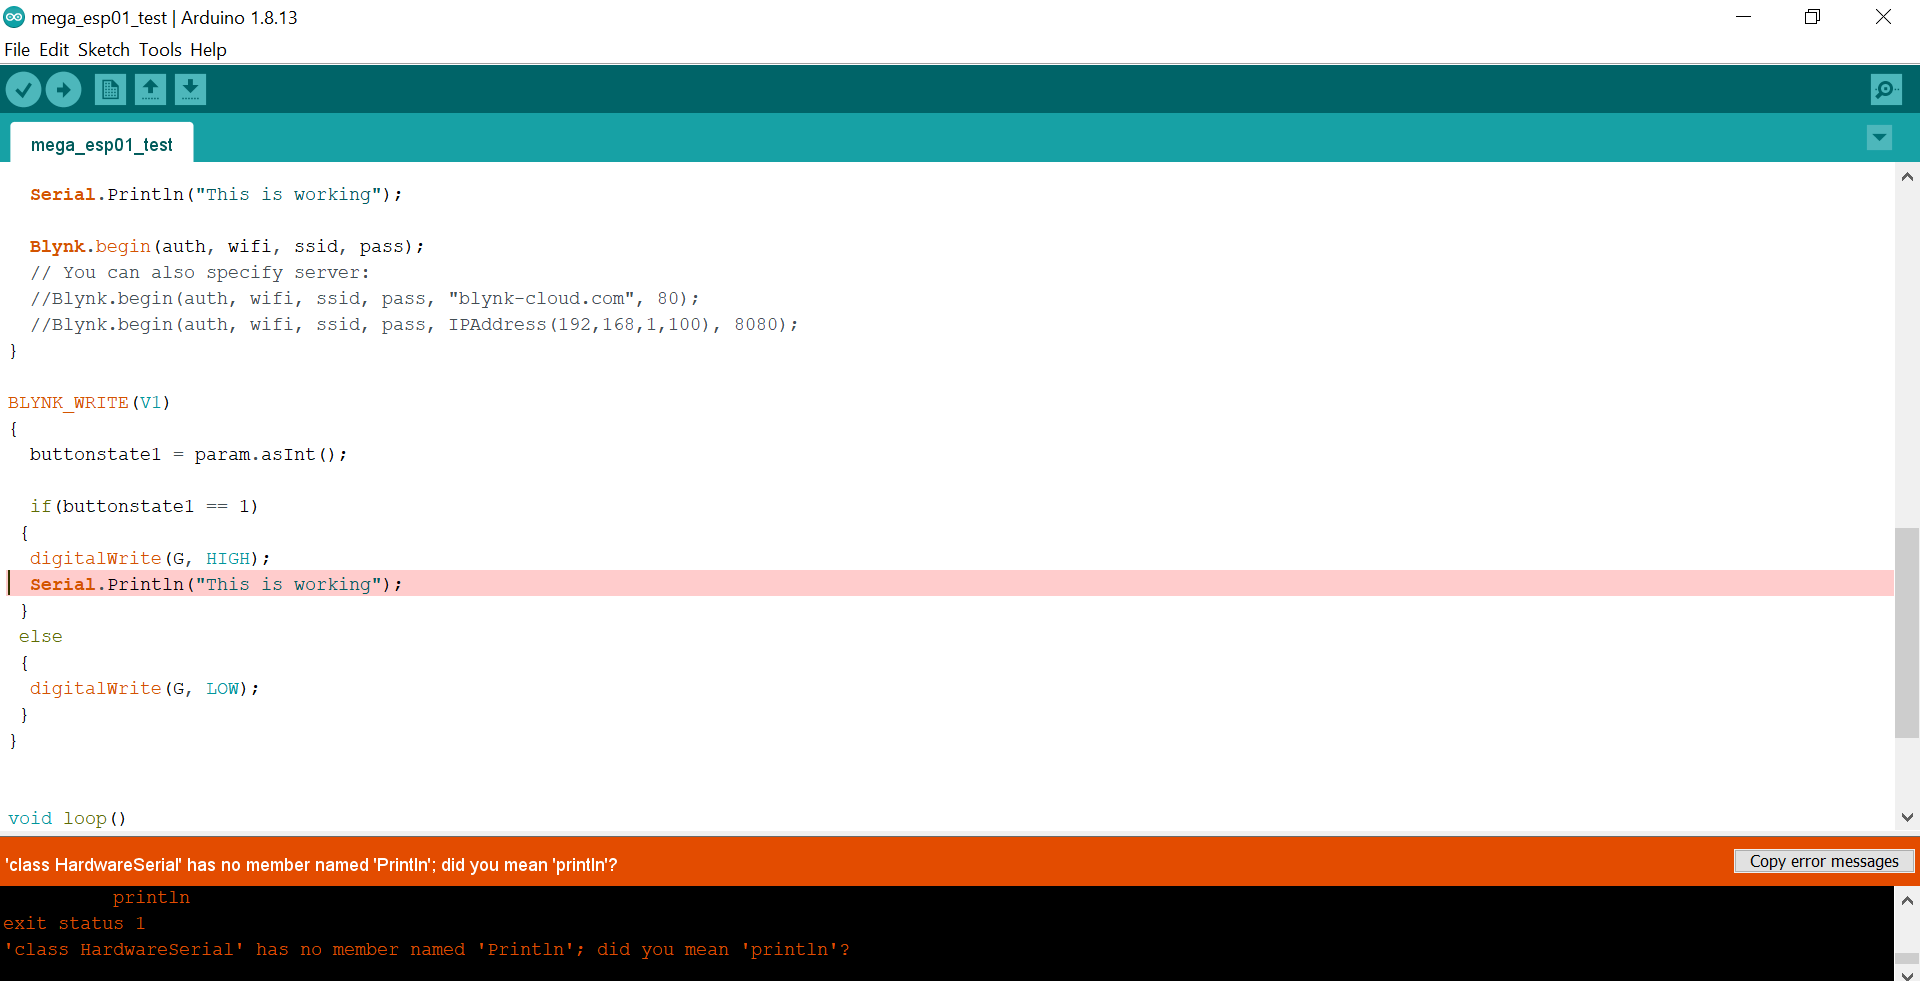
I’m running into trouble in mega. I have connected Rx and Tx to 18 & 19 to mega respectively. The code is getting compilation error it says Serial1 is not declared in the scope. Please help.
#include <Arduino.h>
// #include <BlynkSimpleStream.h>
#include <ESP8266_Lib.h>
#include <BlynkSimpleShieldEsp8266.h>

/* Comment this out to disable prints and save space */
#define BLYNK_PRINT Serial

// You should get Auth Token in the Blynk App.
// Go to the Project Settings (nut icon).
char auth[] = "ygTs5I9cg_";

// Your WiFi credentials.
// Set password to "" for open networks.
char ssid[] = "No Network";
char pass[] = "nopassword";

//Hardware Serial on Mega, Leonardo, Micro...
#define EspSerial Serial1

// or Software Serial on Uno, Nano...
//#include <SoftwareSerial.h>
//SoftwareSerial EspSerial(2, 3); // RX, TX

// Your ESP8266 baud rate:
#define ESP8266_BAUD 9600

int G=8;
int buttonstate1=0;

ESP8266 wifi(&EspSerial);

void setup()
{
  // Debug console
  // Serial.begin(9600);
  EspSerial.begin(9600);
  Serial.begin(9600);
  // Set ESP8266 baud rate
  pinMode(G, OUTPUT);
  pinMode(13, OUTPUT);

  Serial.Println("This is working");

  Blynk.begin(auth, wifi, ssid, pass);
  // You can also specify server:
  //Blynk.begin(auth, wifi, ssid, pass, "blynk-cloud.com", 80);
  //Blynk.begin(auth, wifi, ssid, pass, IPAddress(192,168,1,100), 8080);
}

BLYNK_WRITE(V1)
{
  buttonstate1 = param.asInt();

  if(buttonstate1 == 1)
 {
  digitalWrite(G, HIGH);

 }
 else
 {
  digitalWrite(G, LOW);
 }
}


void loop()

{
  Blynk.run();
  // You can inject your own code or combine it with other sketches.
  // Check other examples on how to communicate with Blynk. Remember
  // to avoid delay() function!
}