Email example reset my hardware

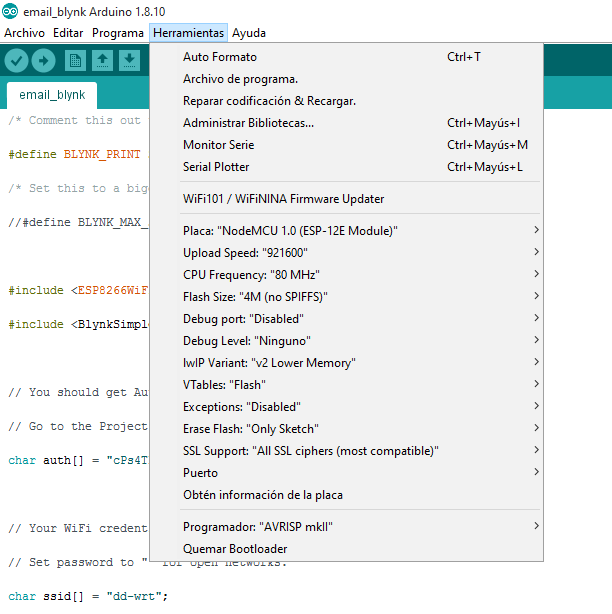
HARDWARE: NodeMCU with Esp8266
Smartphone: Android 9
Blynk server
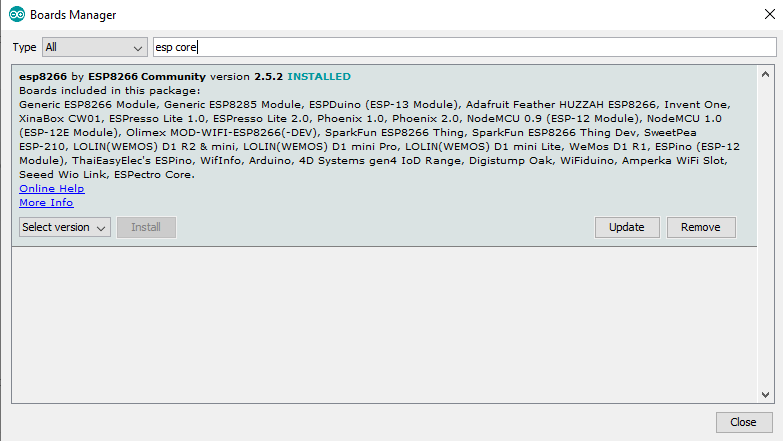
Blynk 0.6.1 (I have a question, attached photo)

the libraries are not related?, the declared library does not exist if it is black?

Hi everyone,

It is my first post, I hope to participate a lot and I will be direct (my English is not very good, but I will try, sorry if some things do not make sense)

I have done different projects with blynk, but now I have a problem that I cannot solve, my hardware constantly restarts with the “email example” and I don’t understand why, even with all the pins disconnected. To make sure it is not my Wi-Fi connection or my hardware I try other codes and they work without any problem.

I would like to know how the email function works, I read that it only works with one email at a time, is that so? Or can I send to different entities? and also know if something in my code is restarting my hardware

pd: my programmer skills are not very high (yet)

BLYNK EXAMPLE
https://examples.blynk.cc/?board=NodeMCU&shield=ESP8266%20WiFi&example=Widgets%2FEmail


/* Comment this out to disable prints and save space */
#define BLYNK_PRINT Serial
/* Set this to a bigger number, to enable sending longer messages */
//#define BLYNK_MAX_SENDBYTES 128

#include <ESP8266WiFi.h>
#include <BlynkSimpleEsp8266.h>

// You should get Auth Token in the Blynk App.
// Go to the Project Settings (nut icon).
char auth[] = "";

// Your WiFi credentials.
// Set password to "" for open networks.
char ssid[] = "";
char pass[] = "";

void emailfun()
{


  bool a = digitalRead(14); 

  if (a) // You can write any condition to trigger e-mail sending
  {
    Serial.println("Button is pressed."); // This can be seen in the Serial Monitor
    Blynk.email("", "Prueba 1", "text");

    // Or, if you want to use the email specified in the App (like for App Export):
    //Blynk.email("Subject: Button Logger", "You just pushed the button...");
  }
}

void setup()
{
  Serial.begin(9600);
  Blynk.begin(auth, ssid, pass);

  // Setting the button
  pinMode(14, INPUT);
  // Attach pin 14 interrupt to our handler
  // attachInterrupt(digitalPinToInterrupt(14), emailfun, CHANGE);
  attachInterrupt(digitalPinToInterrupt(14), emailfun, FALLING);
}

void loop()
{
  Blynk.run();
}

You didn’t use the example correctly, and you must be very careful in using ISR (Interrupt Service Routine) and it’s better not use ISR for not critical task.

If you have multiple sent emails for one press, research for ISR Debounce in previous topics.

Change your code to something similar to this code and test


/* Comment this out to disable prints and save space */
#define BLYNK_PRINT Serial
/* Set this to a bigger number, to enable sending longer messages */
//#define BLYNK_MAX_SENDBYTES 128

#include <ESP8266WiFi.h>
#include <BlynkSimpleEsp8266.h>

// You should get Auth Token in the Blynk App.
// Go to the Project Settings (nut icon).
char auth[] = "";

// Your WiFi credentials.
// Set password to "" for open networks.
char ssid[] = "";
char pass[] = "";

void emailfun()
{
  //bool a = digitalRead(14); 
  // Only activate email sending when button is pressed.
  // Otherwise, system will crash because too many ISRs
  bool a = !digitalRead(14); 

  if (a) // You can write any condition to trigger e-mail sending
  {
     // If crashed, comment out Serial.println
     Serial.println("Button is pressed."); // This can be seen in the Serial Monitor
     // Not good to use this inside ISR, if having problem, move out and use a timer to poll 
     // Blynk.email("", "Prueba 1", "text");
     Blynk.email("your_email@mail.com", "Subject: Button Logger", "You just pushed the button...");

     // Or, if you want to use the email specified in the App (like for App Export):
     //Blynk.email("Subject: Button Logger", "You just pushed the button...");
  }
}

void setup()
{
  Serial.begin(9600);
  Blynk.begin(auth, ssid, pass);

  // Setting the button
  // pinMode(14, INPUT);
  // Must have a pull-up to make sure if not press the button, the digitalRead will be HIGH
  pinMode(14, INPUT_PULLUP);

  // Attach pin 14 interrupt to our handler
  //attachInterrupt(digitalPinToInterrupt(14), emailfun, CHANGE);
  attachInterrupt(digitalPinToInterrupt(14), emailfun, FALLING);
}

void loop()
{
  Blynk.run();
}


i try with your code, without any connection and my hardware continues to restart, the library “BlynkSimpleEsp8266.h” should be orange to be included? Is that the problem?

No, that has nothing to do with anything. Developers can include a keywords text file with the library to tell the Arduino IDE which words should be displayed in different colours. The fact that this is t appearing as orange simply means the the optional text file either doesn’t exist, or doesn’t contain the necessary entry for this keyword.

What are you seeing in your serial monitor?

Pete.

i see this, and I don’t know what it means

ets Jan 8 2013,rst cause:2, boot mode:(3,6)

load 0x4010f000, len 1384, room 16
tail 8
chksum 0x2d
csum 0x2d
v8b899c12
~ld

Captura

Exactly which NodeMCU board are you using, and what board settings are you choosing when you compile/upload your sketch?
What version of the Arduino ESP8266 core are you using, and what version of the IDE?

Pete.

I have nodemcu v3, i choose nodemcu 1.0 to compile (because that is for nodemcu v2 and v3) and the lastet arduino version.
“version of the arduino esp8266 core” i dont know, where i see that?

Boards, Board Manager, scroll down to the bottom and look for ESP core by ESP community.

What other settings are you using for the compilation/upload?

Pete.

Can I continue with the topic on Monday? I have the computer I compile with at work and I don’t remember all these settings.
I am really grateful for the help, thank you very much

1 Like

You can use this code I change the original example. It’s tested and working correctly:

/* Comment this out to disable prints and save space */
#define BLYNK_PRINT Serial

#define USE_BLYNK_WM      false

#include <ESP8266WiFi.h>

#if USE_BLYNK_WM
  #include <BlynkSimpleEsp8266_WM.h>
#else
  #include <BlynkSimpleEsp8266.h>
  // You should get Auth Token in the Blynk App.
  // Go to the Project Settings (nut icon).
  char auth[] = "";
  
  // Your WiFi credentials.
  // Set password to "" for open networks.
  char ssid[] = "";
  char pass[] = "";  
#endif

/* Set this to a bigger number, to enable sending longer messages */
//#define BLYNK_MAX_SENDBYTES 128

BlynkTimer timer;

#define PIN_D3            0         // Pin D3 mapped to pin GPIO0/FLASH of ESP8266
#define PIN_D5            14        // Pin D5 mapped to pin GPIO14/HSCLK of ESP8266

volatile bool toSendEmail = false;

// Button must be connected between GND and PIN_D5(GPIO14), with internal pullup
void ICACHE_RAM_ATTR emailfun()
{
  // Just set a flag when button is pressed. The timer will call function to take care of sending email
  if (!digitalRead(PIN_D3) && !toSendEmail) // You can write any condition to trigger e-mail sending
  {
    toSendEmail = true;
  }
}

void sendEmail()
{
  if (toSendEmail)
  {
    toSendEmail = false;
    Serial.println("Sending email"); // This can be seen in the Serial Monitor
    Blynk.email("your_email@mail.com", "Subject: Button Logger", "You just pushed the button...");
  }
}

// Check every 10s to send email if flag set
#define SEND_EMAIL_CHECK_INTERVAL     10000L

void setup()
{
  // Must have a pull-up to make sure if not press the button, the digitalRead will be HIGH
  pinMode(PIN_D3, INPUT_PULLUP);

  // Remember to change terminal baud rate to 115200
  Serial.begin(115200);

  #if USE_BLYNK_WM
    Blynk.begin();
  #else
    Blynk.begin(auth, ssid, pass);
  #endif

  // Attach PIN_D3 interrupt to our handler
  attachInterrupt(digitalPinToInterrupt(PIN_D3), emailfun, FALLING);
  timer.setInterval(SEND_EMAIL_CHECK_INTERVAL, sendEmail);
}

void loop()
{
  Blynk.run();
  timer.run();
}

In this example, ISR is not used to send email directly, but only to set a flag, Then the 10s timer will pick up the flag change and do the heavy job.

Remember

  1. to add Email Widget in your APP so that the email can work.
  2. to change terminal baud rate to 115200
  3. Change your_email@mail.com to correct email address.
  4. Change Email Widget email to correct recipient’s email address.

You can also change the button pin. Currently I’m using the D3 / “FLASH” button in NodeMCU for easier test.