Hello guys
I hope you all doing well . I am working in a project and I am totally new to Blynk I have try my best to learn but most video were made by the old version of Blynk thus my case is that I already built the code but I do not know how can I make my idea happen using Blynk
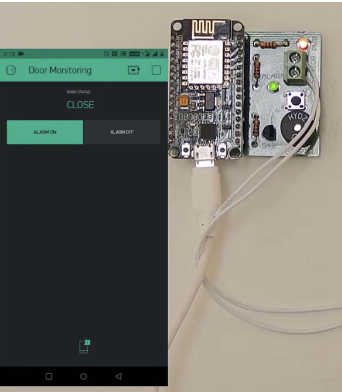
I would will to make a device that will detect whether the door is open or close and sens the information to your smartphone using the BLYNK server,.
So For connection I used GPIO pin number instead of the digital pin number.
Ok. Follow the link on how to migrate to BlynkIoT. And edit your code as required. Configure the data streams on web dashboard.
You can find plenty of tutorials out there on the internet. Try them. Once you have made the necessary changes to your old code, and if does not work then you may post it here and seek help.
hello, I hope you doing well. I have finished configuring my devices and editing the code. So now the code is ready and my device is online so the next step which is my issue is how to make the notification and buttons work as I describe before like the picture I showed you cause I really could not figure out
code
#define BLYNK_TEMPLATE_ID           "00000000"
#define BLYNK_DEVICE_NAME           "Door Notification"
#define BLYNK_PRINT Serial


#include <ESP8266WiFi.h>
#include <BlynkSimpleEsp8266.h>

// You should get Auth Token in the Blynk App.
// Go to the Project Settings (nut icon).
char auth[] = "0000000000000000";

// Your WiFi credentials.
// Set password to "" for open networks.
char ssid[] = "0";
char pass[] = "0000000";

bool alarm_mode = false ;
int sensor = 5;  //GPIO Pin number on which sensor is connected
int buzzer = 15; //GPIO Pin number on which buzzer is connected
int alarm_led = 4; //GPIO Pin number on which alarm status led is connected

BlynkTimer timer;

void myTimerEvent(){

  if(digitalRead(sensor) == 0){
    Blynk.virtualWrite(V0, "CLOSE");

  }
  if(digitalRead(sensor) == 1){
    Blynk.virtualWrite(V0, "OPEN");
    if(alarm_mode == true){
      Blynk.notify("ALERT, Door is open, Alarm Mode ON");
      digitalWrite(buzzer, HIGH);
      }
  }
  }

BLYNK_WRITE(V1) {
  switch (param.asInt()) {
    case 1: { // Item 1
      Serial.println("Item 1 selected");
      alarm_mode = true;
      digitalWrite(alarm_led, HIGH);
      break;
    }
    case 2: { // Item 2
      Serial.println("Item 2 selected");
      alarm_mode = false;
      digitalWrite(buzzer, LOW);
      digitalWrite(alarm_led, LOW);
      break;
    }
  }
}

void setup()
{
  pinMode(sensor, INPUT_PULLUP);
  pinMode(buzzer, OUTPUT);
  pinMode(alarm_led, OUTPUT);

  // Debug console
  Serial.begin(9600);

  Blynk.begin(auth, ssid, pass);

  // Setup a function to be called every second
  timer.setInterval(1000L, myTimerEvent);
  //timer.setInterval(500L, myTimerEvent);
}

void loop()
{
  Blynk.run();
  timer.run(); // Initiates BlynkTimer
}
If you are on free plan you are left with LCD widget to display the data you need.
Or else use the New Automations to send an notification when the door opens or closes.
please edit your post, using the pencil icon at the bottom, and add triple backticks at the beginning and end of your code so that it displays correctly. Triple backticks look like this: ```
EDIT:
I think it is the segment switch that has been used in the Blynk1.0
But that is not available in the free plan. So you will have to modify your code to work with LCD widget. You can find examples here in forum or on example builder
Yes, of course!
One of the most versatile widgets available.
It was even better in Legacy, as you could simply enter the text you wanted, and use them as a divider. Now you’d probably assign a default value to the datastream.