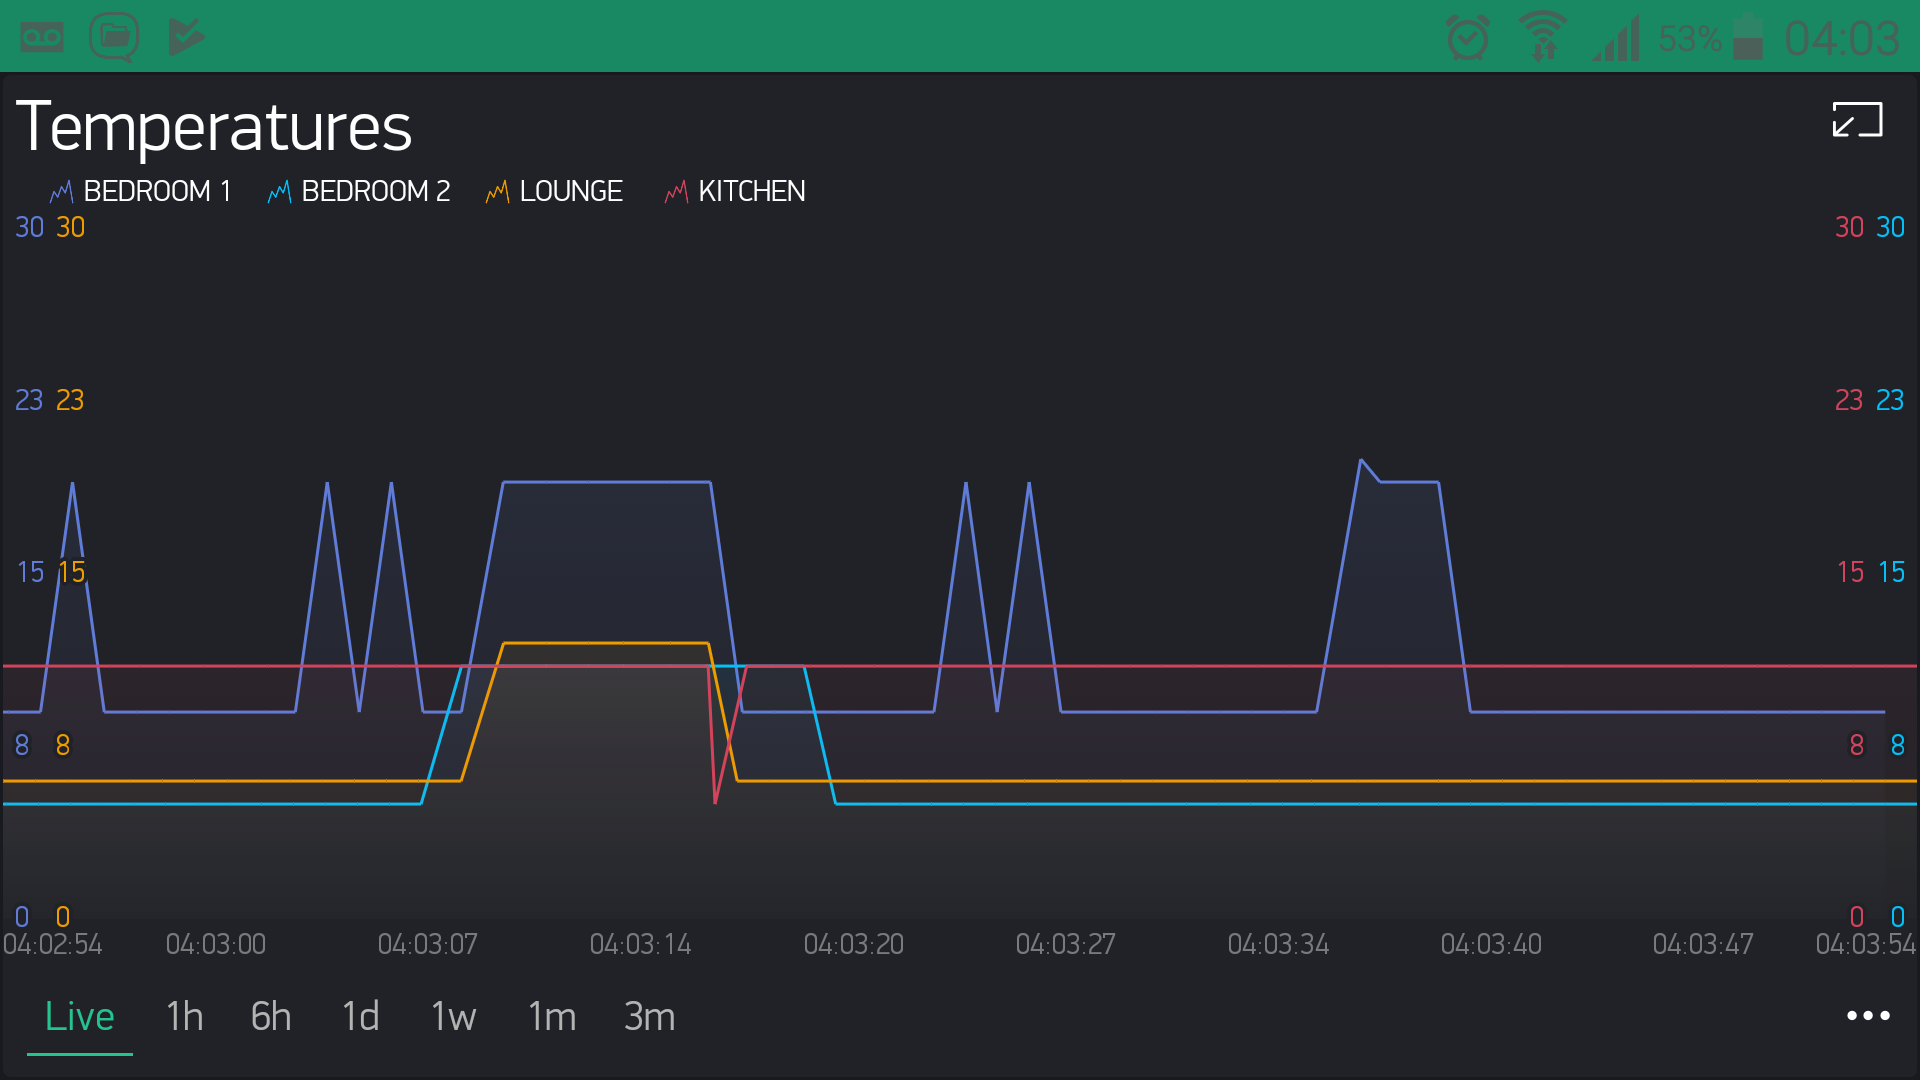
Any ideas as to why i get such wild temp readings?
it drops then reads correctly and then repeats, i have 4 DHT11 sensors and they all act the same.
    #define BLYNK_PRINT Serial    // Comment this out to disable prints and save space
    #include <ESP8266WiFi.h>
    #include <BlynkSimpleEsp8266.h>
    #include <SimpleTimer.h>
    #include <dht11.h>
    dht11 DHT;
    #define DHT11_PIN 2
    // You should get Auth Token in the Blynk App.
    // Go to the Project Settings (nut icon).
    char auth[] = "*************"; //insert here your token generated by Blynk

    SimpleTimer timer;

    void setup()
    {
      Serial.begin(115200); // See the connection status in Serial Monitor
       Blynk.begin(auth, "*************", "*************", IPAddress(*************));

      // Setup a function to be called every second
      timer.setInterval(6000L, sendUptime);
    }

    // This function sends Arduino's up time every second to Virtual Pin (5).
    // In the app, Widget's reading frequency should be set to PUSH. This means
    // that you define how often to send data to Blynk App.
    void sendUptime()
    {
      // You can send any value at any time.
      // Please don't send more that 10 values per second.
      Blynk.virtualWrite(10, DHT.temperature); //virtual pin
      Blynk.virtualWrite(11, DHT.humidity); // virtual pin
    }

    void loop()
    {
      Blynk.run(); // Initiates Blynk
      timer.run(); // Initiates SimpleTimer
      int chk;
      chk = DHT.read(DHT11_PIN);    // READ DATA
    }
you can also use the RunningMedian library to smooth out readings:
int chk;
//roof DHT22 section
chk = DHT.read22(ROOF_DHT22_PIN);
roofHum = DHT.humidity;
medianRoofHum = samplesRoofHum.getMedian();
samplesRoofHum.add(roofHum); // this is the Running Median command
roofTemp = DHT.temperature;
medianRoofTemp = samplesRoofTemp.getMedian();
samplesRoofTemp.add(roofTemp); // this is the Running Median command
roofDewPoint = dewPoint(DHT.temperature, DHT.humidity);
medianRoofDewPoint = samplesRoofDewPoint.getMedian();
samplesRoofDewPoint.add(roofDewPoint); // this is the Running Median command
Blynk.virtualWrite(V16, medianRoofTemp); // this sends the calculation to the Blynk virtual pin
Blynk.virtualWrite(V18, medianRoofHum); // this sends the reading to the Blynk virtual pin
Blynk.virtualWrite(V30, medianRoofDewPoint); // this sends the calculation to the Blynk virtual pin
Soooo sorry… and a bit embarrassed… dyslexic tendency gets the best of me when I am bleary headed…I had just woke up and clearly wasn’t seeing straight
However, like me at times… this statement holds true
thanks to everyone for commenting.
thanks to @Skybound your answer worked a treat,
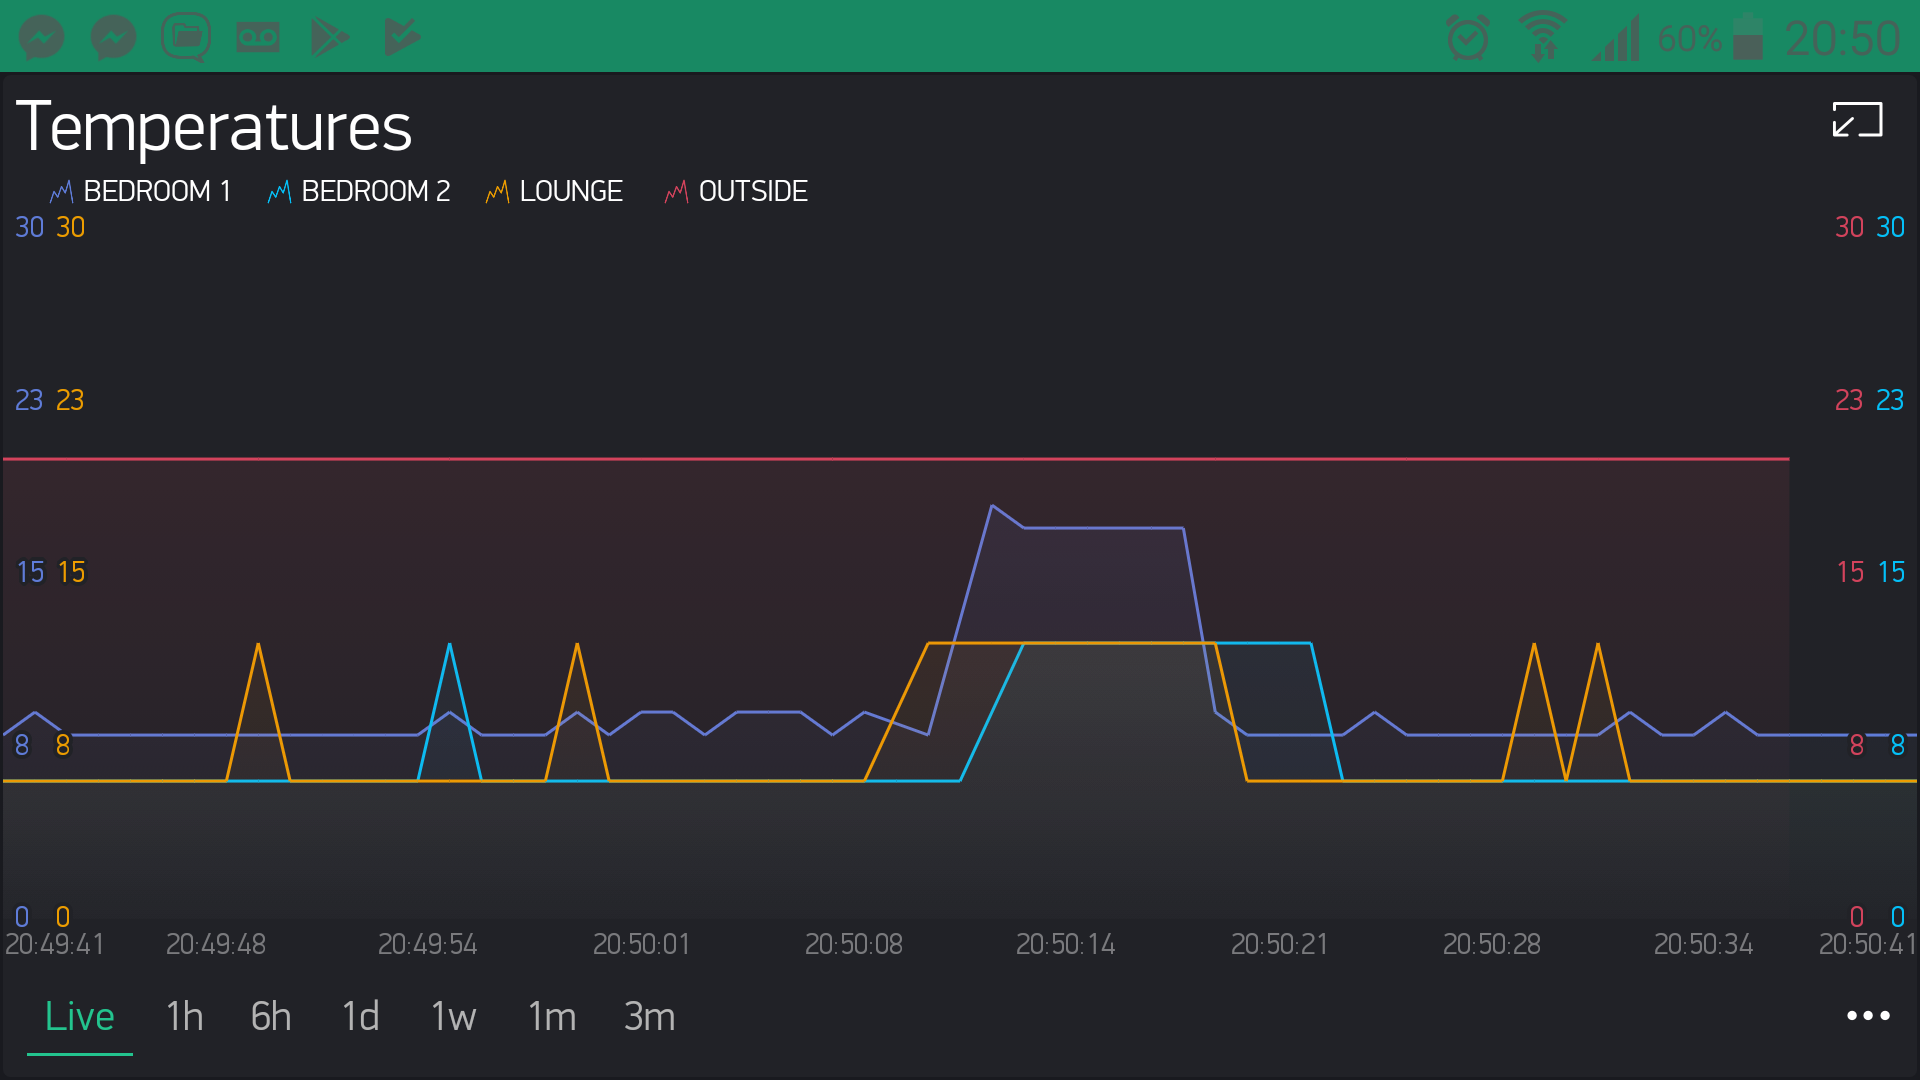
here is a screen shot showing the constant red temp line named “outside” in comparison to the other 3 not yet edited. i chose a 6 second interval as it is not important for it’s purpose.
#define BLYNK_PRINT Serial // Comment this out to disable prints and save space
#include <ESP8266WiFi.h>
#include <BlynkSimpleEsp8266.h>
#include <SimpleTimer.h>
#include <dht11.h>
dht11 DHT;
#define DHT11_PIN 2
// You should get Auth Token in the Blynk App.
// Go to the Project Settings (nut icon).
char auth[] = "*************"; //insert here your token generated by Blynk
SimpleTimer timer;
void setup()
{
Serial.begin(115200); // See the connection status in Serial Monitor
Blynk.begin(auth, "*************", "*************", IPAddress(*************));
// Setup a function to be called every second
timer.setInterval(6000L, sendUptime);
}
// This function sends Arduino's up time every second to Virtual Pin (5).
// In the app, Widget's reading frequency should be set to PUSH. This means
// that you define how often to send data to Blynk App.
void sendUptime()
{
// You can send any value at any time.
// Please don't send more that 10 values per second.
Blynk.virtualWrite(10, DHT.temperature); //virtual pin
Blynk.virtualWrite(11, DHT.humidity); // virtual pin
  int chk;
  chk = DHT.read(DHT11_PIN);    // READ DATA
}
void loop()
{
Blynk.run(); // Initiates Blynk
timer.run(); // Initiates SimpleTimer
}
{
  // You can send any value at any time.
  // Please don't send more that 10 values per second.
  Blynk.virtualWrite(10, DHT.temperature); //virtual pin
  Blynk.virtualWrite(11, DHT.humidity); // virtual pin
int chk;
  chk = DHT.read(DHT11_PIN);    // READ DATA
}
i think it should be in this order:
{
  // You can send any value at any time.
  // Please don't send more that 10 values per second.
int chk;
  chk = DHT.read(DHT11_PIN);    // READ DATA

  Blynk.virtualWrite(10, DHT.temperature); //virtual pin
  Blynk.virtualWrite(11, DHT.humidity); // virtual pin
}
Are you sure its not something external, like having the sensors where the sun shines directly on them from time to time, causing a temperature spike? OK, wrong time of day, but maybe a central heating radiator or some such?
i think it causes the DHT.read() instruction that is specified in the library to operate:
Arduino Playground - HomePage
The interface of the class supports only one function for reading the humidity and temperature from the sensors and store it in two members of the class. The read() function verifies the checksum of the data transmission and it has a time out function. If there is a checksum error the values of temperature and/or humidity might still be valid.
The class has 6 read functions read11(PIN), read(PIN) and readxx(PIN) which have essentially the same interface. They read the DHT connected to PIN, and fill the two class members temperature and humidity. Multiple reads from these class members (H & T) will return the same (previous) values until a new read is done.
The readXX() functions return:
DHTLIB_OK (0) : if the sensor sample and its checksum is OK.
DHTLIB_ERROR_CHECKSUM (-1) : if the checksum test failed. This means that data was received but may be incorrect.
DHTLIB_ERROR_TIMEOUT (-2) : if a timeout occurred, communication failed.
In case of a DHTLIB_ERROR_TIMEOUT, humidity and temperature will both get the value DHTLIB_INVALID_VALUE. In case of DHTLIB_ERROR_CHECKSUM the values of humidity and temperature are left unchanged as it is impossible to determine which byte failed in the checksum. It is up to the programmer to decide what to do. One can compare with previous value, but better reread the sensor.
The class is kept simple and with one instance it is possible to read multiple, even different sensors, provided each sensor has a separate pin. Please note that the values of temperature and humidity will be overwritten with every call. So either copy those values asap of use an instance of the class per sensor. Since version 0.1.04 the temperature and humidity are set to DHTLIB_INVALID_VALUE if there is a DHTLIB_ERROR_TIMEOUT to make explicit there is something wrong.
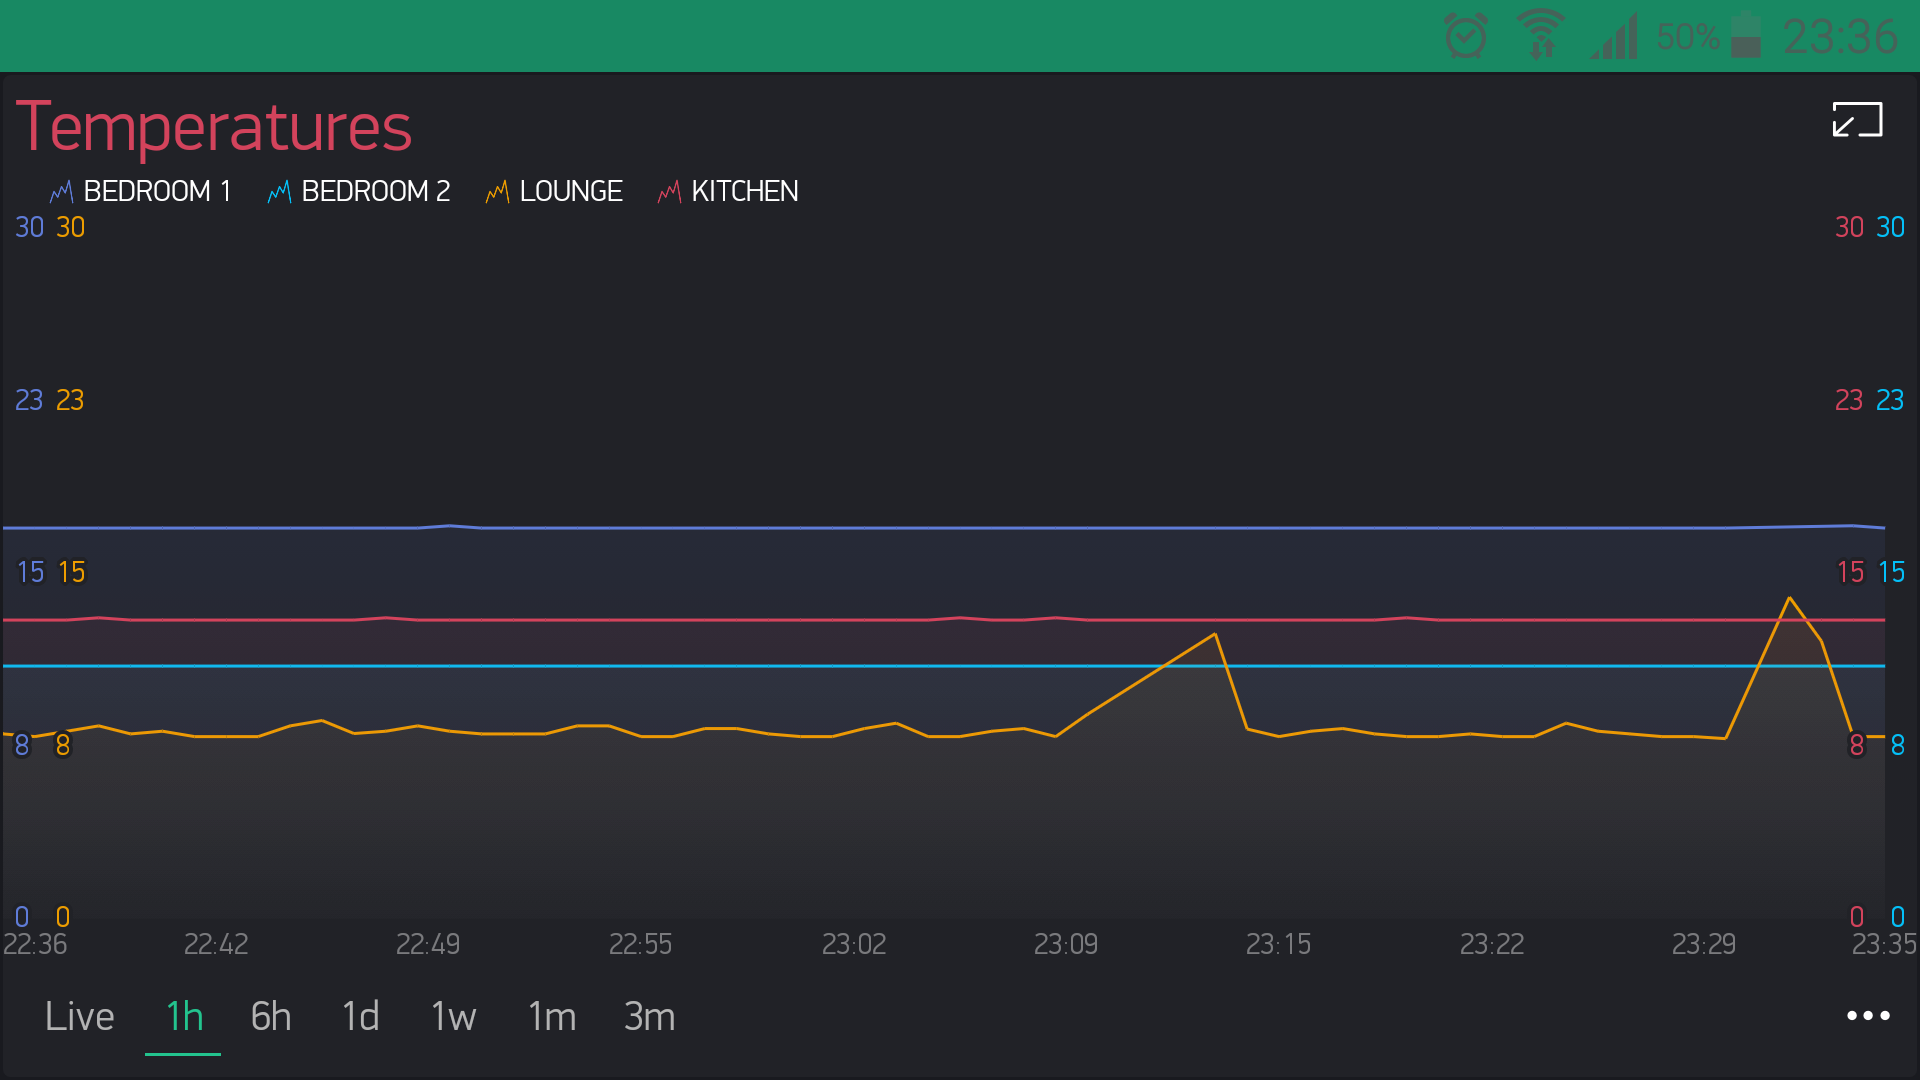
Just to end with, above screensot shows 3 DHT11 sensors with OTA modified code with 6 second intervals in different rooms at different temperatures. The erratic yellow line is the unmodified DHT11 sensor with only a one second interval. All 4 ESP’s used were ESP-01 using GPIO2 as the data pin.
There is one strange anomaly, all 4 sensors give very odd Humidity readings, i mean like from 0, 25, 45, 100.
The DHT11 modules were bought in one batch as were the ESP-01’s as were the 240v to 5v usb wall socket adapters, the wiring and cables are exactly the same gauge and lengths, the SOT223 5v to 3.3V are soldered to the same batch of protoboards in exactly the same way.
so i think that when @Gunner commented that the DHT11’s are not very accurate at the beginning of this topic just about sums it up.
Any ideas why the humidity readings are so not right?