Convert a straightforward arduino code to Blynk environment

Hi,
New to blynk here.
I was trying to get familiarized with Blynk by using stepper motor examples.

void setup() {                
      pinMode(8, OUTPUT);     
      pinMode(9, OUTPUT);
      digitalWrite(8, LOW);
      digitalWrite(9, LOW);
    }
    
void loop() {
      digitalWrite(9, HIGH);
      delay(1);          
      digitalWrite(9, LOW); 
      delay(1);          
    }

How do we integrate a simple application like the above one into Blynk.

Regards,
mvk

From one newb to another, I’m finding that many of the Blynk examples can be reverse engineered and skills gained can be reapplied. What you have posted appears to me to be a blink sketch, not a stepper sketch. That aside, Blynk does have a Servo example that you may be able to use to recreate your sketch. I am on a similar path of adding a pre-existing functional sketch into the Blynk environment to gain networkability and some other perks. It’s definitely a work in progress and will undoubtedly recede my hairline some, but hopefully my hardships can shorten the next Blynker’s journey. Sorry, I don’t have a definitive answer for you, but am willing to dialogue about the matter until someone of higher knowledge can better explain how to achieve your goals.

Best regards!

Hi,
Glad to have a newbie company :slight_smile:
The script is actually for a stepper operation with stepper driver TB6560.
I’m using TI’s CC3200 board. Reverse engineering sounds like a good starter. I will be on it.
Will post of any progress.

1 Like

Can someone who already did this pitch in with your experience?

#include <Stepper.h>
#define STEPS 100

Stepper stepper(STEPS, 2, 3, 4, 5);

int previous = 0;

void setup() {
  // set the speed of the motor to 30 RPMs
  stepper.setSpeed(30);
  curtains();
}

void loop() {
}

void curtains()
{
  stepper.step(-500);
  digitalWrite(2, LOW);
  digitalWrite(3, LOW);
  digitalWrite(4, LOW);
  digitalWrite(5, LOW);

  delay(4000);

  stepper.step(500);
  digitalWrite(2, LOW);
  digitalWrite(3, LOW);
  digitalWrite(4, LOW);
  digitalWrite(5, LOW);
}

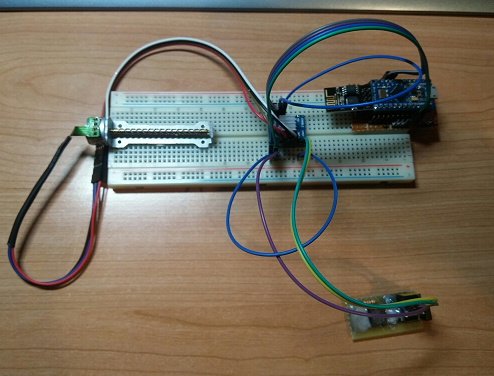
This is, I think, how you would normally address a stepper. I made this as prototype for my curtains, but currently I use it for cleaning my old vinyl records.

When you add Blynk it will look something like this:

#include <Stepper.h>
#define STEPS 100
#define BLYNK_PRINT Serial    // Comment this out to disable prints and save space
#include <ESP8266WiFi.h>
#include <BlynkSimpleEsp8266.h>

// esp-two-relay local pi server
char auth[] = "<authkey here>";

Stepper stepper(STEPS, 2, 3, 4, 5);

int previous = 0;

void setup() 
{
  Serial.begin(9600);
  Blynk.begin(auth, "Wanda2.4", "<wifipwd>", "<ip of server or leave blank for cloud>", 8442);
  // set the speed of the motor to 30 RPMs
  stepper.setSpeed(30);
  curtains();
}

BLYNK_WRITE(v0)
{
  // Execute curtains routine if V0 is pressed in dashboard
  if(param.asInt)
  {
    curtains();
  }
}

void loop() 
{
  Blynk.run();
}

void curtains()
{
  stepper.step(-500);
  digitalWrite(2, LOW);
  digitalWrite(3, LOW);
  digitalWrite(4, LOW);
  digitalWrite(5, LOW);

  delay(4000);

  stepper.step(500);
  digitalWrite(2, LOW);
  digitalWrite(3, LOW);
  digitalWrite(4, LOW);
  digitalWrite(5, LOW);
}

This will execute the curtains void with a press of a button on V0. param.asInt() will catch the value of the virtual button, be it 0 or 1, and act accordingly :slight_smile:

4 Likes

Exactly what I wanted. Thanks a lot!

A query.
Have you been using the default stepper library of Arduino??
I was trying to figure out pin mapping in the library.
In the constructor

Stepper(int number_of_steps, int motor_pin_1, int motor_pin_2,
                                 int motor_pin_3, int motor_pin_4);

what pins on stepper driver (CLK+, CLK-, CW+, CW-) do the pins in constructor correspond to?

Thanks again for the help!

I do not know exactly how the stepper driver works, but yes, I did use the default stepper lib. I bought a stepper driver and just attached the wires as needed. I’m using old printer steppers which have four wires.

I use this driver:

Turns out, with the driver I am using, default library does not work.
And did you use slider widget on Blynk? Say, for controlling speed.
How would that change your sketch?

The slider works pretty much the same, that’s the beauty and elegance of Blynk. Stepper motors are not really suitable for long term use so I’d use a standard motor with PWM control for that. The logic will be a bit different if you use steppers.

We are bound to use stepper for our application.

#define BLYNK_PRINT Serial   
#include <SPI.h>
#include <WiFi.h>
#include <BlynkSimpleTI_CC3200_LaunchXL.h>
#include <AccelStepper.h>


AccelStepper stepper(1, 3, 2);


char auth[] = "***********************";

// WiFi credentials
char ssid[] = "*********";
char pass[] = "*********";       


void setup()
{  
  Serial.begin(9600);
  Blynk.begin(auth, ssid, pass);
  stepper.setMaxSpeed(1000);

}
BLYNK_WRITE(V1)
{
 BLYNK_LOG("Got a value: %s", param.asInt()); 
  stepper.setSpeed(param.asInt());
}


void loop()

{
  stepper.run();
  Blynk.run();

}

V1 is controlled with a slider widget. Min and max values for slider are given (say 0-500).
These values as I understand should be setting speed of my stepper.
Where am I going wrong?

@mvkaxon I think the slider might have developed a bug. See [SOLVED] Slider Widget not linked to app since the changes

I see from the thread that the bug is fixed now. So the above code should work? Bed time now, will be testing tomorrow.

Shouldn’t you be putting the number of steps somewhere it has to make? I’m pretty sure this isn’t going to work. I think I’ll try it today, but with the normale stepper library.

I found this info: http://www.airspayce.com/mikem/arduino/AccelStepper/AFMotor_ConstantSpeed_8pde-example.html

That may help a bit with this library (which looks quite interesting btw, thank you!)

Hi,
I tried the above script after I was told the slider bug had been fixed. Still doesn’t work.
Tried placing Blynk.run() in BLYNK_WRITE{} function.

#define BLYNK_PRINT Serial   
#include <SPI.h>
#include <WiFi.h>
#include <BlynkSimpleTI_CC3200_LaunchXL.h>
#include <AccelStepper.h>


AccelStepper stepper(1, 5, 2);
/
char auth[] = "****************";

// Your WiFi credentials
char ssid[] = "***********";
char pass[] = "**********";        


void setup()
{  
  Serial.begin(9600);
  Blynk.begin(auth, ssid, pass);
  stepper.setMaxSpeed(6400);

}
BLYNK_WRITE(V1)
{
 BLYNK_LOG("Got a value: %s", param.asInt()); 
  stepper.setSpeed(param.asInt());
  stepper.run();
}


void loop()

{
  
  Blynk.run();

}

No success. Any help??

@Pavel Would you mind chipping in? :slight_smile:
Desperately looking for a solution.

@Dmitriy @vshymanskyy - any ideas?

@mvkaxon, sorry, I don’t know how this particular stepper motor driver works, but it looks like it blocks main program operation while it drives the motor. it may be not a good idea to handle both driving and wifi on the same board, so mabe you ma need a separate hardware driver for the motor.

Hi @mvkaxon

Adapt this code to your needs, it works with my Pro-micro and Esp8266 as Shield:
The driver is the A4988

 **************************************************************/

//#define BLYNK_PRINT Serial    // Comment this out to disable prints and save space
#include <SPI.h>
#include <ESP8266_HardSer.h>
#include <BlynkSimpleShieldEsp8266_HardSer.h>
#include <AccelStepper.h>
#define EspSerial Serial1
ESP8266 wifi(EspSerial);


int maximo;

AccelStepper stepper(1, 5, 6); //     5 pinStep, 6 pinDirection

char auth[] = "blablablablablablabla";

void setup()
{
  Serial.begin(9600);
  delay(10);
  EspSerial.begin(9600);
  delay(10);
  Blynk.begin(auth, wifi,"xxxxx","xxxxx","xxx.xxx.x.xx");
  delay(10);
  stepper.setMaxSpeed(200);
  delay(10);
  stepper.setSpeed(50);
  delay(10);
  while (Blynk.connect() == false) {
  }
  
}

BLYNK_WRITE(V0)  //  slider  from  0 a 200 (maximum)
{
int vel = param.asInt(); 
maximo=vel;
stepper.setSpeed(maximo);
}

void loop()
{
  Blynk.run();
  stepper.runSpeed();
  
}

The result:

The video:

I hope you like it!!

2 Likes