Recently I have found some farely powerfull stepper motors in a scrap shop, and I was playing around with them and thought why not control it with blynk. I did what everey one else does in this situation, GOOGLED it first  ! But I was surprised that I didn’t found a completely working project of controlling a stepper properly with blynk and uno. Though I did find some projects or asking help for the project in this forum and instructables but they were with raspberry pi or I didn’t like too many lines of code for this simple task. So I made my own. And after completing, it seems quiet promising and I do think this can be used in many projects, so thought I would share it with you guys. So here it goes.
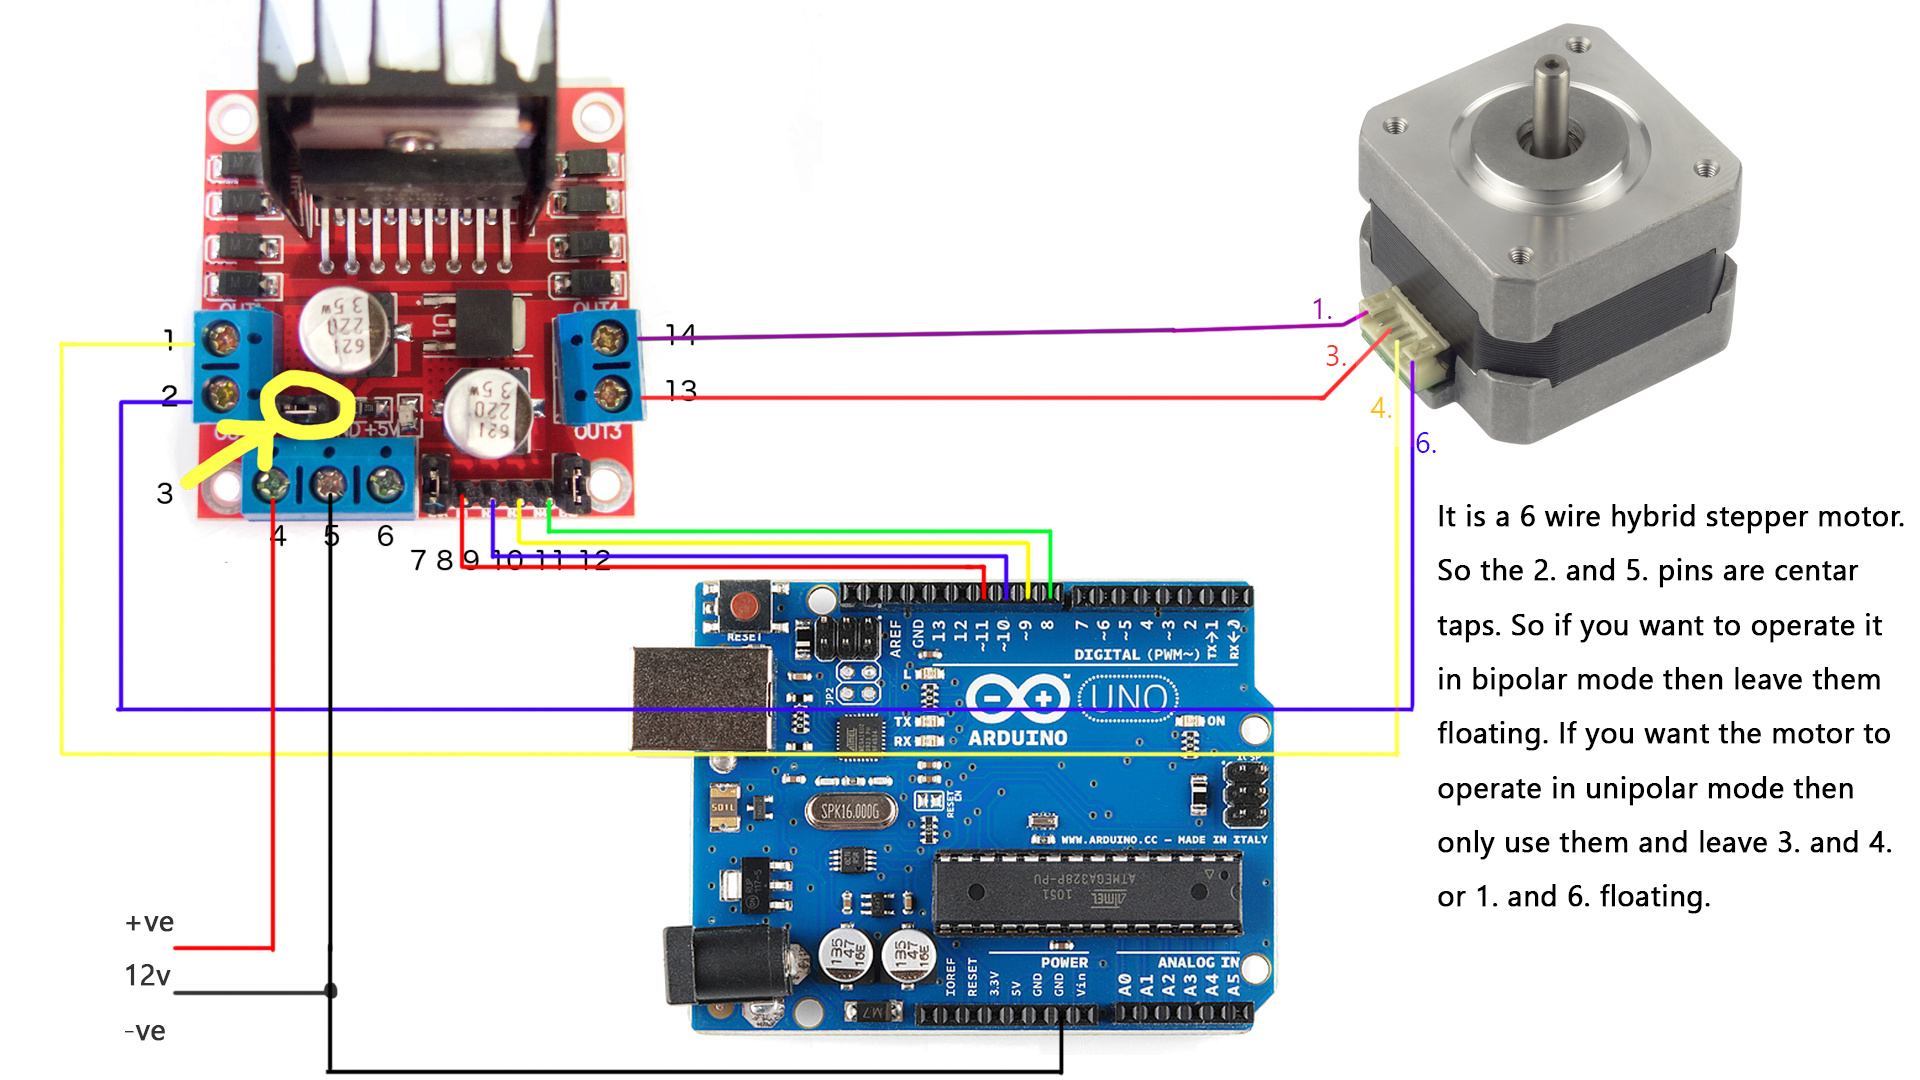
On the hardware side I used the arduino uno and a generic LM298N driver module to control the stepper motor. On the Software side of things I used arduino example code for stepper_speed_control and modified it according to my need. I knew I have to some how simulate a potentiometer to control the speed, so I used virtual pin and a slider to emulate potentiometer values. But then again I have to change the direction too. So used a slider with values ranging from -2000 to +2000 (you can use any range of your choice if they vary from -ve to +ve) and I used the value of the slider to control the speed and sign of the slider value to control the direction, i.e. if the slider value is +ve then it rotates clockwise and if it is -ve then it rotates counterclockwise or vice-versa depending on your wiring. Oh and I also added another push butten on the same virtual pin (V1 in my case) as the slider, with 1 -0 configuration to quickly stop the motor at one click of it. The code and demo operation video is attached below. Do let me know where I can improve. And I powered the arduino via usb cable as I connected it to the server via usb serial. If you want to connect it via wifi or ethernet then you can use a external 12v supply and removing the jumper on LM298N you can take 5V out from it to power your arduino as well. Cheers 
P.S. DO USE AN EXTERNAL POWER SOURCE WITH HIGH AMPEARAGE ( I USED 12V OUTPUT FROM MY OWN VARIABLE POWER SUPPLY MADE FROM AN OLD SMPS). DO NOT USE YOUR ARDUINO BOARD TO POWER THE MOTOR IF YOU DON’T LIKE OVERCOOKED ARDUINOS. AND YEAH THE MOTOR AND SPECIALY THE L298N IS SUPER HOT  WHILE OPERATING (LIKE 100 C OR SO), SO DON’T GET BURNT!
//#define BLYNK_PRINT DebugSerial
// You could use a spare Hardware Serial on boards that have it (like Mega)
#include <SoftwareSerial.h>
SoftwareSerial DebugSerial(2, 3); // RX, TX
#include <BlynkSimpleStream.h>
#include <Stepper.h>
const int stepsPerRevolution = 100; // change this to fit the number of steps per revolution
//for your motor
Stepper myStepper(stepsPerRevolution, 8, 9, 10, 11);
int stepCount = 0;
// You should get Auth Token in the Blynk App.
// Go to the Project Settings (nut icon).
char auth[] = "Auth";
int val;
int absl;
void setup()
{
  // Debug console
  DebugSerial.begin(9600);

  // Blynk will work through Serial
  // Do not read or write this serial manually in your sketch
  Serial.begin(9600);
  Blynk.begin(Serial, auth);
}
BLYNK_WRITE(V1)
{
  int pinValue = param.asInt();
  val = pinValue;
  absl = abs(val);
}
void loop()
{
  Blynk.run();
  int motorSpeed = map(absl, 0, 1023, 0, 100);
    if (motorSpeed > 0) {
    myStepper.setSpeed(motorSpeed);
    // step 1/100 of a revolution:
    myStepper.step(((stepsPerRevolution*val)/absl) / 100);
  }
}