Hi!
This is correct.
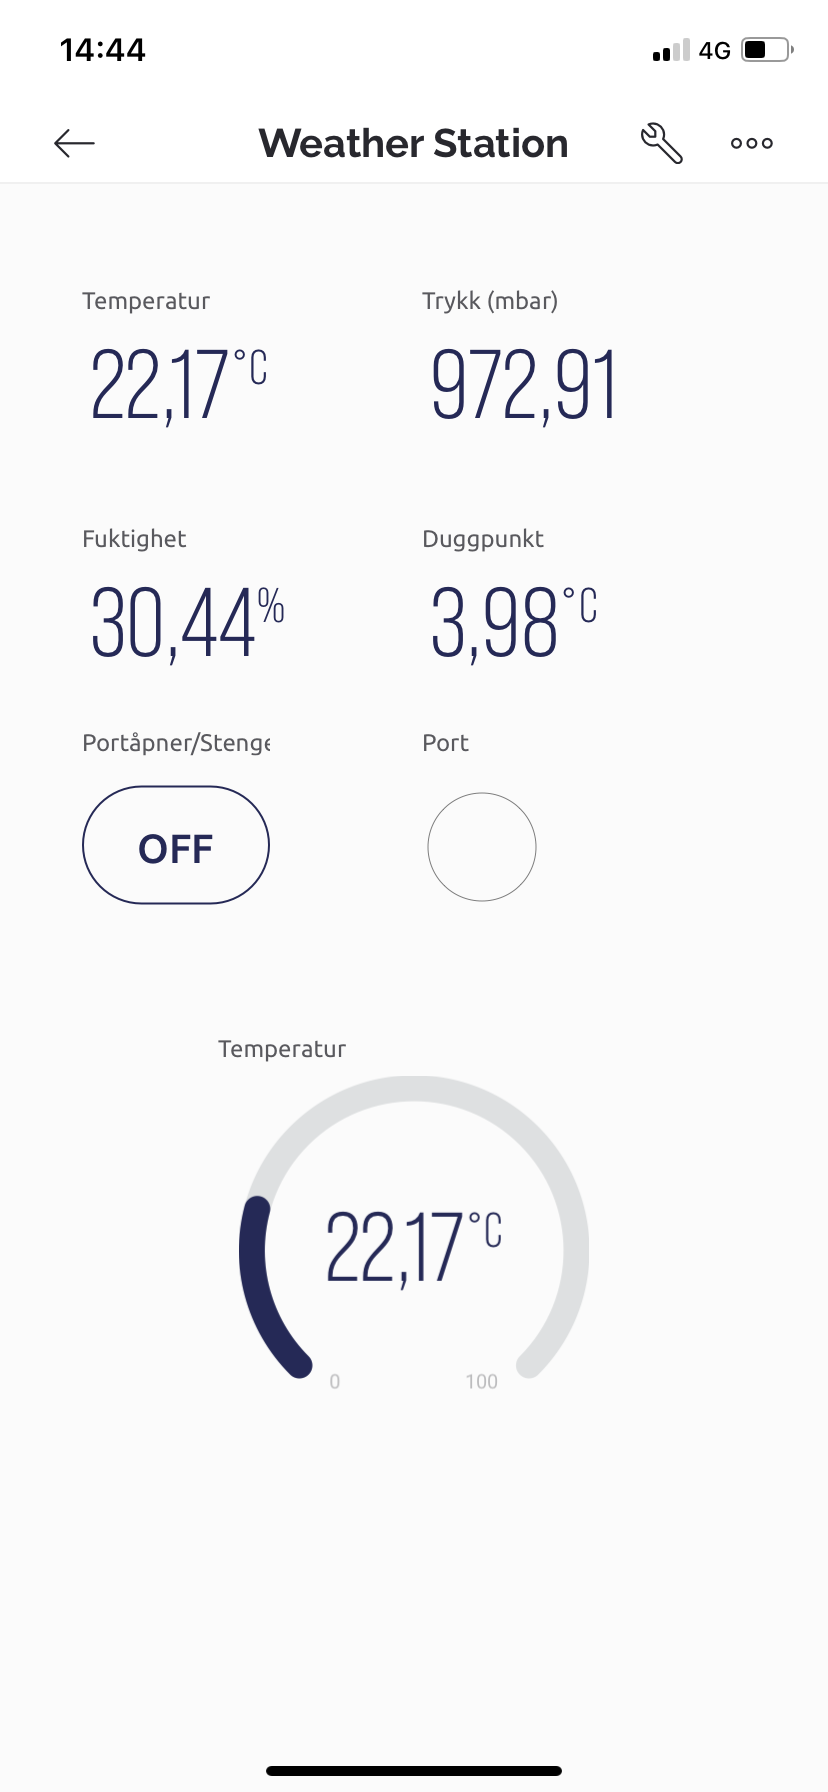
Below is a code that works very vell. as long I remove the lines for the DS18B20 sensor.
( I have tested this on a program, not connecting to Blynk and it works well).
I have a relay connect on V8 , so when I press the OFF button in the app the relay close.
Also I want to connect a magnetic switch and se if the garage port is open or closed. Want to have the widgets LED (V9) to be green or red depending on the status of the port.
The last ting is not working yet.
If I do not get the ds18B20 to work I have to find another sensor.
(Going to use a SHT-21 sensor instead of the BME280)
Also I need to do some cleanup in the program.
#define BLYNK_TEMPLATE_ID "XXXXXXX-NNTTd"
#define BLYNK_TEMPLATE_NAME "Weather Station"
#define BLYNK_GREEN     "#23C48E"
#define BLYNK_RED       "#D3435C"
//#define MagSwitch_PIN 32
#define SEALEVELPRESSURE_HPA 1013.25
#define SD_CS 5
/* Comment this out to disable prints and save space */
#define BLYNK_PRINT Serial

#include <WiFi.h>             // Library for the WiFi interface
#include <RTClib.h>           // Library for the DS3231 RTC module
#include <Wire.h>             // Library for the I2C interface
#include <WiFiClient.h>
#include <BlynkSimpleEsp32.h>
#include "Arduino.h"
#include <Adafruit_Sensor.h>
#include <Adafruit_BME280.h>
#include <LiquidCrystal_I2C.h>  // Library for the 12C 20x4 LCD module
// #include "FS.h"                 // Libraries for the microSD card
#include "SD.h"                 // Libraries for the microSD card
#include <SPI.h>                // Libraries for the microSD card
#include <OneWire.h>            // Libraries for the DS18B20
#include <DallasTemperature.h>  // Libraries for the DS18B20
//#include "DHT.h"
//#include "SI114X.h"
//#include "BMP085.h"

// Save reading number on RTC memory
RTC_DATA_ATTR int readingID = 0;   //https://randomnerdtutorials.com/esp32-data-logging-temperature-to-microsd-card/
File myFile;

Adafruit_BME280 bme; // I2C 0x76
BlynkTimer timer;

// const int CS = 5;      // SD card
const int oneWireBus = 4; // GPIO where the DS18B20 is connected to
int pin = 26;             // Relay
int MagSwitch = 32;
WidgetLED led1(V9);   // Virutal pin V9 for Widget LED

//OneWire oneWire(oneWireBus);     // Setup a oneWire instance to communicate with a OneWire device
//DallasTemperature sensors(&oneWire);  // Pass our oneWire reference to Dallas Temperature sensor

// float temperature; // parameters
// float DallastemperatureC;
// float humidity;
// float pressure;
// float mbar;
// float altitude;
// float uv;
// float visible;
// float ir;

LiquidCrystal_I2C lcd(0x27, 20, 4); // create LCD with I2C address 0x27, 20 characters per line, 4 lines
RTC_DS3231 rtc;                     // create rtc for the DS3231 RTC moduke, address is fixed at 0x57

//SI114X SI1145 = SI114X(); // initialise sunlight sensor
//BMP085 myBarometer; // initialise pressure sensor

char auth[] = "xxxxxxxxxxxxxxxxxx"; // replace this with your auth token
char ssid[] = "xxxxxxxxxxxx"; // replace this with your wifi name (SSID)
char pass[] = "xxxxxxxxxxx"; // replace this with your wifi password
bool Connected2Blynk = false;

//DHT dht(DHTPIN, DHTTYPE); // initialise dht sensor

/*void sendSensor() // function to read sensor values and send them to Blynk
  {
  humidity = dht.readHumidity();
  temperature = dht.readTemperature();
  if (isnan(humidity) || isnan(temperature))
  {
    Serial.println("Failed to read from DHT sensor!");
    return;
  }*/

void setup()
{
  Wire.begin();
  //rtc.begin ();         // Initialize the RTC 24H format
  lcd.init();           // Initialize the LCD
  lcd.backlight();
  Serial.begin(115200);
  //sensors.begin(); // Start the DS18B20 sensor
  Serial.println("ESP32_WS_Relay_BLYNK 221223");
  /*Serial.println("Beginning Si1145!");
    while (!SI1145.Begin())
    {
    Serial.println("Si1145 is not ready!");
    delay(1000);
    }
    Serial.println("Si1145 is ready!");
    myBarometer.init();
    dht.begin();
    delay(1000);*/

  // Initializ the RTC
  if (! rtc.begin()) {
    Serial.println("Couldn't find RTC");
    Serial.flush();
    delay(1000);
    while (1);
  }

  // Initialize SD card (F("save SRAM memory by moving the constant string from SRAM to FLASH memory"))
  Serial.println(F("Initializing SD card..."));
  if (!SD.begin(SD_CS)) {
    Serial.println(F("Error, SD Initialization Failed!"));
    while (1);
  }
  Serial.println(F("SD card INITIALIZED."));

  if ( SD.exists("/Log.txt") == 0) { // test if file with name 'Log.txt' already exists
    Serial.println(F("Log.txt doesn't exist. Creating Log.txt file..."));
    // create a new file by opening a new file and immediately close it
    File myFile = SD.open("/Log.txt", FILE_WRITE);
    myFile.close();
  }
  // recheck if file is created or not
  if ( SD.exists("/Log.txt"))
    Serial.println(F("Log.txt exists on SD Card."));
  else
    Serial.println(F("Log.txt doesn't exist on SD Card."));

  File myFile = SD.open("/Log.txt", FILE_WRITE);   // create (&open) file Log.txt
  if (myFile) {
    Serial.println("OK");
    // if the file opened okay, write to it:
    Serial.println("OK");
    // write some texts to 'Log.txt' file
    myFile.println("Reading ID  |   DATE    |    TIME  ; TEMPERATURE ; HUMIDITY ; AVERAGE Hum ; DewPoint ; Temp. box");
    myFile.println("            (dd-mm-yyyy)|(hh:mm:ss);     degC    ;     %    ;      %      ;   degC   ;   degC");
    myFile.close();   // close the file
    Serial.println("Success, data written to Log.txt");
  } else {
    Serial.println("Error, couldn't not open Log.txt");
  }

  pinMode(pin, OUTPUT); // Initialise digital pin 26 as an output pin

  pinMode(MagSwitch, INPUT);  // Where Magnetic Switch is connected 32 as input pin

  WiFi.mode(WIFI_STA);

  Blynk.begin(auth, ssid, pass);
  Serial.print("RSSI: ");
  Serial.println(WiFi.RSSI());
  delay(1000);

  timer.setInterval(2000L, getBME280Readings); // sendSensor function will run every 2000 milliseconds
  timer.setInterval(3000L, PortStatus); // Check if Magnetic Switch is open or closed
  timer.setInterval(10000L, ESP32TimeAndDate); // Print ESP32 Time and date
  timer.setInterval(300000L, LogDateAndTime);  // Save to SD card every hour 1t=3600000

  lcd.init();           // Initialize the LCD
  lcd.backlight();
  lcd.setCursor(1, 0);
  lcd.print("IP: ");
  lcd.print(WiFi.localIP());
  lcd.setCursor(1, 0);
  lcd.print("IP: ");
  lcd.print(WiFi.localIP());
  lcd.setCursor(1, 1);
  lcd.print("RSSI: ");
  lcd.print(WiFi.RSSI());
  // lcd.setCursor(1, 2);
  // lcd.print("Temp: ");
  // lcd.print(bme.readTemperature(), 2);
  // lcd.setCursor(9, 2);
  // lcd.print("\xC2\xB0");
  // lcd.print("C");

  bool status;

  // default settings
  // (you can also pass in a Wire library object like &Wire2)
  status = bme.begin(0x76);  // I2C Adress of BME280
  if (!status) {
    Serial.println("Could not detect a BME280 sensor, Fix wiring Connections!");
    while (1);
  }
}

BLYNK_WRITE (V8)
{
  int pinValue = param.asInt(); // assigning incoming value from pin V8 to a variable
  Serial.print("V8 Buttom value is: ");
  Serial.println(pinValue);
  digitalWrite(pin, HIGH); // Set digital pin 26 HIGH
  delay (500);
  digitalWrite(pin, LOW);  // Set digital pin 26 LOW
}

void LogDateAndTime () {
  //sensors.requestTemperatures();
  String dataString = "";
  readingID++;

  DateTime now = rtc.now();

  if (now.day() < 10) {
    dataString += String("0");
  }
  dataString += String(now.day(), DEC);
  dataString += ".";
  if (now.month() < 10) {
    dataString += String("0");
  }
  dataString += String(now.month(), DEC);
  dataString += ".";
  dataString += String(now.year(), DEC);
  dataString += " ";
  if (now.hour() < 10) {
    dataString += String("0");
  }
  dataString += String(now.hour(), DEC);
  dataString += ":";
  if (now.minute() < 10) {
    dataString += String("0");
  }
  dataString += String(now.minute(), DEC);
  dataString += ":";
  if (now.second() < 10) {
    dataString += String("0");
  }
  dataString += String(now.second(), DEC);
  dataString += ";";
  dataString += readingID;
  dataString += ";";
  dataString += String(bme.readTemperature(), 2);
  dataString += ";";
  //dataString += String(sensors.getTempCByIndex(0), 2);
  //dataString += ";";

  Serial.print (F("DataString "));
  Serial.println(dataString);
  File myFile = SD.open("/Log.txt", FILE_WRITE);   // open file Log.txt
  myFile.close();
}

void ESP32TimeAndDate () {
  DateTime now = rtc.now();
  Serial.print("ESP32 RTC Date Time: ");
  Serial.print(now.day(), DEC);
  Serial.print('/');
  Serial.print(now.month(), DEC);
  Serial.print('/');
  Serial.print(now.year(), DEC);
  Serial.print ("  ");
  Serial.print(now.hour(), DEC);
  Serial.print(':');
  Serial.print(now.minute(), DEC);
  Serial.print(':');
  Serial.println(now.second(), DEC);

  delay(1000); // delay 1 seconds
}

void getBME280Readings()
{
  float temperature = bme.readTemperature();
  float pressure = bme.readPressure() / 100.0F;
  float humidity = bme.readHumidity();
  //float altitude = bme.readAltitude(SEALEVELPRESSURE_HPA);
  if (isnan(humidity) || isnan(temperature))
  {
    Serial.println("Failed to read from BME280 sensor!");
    return;
  }
  double DewPoint = (243.04 * (log(humidity / 100) + (17.625 * temperature) / (243.04 + temperature ))) / (17.625 - log(humidity / 100) - ((17.625 * temperature ) / (243.04 + temperature )));
  //sensors.requestTemperatures();
  //float DallastemperatureC  = sensors.getTempCByIndex(0);

  //pressure = myBarometer.bmp085GetPressure(myBarometer.bmp085ReadUP()); // read pressure value in pascals
  //mbar = pressure / 100; // convert millibar to pascals
  //visible = SI1145.ReadVisible(); // visible radiation
  //ir = SI1145.ReadIR(); // IR radiation
  //uv = SI1145.ReadUV(); // UV index

  Blynk.virtualWrite(V0, temperature); // send all the values to their respective virtual pins
  Blynk.virtualWrite(V1, pressure);
  Blynk.virtualWrite(V2, humidity);
  Blynk.virtualWrite(V3, DewPoint);
  //Blynk.virtualWrite(V4, DallastemperatureC);
  //Blynk.virtualWrite (V4, altitude);
  //Blynk.virtualWrite(V5, visible);
  //Blynk.virtualWrite(V6, ir);
  //Blynk.virtualWrite(V7, uv);
}

// **********************************
// https://github.com/blynkkk/blynk-library/blob/master/examples/Widgets/LED/LED_Color/LED_Color.ino

void PortStatus()
{
  int value = digitalRead(MagSwitch);
  if (value == HIGH) {
    //Serial.println("Button is pressed");
    //BLYNK_WRITE (V9)
    led1.setColor(BLYNK_GREEN);
    //Blynk.setProperty(V9, "color", "#23C48E");  // BLYNK GREEN
    //Blynk.virtualWrite(V9, "color", "#23C48E");
    //Blynk.notify("Switch Pressed"); // This notification will be sent to Blynk App, https://iotstarters.com/esp32-based-switch-notification-project-using-blynk/#:~:text=Once%20the%20switch%20is%20pressed%2C%20a%20notification%20is,notification%20will%20be%20sent%20to%20Blynk%20App%20%7D
  }
  else {
    //Serial.println("Button is not pressed");
    led1.setColor(BLYNK_RED);
    //Blynk.setProperty(V9, "color",  "#D3435C");  // BLYNK RED
  }
}
// *******************************

// ***********CheckBlynk**********
void CheckBlynk()
{
  if (!Blynk.connected())
  {
    Serial.println("Restarting ESP32 ... ");
    Serial.print("RSSI: ");
    Serial.println(WiFi.RSSI());
    // Blynk.connect();
    ESP.restart();
  }
}
// ******END CheckBlynk**********

void loop()
{

  CheckBlynk();
  // PortStatus();
  // ESP32TimeAndDate();
  Blynk.run();
  timer.run();
}
Regards
Stein