Yesss it is working as you described !
Wow that was quick. Obviously when we create the bin files we can’t be 100% sure it works as we don’t have any Elro’s here but now you have confirmed the sockets are responding we can incorporate them into WeMosRFvXXX.
I’ll send you a link when it’s ready.
What we will also do is code up activation of the RF devices with say a couple of Blynk timers and provide details of the virtual pins we have allocated to them. The timers will not appear in the app as that would take the Energy levels over 2000 units but the sketch will include the code required and Blynkers can then add the Timer widgets if they want them.
@Costas
I have quite a lot of energy…! No problem at all. And I like the extensive and full of features GUI’s !!!
I will wait for the new Blynk and firmware (also the how to for OTA or flashing the firmware, after the last test firmware the WeMos does not connect to blynk server and has been started the THECHARIOT access point…)
Thanks
Latest bin file is available for download from https://thechariot.co.uk/esprf/ESP-RFv0.3.8a.bin
PLEASE READ: Includes the following updates:
- Elro AB440R RF Sockets added with channels A, B, C and D (system code DIP switches 1 to 5 set as ON-OFF-ON-OFF-ON)
- Updated to Blynk library 0.3.8.
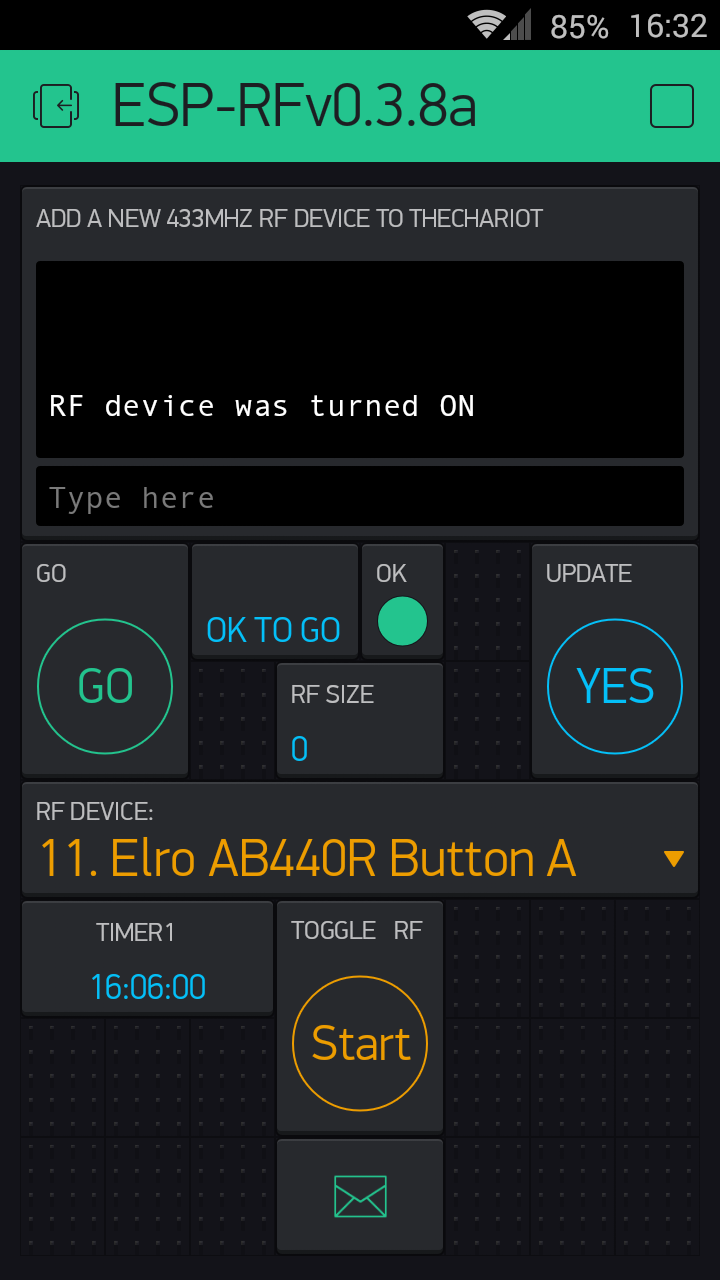
- Terminal window confirmation of last toggle state for RF device.
- Timer1 added taking Energy required to maximum free allowance of 2000.
- Timer2 code included in the bin file against virtual pin 30 so if you want to use a second timer just add it in your copy of the app.
- Should work with any ESP which has GPIO 16 (WeMos D0) available for the RF transmitter.
- Please wait 33 seconds after each ESP reset / flash before sending the first RF signal.
For the latest version you really need a new QR code that includes the additional menu items for the Elro and Timer1 . You could manually adjust your existing app with the following details:
Timer1 on virtual pin 31
Menu items 11, 12, 13 and 14 for Elro A, B, C and D.
but here’s the new QR and Smartphone link http://tinyurl.com/gt8p9sw in any case:

The Elro test bin we provided didn’t have any OTA, or Blynk, code so you will have to take a step back and flash the code in the first post and then click the UPDATE button in the app etc. Hopefully it will be easier for you second time around but note if you use the new QR code it will have a new token so you will need to enter this with WiFi Manager.
Thanks a lot Costas.
I will try it later on and I will let you know!
Best Regards
Mike Kranidis
Lost me there Mike.
If you think of any other features that you would like in the app that I can add without increasing the Energy requirement please let me know.
@Costas
more features… hmmm why not!
Any sane way to specify, at the Timer1 adjustment, which RF device should put at ON and then OFF ???
Also at the terminal window is better to have RF device name ON or OFF instead of just the word RF device…
AND one spelling correction: “Come Greece to buy your diner !” that is the correct one.
Morning Mike.
Maybe when summer ends I’ll pop over for dinner.
RF device name to appear in the Terminal window:
This would be easy enough to do, Energy free, and it is done for the Elro’s (but not other devices) when sending prompts to Serial Monitor. The RF device name that appears in Serial Monitor was really just for debugging the sketch. However the currently active RF device is already clearly shown in the app e.g. 11. Elro AB440R Button A in the last screenshot I posted.
Allocation of Timers to RF devices:
This one is a bit more tricky, especially Energy free. In the full app (11800 energy units) there are currently 4 timers, 4 tabs and absolutely no space left on any of the tabs. The 4 timers effectively only control one RF device at a time i.e. the RF Central Heating switch we provide with the app (like Google’s Nest and British Gas’ Hive).
The app as you have it allows you to control many home appliances via the internet but your remote access requires you to manually select the RF device, turn it ON and then OFF, and then move on to another device or use a timer but you can’t currently then switch from device to device as the OFF signal will be sent to a different device to the device that received the ON signal from the timer.
In practical use this would be something like timers set to control the central heating but before leaving work you switch on the electric blankets, air con etc and remember to leave the central heating as the active device for the timer to work correctly.
So we need to look at a proper scheduling system to allocate different timers to different RF devices. The first step in the Energy free version would be to add 2 more timers in addition to the Timer1 (in the app) and Timer2 (coded and to be added to the app if users need it). With the 4 timers, and some creative coding that I haven’t thought about yet, it should be possible to allocate a timer to each of the 4 RF channels you have with the Elro.
If I had any space in the full app you could have 4 drop down menu widgets to tie up to 4 RF devices to 4 different timers. Another, Energy free, way to do it would be to write commands to the Terminal but this wouldn’t be very user friendly.
Let me think this one through and see what we come up with.
Dear @Costas,
good-morning at first.
Well, you also should consider a relative timer scheme, to specify only the duration that the selected device will be on, let’s say you want a home controlled appliance to be on for e.x. 10 minutes. I can do this of course using the timers as is but with many steps. In opposite if you have relative to the activation timers, the user need only to specify for how long the appliance will be at power on state.
Although I am experienced electronic engineer, in the programming arena I consider me as a newbie! so I can not really help you (but I will try hard if you give me “homework”).
That is for now,
Thanks and Best Regards,
Mike Kranidis
P.S. I forgotten to say: You’re very welcome regarding the dinner!
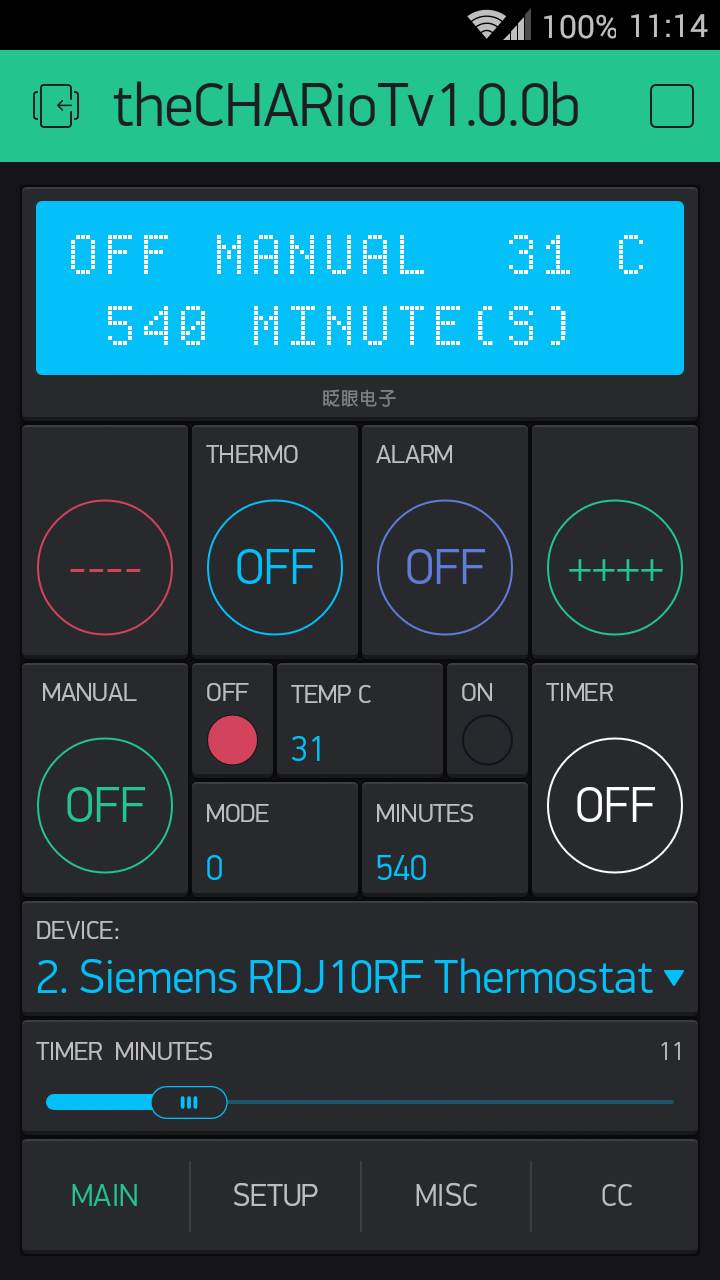
As shown above the full version already allows you to set the duration in minutes with the slider for the STEP minutes and the — and +++ buttons. It has thermostatic and climatic control, PIR sensor with SMS alerts etc but it takes almost 12000 Energy units to do all this.
However even with the full version the duration set is currently only for a single RF device.
Will try to provide better scheduling for both versions of the app.
@Costas
Good morning Costas. Yesterday, I tried to implement a very simple implementation for the RF remote control mimics the real Remote control layout and improved in some functions. I have lot of things to do but one I see in your blynk app and I like is the timers. The question is, what has to do in my ESP app in order to have timers that they will know the current time ex to activate outlet A at 11:10 … How the blynk knows the current time? Please give me your lights about.
Thanks and Best Regards,
Mike Kranidis
Mike,
If it is the regular Blynk timers that you are referring to you simply stop the app and set the ON and OFF times in the timer. Blynk takes care of the time providing the time on your Smartphone is correct.
If the precise timing is not critical then your phone time can be out by a few minutes as long as you are not testing it for say a minute in the future but your phone is already 2 minutes in the future compared with the real internet time.
Most Smartphones these days have a setting to obtain internet time based on your location and you might want to check if this is set.
As well as timer1 that is visible (and linked to V31) you can add a second timer against V30 as the bin file already includes the code for this (but it doesn’t appear in the app as it would take the user over the 2000 free Energy units).
If you are referring to different timers i.e. on for 34, 72, 15 minutes etc without using Blynk’s Timer widget, please let me know and I will advise accordingly.
Dear Costas. Thanks for your answer. Regarding the second timer attached to V30, I have done this already from your first reference…Do you have also other ( not shown due to energy units ) features that you can share with me?
Again thanks.
Best Regards,
Mike Kranidis
Mike,
Currently there aren’t any other ‘hidden’ features and I would prefer to provide visible, Energy free, features wherever possible.
However if there is anything you want, hidden or visible, let me know and I will try to provide it.
We have now added an Energy free RF scheduler to the app and it is available for download from https://thechariot.co.uk/esprf/ESP-RFv0.3.8b.bin
New version notes:
A. You can use your existing project which will show just TIMER1.
B. To operate 4 RF devices it will cost $0.99 to top up the 2000 free Energy units by 1000 and it will consume 2600 units.
C. Add TIMER2 to V30 if you haven’t already done that in the previous version of the project. Add TIMER3 to V29 and TIMER4 to V28.
D. By default all 4 timers control the Home Easy HE105 Central Heating Switch.
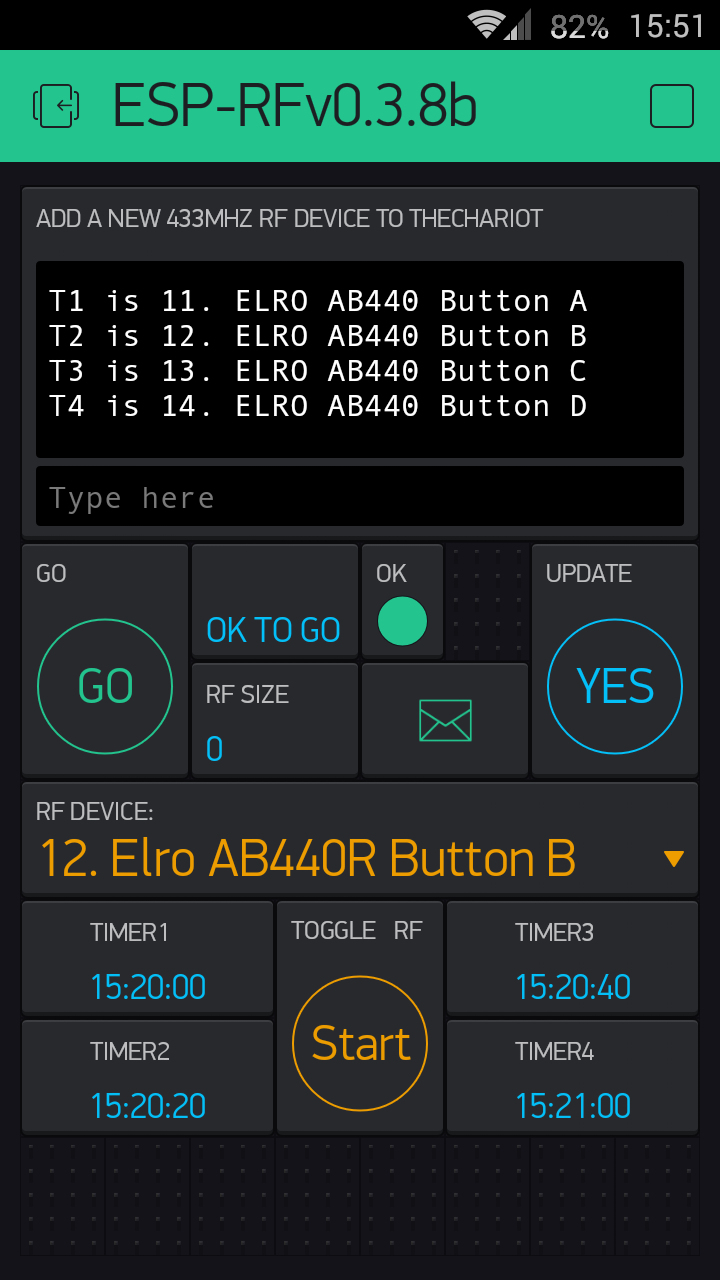
E. Timers are allocated to different RF devices via the following Terminal commands:
t (timer, Timer or TIMER) will display the current allocation as shown in the screenshot above.
elro (Elro or ELRO) will set TIMER1 to Elro Channel A, TIMER2 to channel B, TIMER3 to channel C and TIMER4 to channel D.
1 will reset all timers to the Home Easy default.
Enter the number of the RF device as shown in the Menu widget and all timers will be set to use that particular RF device. So entering 6 in the Terminal will set all timers to use 6. Status Socket Button 4.
If you want to allocate the timers to different RF devices other than the Elro standard 4 sockets select the required RF device from the Menu widget and then enter t1, t2, t3 or t4 in Terminal. You must actually select the device in the Menu widget even if it is already showing as your required device and must be repeated for each TIMER you want to allocate.
F. Other Terminal commands:
? (help, Help or HELP) will display instructions to add new RF devices
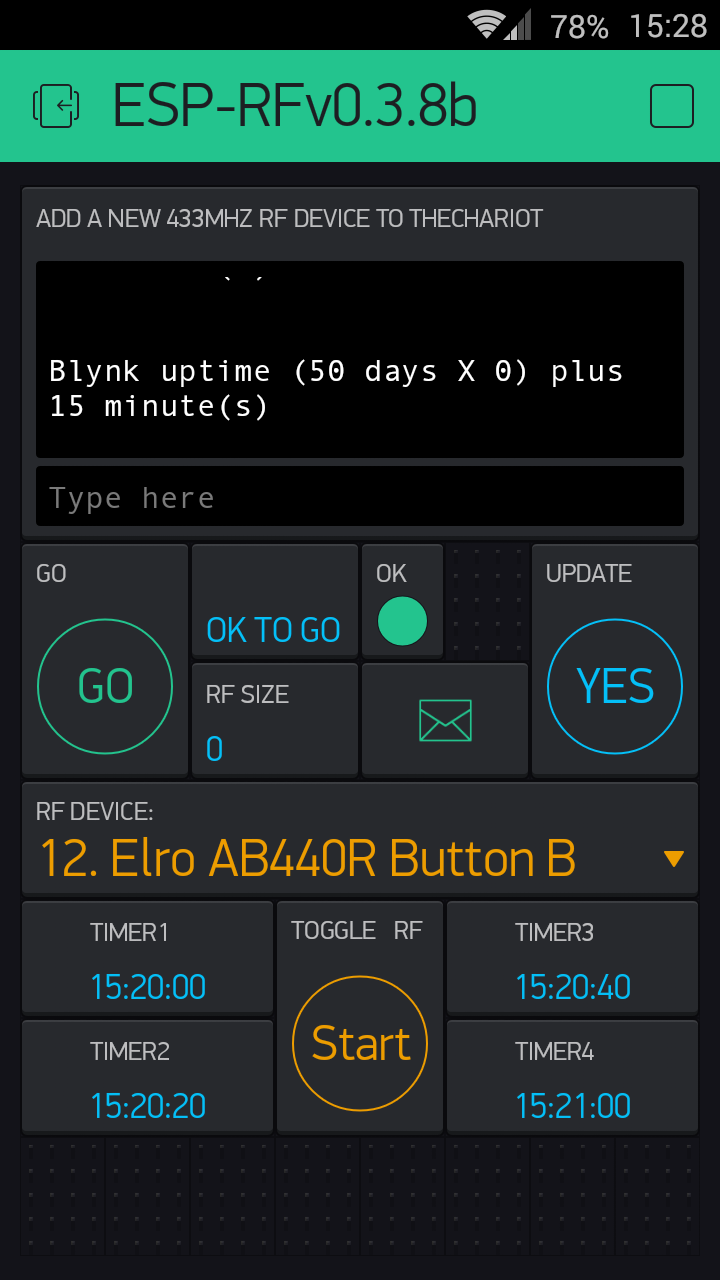
on (On or ON) will switch on the Blynk up time details to Terminal (OFF by default), refreshed each minute. Covers 50 day rollover of millis(), see screenshot below:
off (Off or OFF) will disable Blynk up time to Terminal
The app is primarily intended for users that have never used Blynk and may not have any Arduino experience. Installing the Arduino IDE, loading the required libraries, learning a new “language” and interpreting it for use with Blynk is a big ask.
So for Windows users they can literally start using Blynk in minutes by using the nodemcu-flasher and a WeMos D1 Mini.
64 bit version at https://github.com/nodemcu/nodemcu-flasher/raw/master/Win64/Release/ESP8266Flasher.exe
32 bit version at https://github.com/nodemcu/nodemcu-flasher/raw/master/Win32/Release/ESP8266Flasher.exe
Once you have downloaded the latest bin file just add the path and filename in the Config tab, so for a bin file called VPinTest.bin in C;\binfiles directory it will be as shown below.
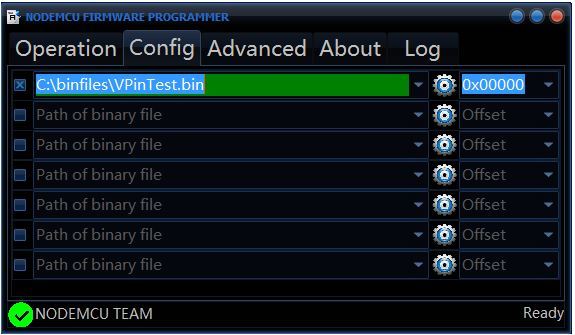
Then return to the Operation tab and click the Flash(F) button. Once the flashing has finished be sure to press the reset button on the WeMos for the sketch to start.
I’ll hopefully create an instructable for this some time soon as I’m sure 99% of the world have no idea what Blynk is.
Congrats @Costas the new improved version is looking very “sexy” !!!
I will try it possible today and I will let you know.
Again many thanks for sharing a fine blynk / WeMos implementation!
P.S. I have a question but I don’t want to hijack this message…! Later.
Dear friends,
this is a working Code/Sketch sample for anyone that looking for something like this.
PLEASE, I am not programmer very unfortunately, so be kind with me. My sketch need for sure optimization… If anyone want to give me a helping hand… I will appreciate too much! If you need also my layout at the blynk application, ask me to sent the QR code.
Thanks and Best Regards,
Mike Kranidis
P.S. Not to forget to send my best regards, to my mentor for this subject Mr. @Costas
*** PLEASE SEE MY LATEST SKETCH ***
Hey i am a new user here…by profession i am a RF design engineer. I made a test using my remote controlled outlets (ELRO AB440R). After completed the procedure, one message wrote that we will add your… device as soon as possible… The question is where my device will be added? Your application WeMos RF,has any usefulness or it is just a way to import RF devices to your database?
@ElsyKhong if you read through the thread and use the latest version of the app you will see the ELRO AB440R’s are available in the drop down menu.
If you have any problems let me know and I will get you up and running.