Completely lost

i made the few changes that you recommended Pete and re-uploaded the code to the device.

It does seem to now be working, at least interacting. Thank you. It is not working exactly as I expect, but I am MUCH farther along than I was before. The reverse doesn’t seem to be working, well, really, the right motor doesn’t seem to be reacting to changes in the joystick. The right motor is just continuously running in the same direction, while the left motor changes based on the joystick changes. Is there something related to this:oldJoystick_code

that needs to be addressed or added or calculated?

V0_code

Related to this code…

I’d guess that the best approach is to see what values are coming from the joystick widget and if necessary add a C++ map command into your sketch to re-map these values to the range that you need.

Pete.

Amazing the progress than can be made when you share your existing code . . . and listen to people who are trying to help . . . good luck, hopefully a lesson learnt.

3 Likes

I was going to say something about being so smug, but I realized that nothing good comes from that sort of talk.

The issue I have now is that the reaction and interaction of the Android to the 8266 is so slow that it’s practically not worth having gone through the pain of figuring out the new Blynk app.

I’m trying to run just two motors (as the code suggests) and they are fine once they start moving, but as soon as you want to do anything other than go straight and move the joystick even a little bit, the motors stop, have to re-acquire, and then start moving in the new direction. That whole process takes 3-7 seconds. Not very interesting or fun for a remote control vehicle. Sadly, the original app was easier to understand and use and this process worked flawlessly.

Anyone gotta clue?

We’re back to the same old response I’m afraid - we need to see your latest sketch.

Pete.

It is the same sketch. I have only added the conversion of the -15 to +15 that the joystick apparently can no longer do

/*  Created by Lucas "Jack Carter" Fierfort           */
/*  November 2019                                          */

/*  Code made for a NodeMCU and using the Blynk app   */

/*  Thingiverse page for the plans : https://www.thingiverse.com/thing:3846925  */

/*  You will have to set your own Wi-Fi SSID / password and copy/paste your Blynk authentification token before compiling   */

#define BLYNK_TEMPLATE_ID "TMPL4ROyKpIQ"
#define BLYNK_DEVICE_NAME "Quickstart Template"
#define BLYNK_AUTH_TOKEN "cULXmIvjhwYTvJBoJtVRUB9oIGuWjFa7"

#define MAX_RPM 15

#define BLYNK_PRINT Serial

/*The "Stepper.h" library may work instead of the "Stepper2.h", but the Motor.setDirection() functions will no more be compatible*/
//#include <Stepper.h>
#include <Stepper2.h>
#include <ESP8266WiFi.h>
#include <BlynkSimpleEsp8266.h>


int Right_Motor_pinOut[4] = {D1,D2,D3,D4};
int Left_Motor_pinOut[4] = {D5,D6,D7,D8};

Stepper2 Motor_Left(Left_Motor_pinOut);
Stepper2 Motor_Right(Right_Motor_pinOut);

int Actual_RightSpeed;
int Actual_LeftSpeed;

int Command_RightTrack;
int Command_LeftTrack;

// Your WiFi credentials.
// Set password to "" for open networks.
char ssid[] = "XXXXXXXXXXXXXX";
char pass[] = "xxxxxxxxxxxxx";

void setup()
{
  Actual_RightSpeed = 0;
  Actual_LeftSpeed = 0;

  Command_RightTrack = 0;
  Command_LeftTrack = 0;
  Serial.begin(9600);
  
  Blynk.begin(BLYNK_AUTH_TOKEN, ssid, pass);
  // You can also specify server:
  //Blynk.begin(auth, ssid, pass, "blynk-cloud.com", 80);
  //Blynk.begin(auth, ssid, pass, IPAddress(192,168,1,100), 8080);
  //pinMode(LED_BUILTIN,OUTPUT);
}

void loop()
{
  Blynk.run();

  
  /*The actual speed of the motors slowly increase/decrease to the command*/
  if(abs(Actual_LeftSpeed) < abs(Command_LeftTrack) )  Actual_LeftSpeed++;
  if(abs(Actual_LeftSpeed) > abs(Command_LeftTrack) )  Actual_LeftSpeed--;
  if(abs(Actual_RightSpeed) < abs(Command_RightTrack) ) Actual_RightSpeed++;
  if(abs(Actual_RightSpeed) > abs(Command_RightTrack) ) Actual_RightSpeed--;

  Serial.print(Actual_LeftSpeed);
  Serial.print("\t\t");
  Serial.println(Actual_RightSpeed);
  
  /*Setting the right direction according to the sign of the speed command
  if(Command_LeftTrack < 0) Motor_Left.setDirection(0);
  if(Command_LeftTrack > 0) Motor_Left.setDirection(1);
  if(Command_RightTrack < 0) Motor_Right.setDirection(1);
  if(Command_RightTrack > 0) Motor_Right.setDirection(0);

  /*Setting the right direction according to the sign of the speed command*/
  if(Command_LeftTrack < 0) Motor_Left.setDirection(0);
  if(Command_LeftTrack > 0) Motor_Left.setDirection(1);
  if(Command_RightTrack < 0) Motor_Right.setDirection(1);
  if(Command_RightTrack > 0) Motor_Right.setDirection(0);

/* forward
  if((Command_LeftTrack > 0) && (Command_RightTrack > 0)){
  Motor_Left.setDirection(1);
  Motor_Right.setDirection(0);
  }

/* reverse
  if((Command_LeftTrack < 0) && (Command_RightTrack < 0)){
  Motor_Left.setDirection(0);
  Motor_Right.setDirection(1);
  }*/

/* right
  if((Command_LeftTrack > 0) && (Command_RightTrack < 0)){
  Motor_Left.setDirection(0);
  Motor_Right.setDirection(0);
  }*/
  
/* left
  if((Command_LeftTrack < 0) && (Command_RightTrack > 0)){
  Motor_Left.setDirection(1);
  Motor_Right.setDirection(1);
  }*/

  if(Command_LeftTrack != 0 || Command_RightTrack != 0) {  
    Motor_Left.setSpeed(Actual_LeftSpeed);
    Motor_Right.setSpeed(Actual_RightSpeed);

    /*The two motors turn a step once one after the others, as two stepper can't turn simultaneously*/
    for(int i=0 ; i<15 ; i++) {
      Motor_Left.step(1);
      Motor_Right.step(1);
    }
  }
}

/*Everytime the joystick changes*/
BLYNK_WRITE(V0) {

  /*Get the Blynk joystick values*/
  int Joystick_x = param[0].asInt();
  int mappedx = map(Joystick_x, 1, 255, 15, -15);
  int Joystick_y = param[1].asInt();
  int mappedy = map(Joystick_y, 1, 255, 15, -15);
  Serial.print("joyx / joyy");
  Serial.print(Joystick_x);
  Serial.print("\t");
  Serial.println(Joystick_y);
  Serial.print("mappedx = ");
  Serial.println(mappedx);
  Serial.print("mappedy = ");
  Serial.println(mappedy);
  
  /*Absolute track speed command. Tracks will actually accelerate until they reach this value
  Command_RightTrack = Joystick_y - Joystick_x ;
  Command_LeftTrack =  Joystick_y + Joystick_x ;

  /*Absolute track speed command. Tracks will actually accelerate until they reach this value*/
  Command_RightTrack = mappedy - mappedx ;
  Command_LeftTrack =  mappedy + mappedx ;
  Serial.print("Command_RightTrack = ");
  Serial.println(Command_RightTrack);
  Serial.print("Command_LeftTrack = ");
  Serial.println(Command_LeftTrack);

  /*The speed commands are capped*/
  if(Command_RightTrack < -MAX_RPM ) Command_RightTrack = -MAX_RPM ;
  if(Command_RightTrack >  MAX_RPM ) Command_RightTrack =  MAX_RPM ;
  if(Command_LeftTrack < -MAX_RPM ) Command_LeftTrack = -MAX_RPM ;
  if(Command_LeftTrack >  MAX_RPM ) Command_LeftTrack =  MAX_RPM ;
}```

@John93 gave you a link to the “keep your void loop clean” article, and that’s one of the things you need to take onboard.

From what I can see, none of the code needs to be in your void loop, except Blynk.run() because the only time that the values change that influence the if statements in your void loop is when your joystick moves.

You could put this code in your BLYNK_WRITE() function, but it would probably be better in its own function that is called from the BLYNK_WRITE()

Also, these consecutive if statements need to be processed each time. I’m sure this code could be streamlined with the addition of some return commands if there’s a situation where one if statement evaluates as true and this negates the need for the following if statements to be evaluated.

In addition, serial print statements take time to process. Whilst they are useful for debugging, they should probably be removed, or better turned off, in your final version of the sketch.
The neat way to do this is to have a #define debug_output command and your serial print commands inside a #ifdef and #endif` block like this…

//#define debug_output

#ifdef debug_output

  Serial.print("joyx / joyy");
  Serial.print(Joystick_x);
  Serial.print("\t");
  Serial.println(Joystick_y);
  Serial.print("mappedx = ");
  Serial.println(mappedx);
  Serial.print("mappedy = ");
  Serial.println(mappedy);

#endif

Un-commenting the #define debug_output line (which should be near the top of your code) and re-compiling will enable the debug serial prints.

Pete.

1 Like

Thanks Pete,

I just commented out all of the serial.print lines and the interaction is actually very good.

Additionally, I’m not sure how to move some of the items in the void loop to clean it up as you and @John93 suggest. Is it suggested that I create another function to call this code?

Thanks,
Gary

No, another function to hold this code, then you call this function when your joystick value changes.
Your joystick changes trigger one of your BLYNK_WRITE() functions, so you call the new function from that BLYNK_WRITE() function.

Pete.

can you give me an example?

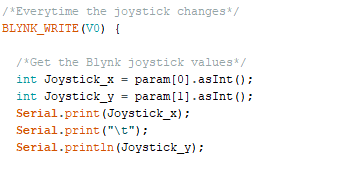
//Everytime the joystick changes
BLYNK_WRITE(V0)
 {
  //Get the Blynk joystick values
  Joystick_x = param[0].asInt();
  Joystick_y = param[1].asInt();

  process_joystick(); //call the new function
 }


void process_joystick()
{
  // put your map commands in here
  // along with the joystick/motor control code that is in your void loop
}

Pete.