Cannot control 12v fan with L298 by Blynk and NodeMCU

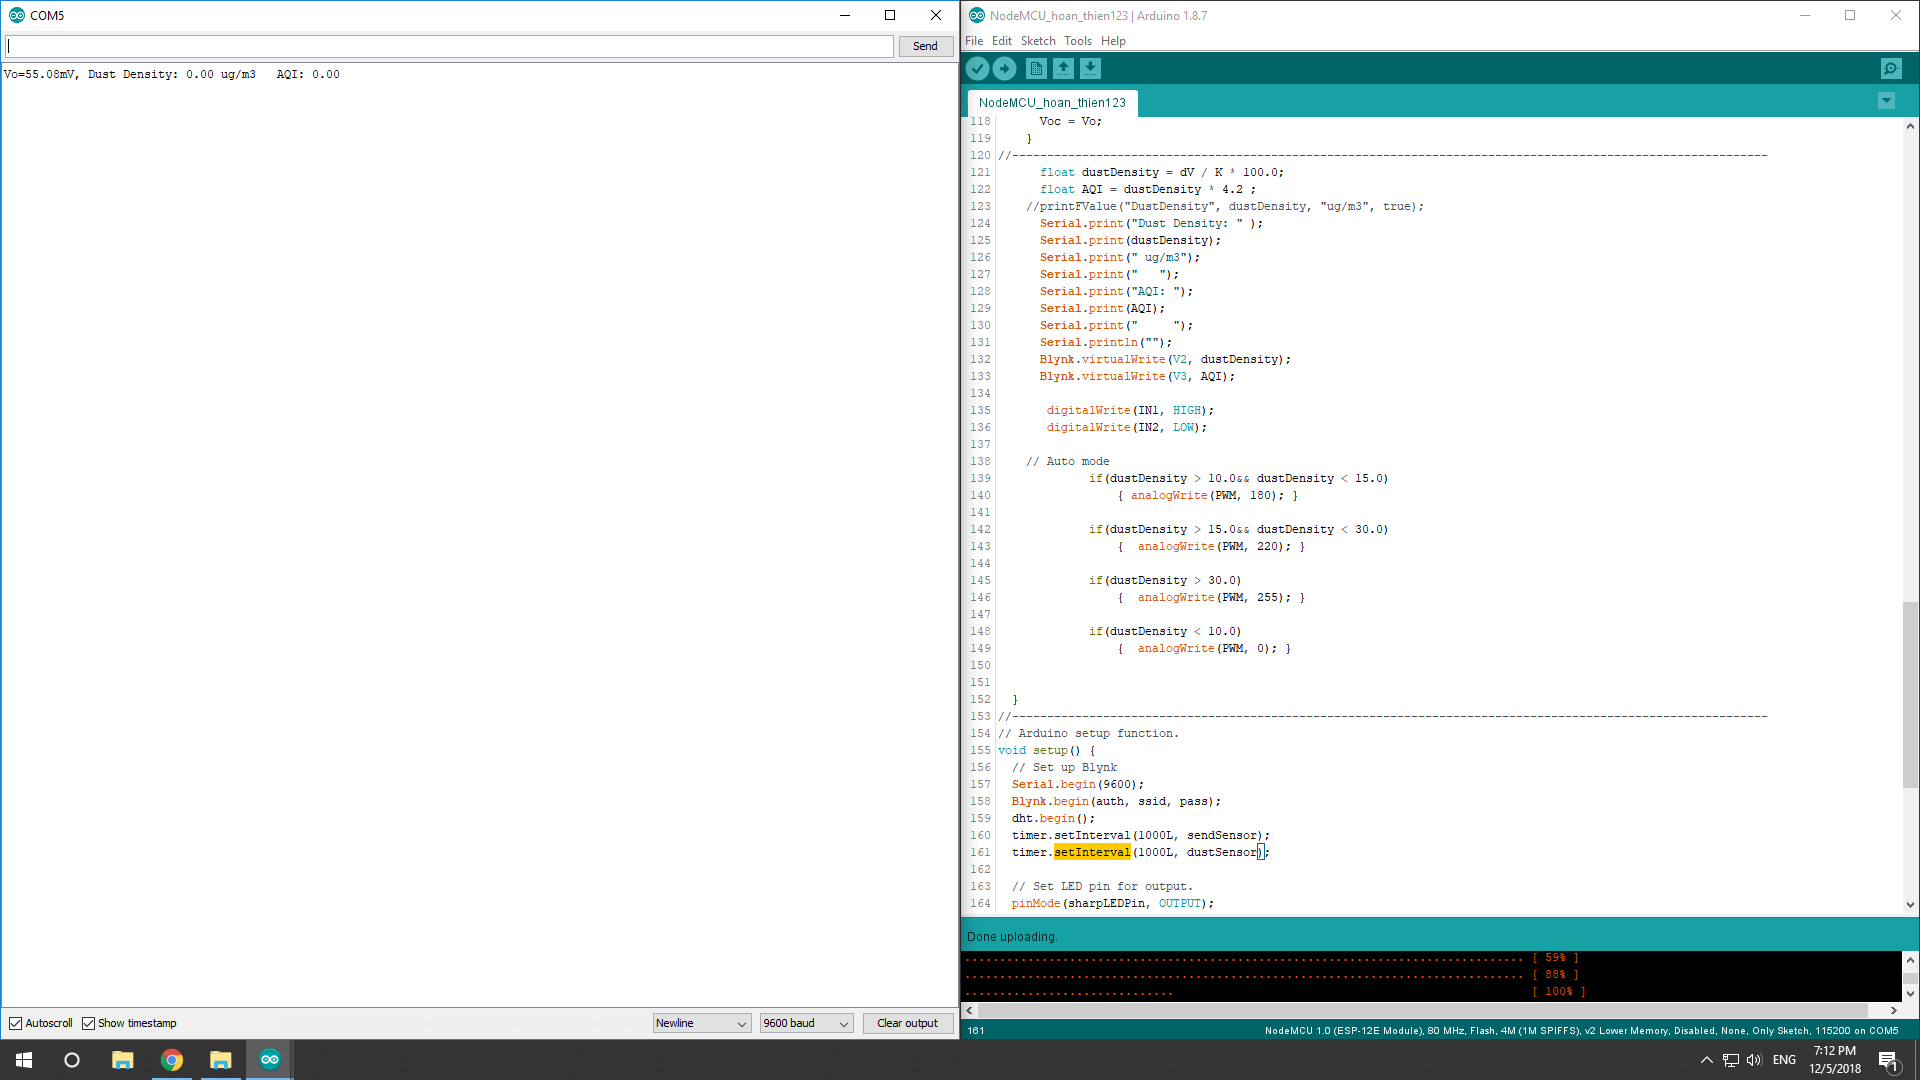
Hello. I’m a beginner. I have problems. My code run perfectly with Arduino Uno - it read dust density data from the sensor then control the fan but when I adjust it for Nodemcu it works but the fan not stop spinning although the dust density is below the condition I set in if clause. Another problem is that Nodemcu doesn’t work if I disconnect USB cable from my computer by use 3.3V power - Sensors don’t run and no data transfer to blynk app and nodemcu doesn’t connect to wifi hostpost too :rowning:
My device includes:

  • 12V 01.11A PWM Fan 4pin
  • NodeMCU 1.0 V3
  • L298 bridge
  • DHT22
  • Sharp dust sensor gp2y10

 //Air Purifier
//------------------------------------------------------------------------------------------------------------
const int IN1 = D5;  //L298 14= D5
const int IN2 = D6;  //L298 13= D6
const int IN3 = D7;  //L298 12= D7
const int IN4 = D8;  //L298 15= D8
const int PWM = D2;

#define BLYNK_PRINT Serial
#include <ESP8266WiFi.h>
#include <BlynkSimpleEsp8266.h>
#include <SimpleTimer.h>
#include <DHT.h>
#include "DHT.h"
#include "SharpGP2Y10.h"
#include <SPI.h>

char auth[] = "50f3a727f0d0403db542d94694f15be2";        
char ssid[] = "Air Purifier";        
char pass[] = "minhtamqq";         

#define DHTPIN D4
#define DHTTYPE DHT22
DHT dht(DHTPIN, DHTTYPE);
SimpleTimer timer;
void sendSensor() {
  float h = dht.readHumidity();     //Doc gia tri do am
  float t = dht.readTemperature();  //Doc gia tri nhiet do
  float f = dht.readTemperature(true);

  // Gan du lieu vao bien virtual de hien thi len blynk
  // Chi nen gan 10 bien tro xuong
  delay(10);
  Blynk.virtualWrite(V0, h);
  Blynk.virtualWrite(V1, t);
  }

 
//------------------------------------------------------------------------------------------------------------
// Choose program options.
//#define PRINT_RAW_DATA
#define USE_AVG

// Arduino pin numbers.
const int sharpLEDPin = D2;   // Arduino digital pin 7 connect to sensor LED.
const int sharpVoPin = A0;   // Arduino analog pin 5 connect to sensor Vo.

// For averaging last N raw voltage readings.
#ifdef USE_AVG
#define N 100
static unsigned long VoRawTotal = 0;
static int VoRawCount = 0;
#endif // USE_AVG

// Set the typical output voltage in Volts when there is zero dust. 
static float Voc = 0.6;

// Use the typical sensitivity in units of V per 100ug/m3.
const float K = 0.5;
  
//------------------------------------------------------------------------------------------------------------
// Helper functions to print a data value to the serial monitor.
void printValue(String text, unsigned int value, bool isLast = false) {
  Serial.print(text);
  Serial.print("=");
  Serial.print(value);
  if (!isLast) {
    Serial.print(", ");
  }
}
void printFValue(String text, float value, String units, bool isLast = false) {
  Serial.print(text);
  Serial.print("=");
  Serial.print(value);
  Serial.print(units);
  if (!isLast) {
    Serial.print(", ");
  }
}

//------------------------------------------------------------------------------------------------------------
// Arduino setup function.
void setup() {
  // Set up Blynk
  Serial.begin(9600);                   
  Blynk.begin(auth, ssid, pass);        
  dht.begin();
  timer.setInterval(1000L, sendSensor);
  
  // Set LED pin for output.
  pinMode(sharpLEDPin, OUTPUT);
  
  // Start the hardware serial port for the serial monitor.
  Serial.begin(9600);
  
  // Wait two seconds for startup.
  delay(2000);
  Serial.println("");
  Serial.println("DUST SENSOR SHARP GP2Y1014AU0F");
  Serial.println("");

//------------------------------------------------------------------------------------------------------------
  //FAN
 pinMode (IN1, OUTPUT );
 pinMode (IN2, OUTPUT );
 pinMode (IN3, OUTPUT );
 pinMode (IN4, OUTPUT );
 pinMode (PWM, OUTPUT );
 } 
//------------------------------------------------------------------------------------------------------------
// Arduino main loop.
void loop() {  
  //Blynk set up
    Blynk.run(); 
    timer.run(); 
  // Turn on the dust sensor LED by setting digital pin LOW.
  digitalWrite(sharpLEDPin, LOW);

  // Wait 0.28ms before taking a reading of the output voltage as per spec.
  delayMicroseconds(280);

  // Record the output voltage. This operation takes around 100 microseconds.
  int VoRaw = analogRead(sharpVoPin);
  
  // Turn the dust sensor LED off by setting digital pin HIGH.
  digitalWrite(sharpLEDPin, HIGH);

  // Wait for remainder of the 10ms cycle = 10000 - 280 - 100 microseconds.
  delayMicroseconds(9620);
  
  // Print raw voltage value (number from 0 to 1023).
  #ifdef PRINT_RAW_DATA
  printValue("VoRaw", VoRaw, true);
  Serial.println("");
  #endif // PRINT_RAW_DATA
  
  // Use averaging if needed.
  float Vo = VoRaw;
  #ifdef USE_AVG
  VoRawTotal += VoRaw;
  VoRawCount++;
  if ( VoRawCount >= N ) {
    Vo = 1.0 * VoRawTotal / N;
    VoRawCount = 0;
    VoRawTotal = 0;
  } else {
    return;
  }
  #endif // USE_AVG

  // Compute the output voltage in Volts. NodeMCU 3.3V
  Vo = Vo / 1024.0 * 3.3;
  printFValue("Vo", Vo*1000.0, "mV");

  // Convert to Dust Density in units of ug/m3.
  float dV = Vo - Voc;
  if ( dV < 0 ) {
    dV = 0;
    Voc = Vo;
  }
//------------------------------------------------------------------------------------------------------------
    float dustDensity = dV / K * 100.0;
    float AQI = dustDensity * 4.2 ;
  //printFValue("DustDensity", dustDensity, "ug/m3", true);
    Serial.print("Dust Density: " );
    Serial.print(dustDensity);
    Serial.print(" ug/m3");
    Serial.print("   ");
    Serial.print("AQI: ");
    Serial.print(AQI);
    Serial.print("     ");
    Serial.println("");
    Blynk.virtualWrite(V2, dustDensity); 
    Blynk.virtualWrite(V3, AQI);
    delay(100);
//------------------------------------------------------------------------------------------------------------
       digitalWrite(IN1, HIGH); 
       digitalWrite(IN2, LOW); 

  // Auto mode
           if((dustDensity) > (10)&&((dustDensity) < (15))) 
               { analogWrite(PWM, 180); } 
            
           if((dustDensity) > (15.0)&&((dustDensity) < (30.0))) 
               {  analogWrite(PWM, 220); }
                
           if((dustDensity) > (30.0)) 
               {  analogWrite(PWM, 255); }
                  
           if((dustDensity) < 10.0) 
               {  analogWrite(PWM, 0); }
            
  
} // END PROGRAM

Your void loop() usage is very bad for IoT & Blynk applications… can also cause WDT issues with ESP devices

As for your power issues, nothing we (Blynk forum) can do there… You probably need to power the ESP from a 5v external source in order to supply the needed internal current… or much higher current 3.3v source.

1 Like

Dust sensor require loop, I move it outside void loop to make it clean then it doesn’t work. Can we loop outside void loop. DHT22 still work outside loop and i wonder why ? :frowning:

const int IN1 = D5;  
const int IN2 = D6; 
const int IN3 = D7;  
const int IN4 = D8;  
const int PWM = D2;

#define BLYNK_PRINT Serial
#include <ESP8266WiFi.h>
#include <BlynkSimpleEsp8266.h>
#include <SimpleTimer.h>
#include <DHT.h>
#include "DHT.h"
#include "SharpGP2Y10.h"
#include <SPI.h>
#define DHTPIN D4
#define DHTTYPE DHT22
DHT dht(DHTPIN, DHTTYPE);
//SimpleTimer timer;
BlynkTimer timer;

char auth[] = "50f3a727f0d0403db542d94694f15be2";        
char ssid[] = "Air Purifier";        
char pass[] = "minhtamqq";         


void sendSensor() {
  float h = dht.readHumidity();     //Doc gia tri do am
  float t = dht.readTemperature();  //Doc gia tri nhiet do
  float f = dht.readTemperature(true);

  // Gan du lieu vao bien virtual de hien thi len blynk
  // Chi nen gan 10 bien tro xuong
  delay(10);
  Blynk.virtualWrite(V0, h);
  Blynk.virtualWrite(V1, t);
  
  }
  
 
//------------------------------------------------------------------------------------------------------------

  #define USE_AVG
  
  // Arduino pin numbers.
  const int sharpLEDPin = D2;   // Nodemcu digital pin D2 connect to sensor LED.
  const int sharpVoPin = A0;   // NodeMCU analog pin A0 connect to sensor Vo.
  
  // For averaging last N raw voltage readings.
  #ifdef USE_AVG
  #define N 100
  static unsigned long VoRawTotal = 0;
  static int VoRawCount = 0;
  #endif // USE_AVG
  
  // Set the typical output voltage in Volts when there is zero dust. 
  static float Voc = 0.6;
  
  // Use the typical sensitivity in units of V per 100ug/m3.
  const float K = 0.5;
    
//------------------------------------------------------------------------------------------------------------

void printValue(String text, unsigned int value, bool isLast = false) {
  Serial.print(text);
  Serial.print("=");
  Serial.print(value);
  if (!isLast) {
    Serial.print(", ");
  }
}
void printFValue(String text, float value, String units, bool isLast = false) {
  Serial.print(text);
  Serial.print("=");
  Serial.print(value);
  Serial.print(units);
  if (!isLast) {
    Serial.print(", ");
  }
}

void DustSensor() {  
     
    digitalWrite(sharpLEDPin, LOW); // Turn on the dust sensor LED by setting digital pin LOW.
    delayMicroseconds(280); // Wait 0.28ms before taking a reading of the output voltage as per spec.
    int VoRaw = analogRead(sharpVoPin);  // Record the output voltage. This operation takes around 100 microseconds.
    digitalWrite(sharpLEDPin, HIGH);  // Turn the dust sensor LED off by setting digital pin HIGH.
    delayMicroseconds(9620);  // Wait for remainder of the 10ms cycle = 10000 - 280 - 100 microseconds.

    #ifdef PRINT_RAW_DATA // Print raw voltage value (number from 0 to 1023).
    printValue("VoRaw", VoRaw, true);
    Serial.println("");
    #endif // PRINT_RAW_DATA
    
    // Use averaging if needed.
    float Vo = VoRaw;
    #ifdef USE_AVG
    VoRawTotal += VoRaw;
    VoRawCount++;
    if ( VoRawCount >= N ) {
      Vo = 1.0 * VoRawTotal / N;
      VoRawCount = 0;
      VoRawTotal = 0;
    } else {
      return;
    }
    #endif // USE_AVG
  
    // Compute the output voltage in Volts. NodeMCU 3.3V
    Vo = Vo / 1024.0 * 3.3;
    printFValue("Vo", Vo*1000.0, "mV");
  
    // Convert to Dust Density in units of ug/m3.
    float dV = Vo - Voc;
    if ( dV < 0 ) {
      dV = 0;
      Voc = Vo;
    }
//------------------------------------------------------------------------------------------------------------
      float dustDensity = dV / K * 100.0;
      float AQI = dustDensity * 4.2 ;
    //printFValue("DustDensity", dustDensity, "ug/m3", true);
      Serial.print("Dust Density: " );
      Serial.print(dustDensity);
      Serial.print(" ug/m3");
      Serial.print("   ");
      Serial.print("AQI: ");
      Serial.print(AQI);
      Serial.print("     ");
      Serial.println("");
      Blynk.virtualWrite(V2, dustDensity); 
      Blynk.virtualWrite(V3, AQI);
    
       digitalWrite(IN1, HIGH); 
       digitalWrite(IN2, LOW); 
  
    // Auto mode
             if(dustDensity > 10.0&& dustDensity < 15.0) 
                 { analogWrite(PWM, 180); } 
              
             if(dustDensity > 15.0&& dustDensity < 30.0) 
                 {  analogWrite(PWM, 220); }
                  
             if(dustDensity > 30.0) 
                 {  analogWrite(PWM, 255); }
                    
             if(dustDensity < 10.0) 
                 {  analogWrite(PWM, 0); }
              
    
  }
//------------------------------------------------------------------------------------------------------------
// Arduino setup function.
void setup() {
  // Set up Blynk
  Serial.begin(9600);                   
  Blynk.begin(auth, ssid, pass);        
  dht.begin();
  timer.setInterval(1000L, sendSensor);
  
  // Set LED pin for output.
  pinMode(sharpLEDPin, OUTPUT);
  pinMode (IN1, OUTPUT );
  pinMode (IN2, OUTPUT );
  pinMode (IN3, OUTPUT );
  pinMode (IN4, OUTPUT );
  pinMode (PWM, OUTPUT );

  
  // Wait two seconds for startup.
  delay(2000);
  Serial.println("");
  Serial.println("DUST SENSOR SHARP GP2Y1014AU0F");
  Serial.println("");

//------------------------------------------------------------------------------------------------------------
  
  //FAN

 } 
//------------------------------------------------------------------------------------------------------------

//------------------------------------------------------------------------------------------------------------
void loop() {  
  //Blynk set up
    Blynk.run(); 
    timer.run(); 

} // END PROGRAM

That’s what BlynkTimer is for… creating timed “self looping” functions.

1 Like

Thank you. You’re so kind :heart: