/*************************************************************
  Download latest Blynk library here:
    https://github.com/blynkkk/blynk-library/releases/latest

  Blynk is a platform with iOS and Android apps to control
  Arduino, Raspberry Pi and the likes over the Internet.
  You can easily build graphic interfaces for all your
  projects by simply dragging and dropping widgets.

    Downloads, docs, tutorials: http://www.blynk.cc
    Sketch generator:           http://examples.blynk.cc
    Blynk community:            http://community.blynk.cc
    Follow us:                  http://www.fb.com/blynkapp
                                http://twitter.com/blynk_app

  Blynk library is licensed under MIT license
  This example code is in public domain.

 *************************************************************
  =>
  =>          USB HOWTO: http://tiny.cc/BlynkUSB
  =>

  This sketch shows how to read values from Virtual Pins

  App project setup:
    Slider widget (0...100) on Virtual Pin V1
 *************************************************************/

/* Comment this out to disable prints and save space */
#define BLYNK_PRINT SwSerial
#define TRIGGER 9
#define ECHO    10

#include <SoftwareSerial.h>
SoftwareSerial SwSerial(10, 11); // RX, TX

#include <BlynkSimpleStream.h>

// You should get Auth Token in the Blynk App.
// Go to the Project Settings (nut icon).
char auth[] = "YOUR AUTH TOKEN HERE";

// This function will be called every time Slider Widget
// in Blynk app writes values to the Virtual Pin V1
BLYNK_WRITE(V5)
{
  int pinValue = param.asInt(); // assigning incoming value from pin V1 to a variable

  // process received value
}

void setup()
{
  // Debug console
  SwSerial.begin(9600);
  Serial.begin(9600);
  Blynk.begin(Serial, auth);
  pinMode(TRIGGER, OUTPUT);
  pinMode(ECHO, INPUT);

}

void loop()
{
  long duration, distance;
  digitalWrite(TRIGGER, LOW);
  delayMicroseconds(2);

  digitalWrite(TRIGGER, HIGH);
  delayMicroseconds(10);

  digitalWrite(TRIGGER, LOW);
  duration = pulseIn(ECHO, HIGH);
  distance = (duration/2) / 29.1;
  Blynk.virtualWrite(V5, distance);
  delay(200);
  Blynk.run();

}
i have a question, can i use this c++ code in raspberry pi? i cant find any python code to run the ultrasonic sensor with blynk apps.
Please post (formatted) code here as it is better for viewing than 3rd party links. I edited your post acordingly.
As for using that code… well, possibly, but you will have to figure out what changes to make in order to accommodate the WiringPi methods.
Python for Blynk is in Alpha stage… but there should be no reason you can’t find Ultrasonic sensor code in Python (Google is your friend ), and simply add in the Blynk library and required Blynk display and control options (well, depends on your Python experience ).
You can also look at using NodeJS on the RPi with Blynk.
as for now, i found the python code to use value display widget on blynk.
but the problem is when i run the code, there is an error said that ;
----> ImportError : No module named ‘BlynkLib’
how can i solve this?
these are the code that i run:
import BlynkLib
import time

BLYNK_AUTH = 'YourAuthToken'

# initialize Blynk
blynk = BlynkLib.Blynk(BLYNK_AUTH)

# register the task running every 3 sec
# (period must be a multiple of 50 ms)
def my_user_task():
    # do any non-blocking operations
    print('Action')
    blynk.virtual_write(2, time.ticks_ms() // 1000)

blynk.set_user_task(my_user_task, 3000)

# start Blynk (this call should never return)
blynk.run()
Found the file BlynkLib.py in /home/pi/.local/lib/python2.7/site-packages/ (on my system )
EDIT - And on my RPi3 it appears it is in /usr/local/lib/python2.7/dist-packages
And I found that if you open a Terminal CLI, go to that folder and type python, you get the Python prompt >>>
And finally, after copy/pasting the entire example sketch at that prompt, it tries to connect… now I don’t have my App set for Cloud, so I edited the BlynkLib.py file for what I think wat the proper method, but now it is getting all sorts of errors…
So until I do, I recommend you try the similar method as listed above, but using the default Cloud Server.
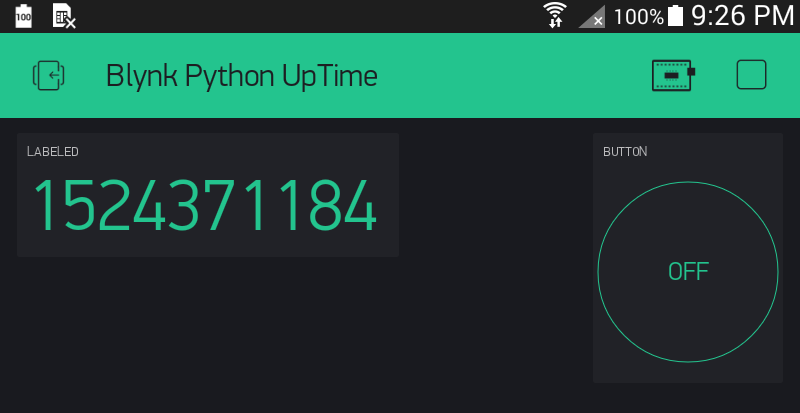
OK, using Cloud Server I was able to connect … and the Button on V1 shows CLI response, but nothing on the display Widget for uptime (EDIT - The widget needs to be set for 1 second reading frequency)…
But what a pain to get this far!!!.. somehow I don’t think this is the correct way
pi@raspberrypi:~/.local/lib/python2.7/site-packages $ python
Python 2.7.13 (default, Nov 24 2017, 17:33:09)
[GCC 6.3.0 20170516] on linux2
Type "help", "copyright", "credits" or "license" for more information.
>>> import BlynkLib
>>> import time
>>>
>>> BLYNK_AUTH = '2c78d294e11xxxxxxxxxx19ac0361e2e'
>>>
>>> # Initialize Blynk
... blynk = BlynkLib.Blynk(BLYNK_AUTH)
>>>
>>> # Register Virtual Pins
... @blynk.VIRTUAL_WRITE(1)
... def my_write_handler(value):
...     print('Current V1 value: {}'.format(value))
...
>>> @blynk.VIRTUAL_READ(2)
... def my_read_handler():
...     # this widget will show some time in seconds..
...     blynk.virtual_write(2, time.ticks_ms() // 1000)
...
>>> # Start Blynk (this call should never return)
... blynk.run()
TCP: Connecting to blynk-cloud.com:80
Blynk connection successful, authenticating...
Access granted, happy Blynking!
Current V1 value: 1
Current V1 value: 0
Current V1 value: 1
Current V1 value: 0
Current V1 value: 1
Current V1 value: 0
Install the Blynk library with THIS command and it will install in the Python 3.x version… then you can use Thonny to edit and run scripts. @vshymanskyy can you update your GitHub directions accordingly?
pip3 install blynk-library-python
That installed it in this directory in case you need to edit it for Local Server use…
i found this on pi forum, they said that almost all code examples you find around the internet are for the python 2.x version. There’s different ways of coding in python 3.x and some examples wont run in it that ran in 2.x.
so i tried to run em’ on python 2.7 instead of python 3.5 and it works just like yours.
i have these terminal widget example code run on my py 2 but there is error said;
AttributeError: 'module' object has no attribute 'dupterm'
and these are the code;
"""
Blynk is a platform with iOS and Android apps to control
Arduino, Raspberry Pi and the likes over the Internet.
You can easily build graphic interfaces for all your
projects by simply dragging and dropping widgets.
  Downloads, docs, tutorials: http://www.blynk.cc
  Sketch generator:           http://examples.blynk.cc
  Blynk community:            http://community.blynk.cc
  Social networks:            http://www.fb.com/blynkapp
                              http://twitter.com/blynk_app
This example shows how to turn a Terminal widget into
the REPL console.
In your Blynk App project:
  Add a Terminal widget, bind it to Virtual Pin V5.
  Run the App (green triangle in the upper right corner).
"""

import BlynkLib
import os

BLYNK_AUTH = 'YourAuthToken'

def hello():
    print('Welcome!')

# initialize Blynk
blynk = BlynkLib.Blynk(BLYNK_AUTH)

term = blynk.repl(5)
os.dupterm(term)

# start Blynk (this call should never return)
blynk.run()
 ), and simply add in the Blynk library and required Blynk display and control options (well, depends on your Python experience
  ).
).


 results…

 … I see now that you are using the 2nd one