Hi,
I want to read sensor data with arduino pro mini 3.3v and send the same to Blynk with nodeMCU through a Serial communication (9600 baudrate).
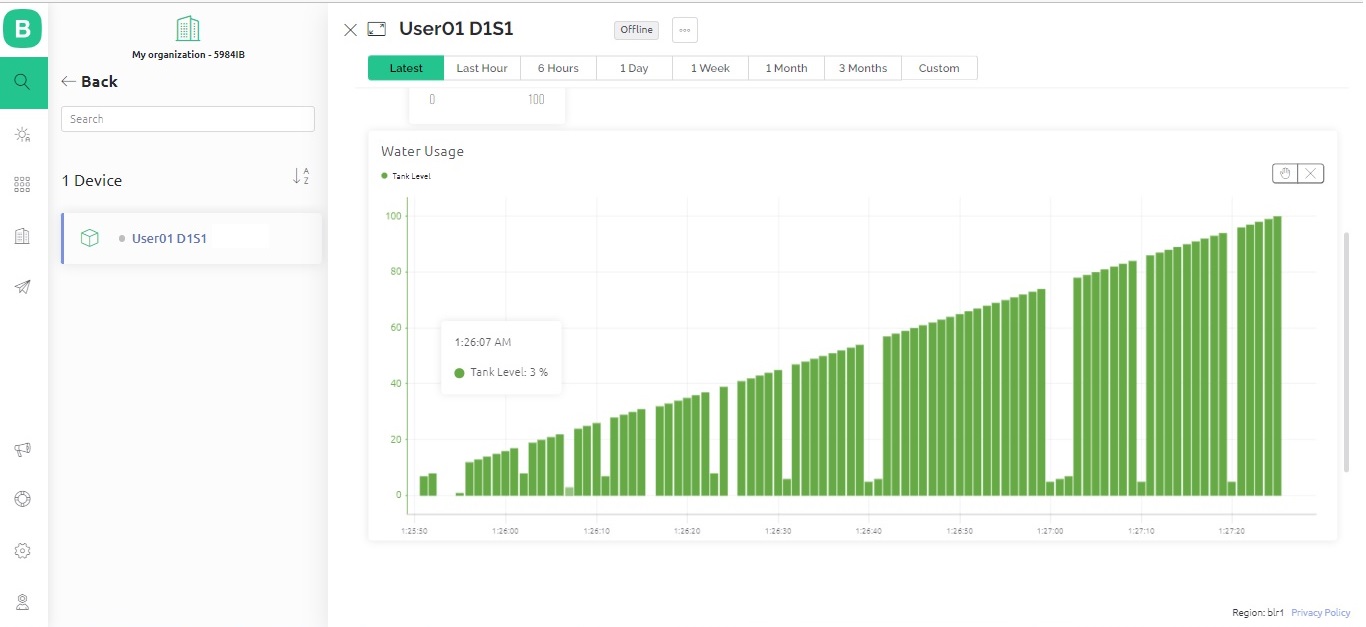
To simply test this case, I’ve created a simple FOR loop with numbers ranging from 0-100. Sending this data to NodeMCU through serial communication and monitor in Blynk cloud.
But surprisingly I’m missing 1st part of these numbers randomly. For example(actual: 23 Received:3). Check the attached graph.
I know that at first blush you are looking at the virtualwrite. I have a lot of asynchronous serial experience. At one value per second, bandwidth or buffer size shouldn’t be a problem…as long as both ends have the same baud rate.
I would put an identical loop in the NodeMCU with a virtualwrite AND a call to BlynkEdgent.run() and see if the problem is on the NodeMCU to Blynk side or on the Arduino serial side. Your data appears to show valid data being received but perhaps missing some significant bytes. If possible you could also fire up a second serial port to the monitor and print out the received data…if possible.
In the legacy platform, this would have been a simple bridge write between the Arduino and the NodeMCU, but, that is not supported in version 2.
Thanks @John93
I’ve tried this way. But the requirement is to continuously check for the serial input data and push it cloud when it is available.
Please suggest?
The reason for Arduino arrangement here is, this device is getting data from remote LoRa sensor node.So currently working device has to continuously check for the data in receiving mode. Whenever data received I am showing it in Blynk dashboard.
Remote sensor Tx(Sensor+Arduino+LoRa)
Local Rx with a display (Arduino+LoRa+Display+NodeMCU)
So basically Arduino is managing the LoRa Continuous Rx part and Display part. NodeMCU is helpful to push the data to cloud whenever Arduino communicates.
Not sure Bridging between Arduino and NodeMCU works this way.
This is the code after your suggestion, but it is not returning anything to Blynk Dashboard.
Tried with 200 mSec time interval. Arduino is still at transmitting data once per sec. But in real time use case the data transmission time is random we will get data once in 15 min.
Kindly suggest.
void setup()
{
  pinMode(4,INPUT);
  pinMode(5,OUTPUT);
  Serial.begin(9600);
  delay(100);

  BlynkEdgent.begin();
  timer.setInterval(200L, sensorDataSend); //timer will run every 200msec

}

void loop() {
  BlynkEdgent.run();
  timer.run();        // run timer every second

}

void sensorDataSend()
{
  if (Serial.available()>0)
    {
    Percent=Serial.parseInt();
    Blynk.virtualWrite(V1,Percent);
     }
}
// Fill-in information from your Blynk Template here
#define BLYNK_TEMPLATE_ID "**************"
#define BLYNK_DEVICE_NAME ""**************"
#define BLYNK_AUTH_TOKEN ""**************"

#define BLYNK_FIRMWARE_VERSION        "0.1.2"

#define BLYNK_PRINT Serial
//#define BLYNK_DEBUG
int TankPercent;
int TankHeight,OnPercent,OffPercent;
int pinValue=0;
int motorPrevious=0;
int motorPresent;
int motorStatus;
String T = "T";
String O = "O";
String F = "F";
String C;


#define APP_DEBUG

// Uncomment your board, or configure a custom board in Settings.h
//#define USE_SPARKFUN_BLYNK_BOARD
#define USE_NODE_MCU_BOARD
//#define USE_WITTY_CLOUD_BOARD
//#define USE_WEMOS_D1_MINI

#include "BlynkEdgent.h"
BlynkTimer timer;

/*BLYNK_CONNECTED() {
  // request the V1 value on connect
  // for initial connect it will be default value 1
    Blynk.syncVirtual(V2);
}
*/
BLYNK_CONNECTED() {

    Blynk.syncAll();
}

BLYNK_WRITE(V0) // read V0 and send data to micro controller
{
  pinValue=param.asInt();
  //digitalWrite(2,pinValue);
  if(pinValue==HIGH)
   {
    motorPrevious=1;
    digitalWrite(5,HIGH);
    Serial.write("M1");
    Blynk.logEvent("motor_on");
   }
    else if (pinValue==LOW)
    {
    motorPrevious=0;
    digitalWrite(5,LOW);
    Serial.write("M0");
    Blynk.logEvent("motor_off");
    }
  //Serial.print(pinValue);
  Blynk.virtualWrite(V4,pinValue);
  delay(100);
  }


BLYNK_WRITE(V2)
{
    // here you get default value 1
    TankHeight = param.asInt();
    C=T+TankHeight;
    Serial.print(C);
}

BLYNK_WRITE(V5)
{
    // here you get default value 1
    OnPercent = param.asInt();
    C=O+OnPercent;
    Serial.print(C);
}
BLYNK_WRITE(V6)
{
    // here you get default value 1
    OffPercent = param.asInt();
    C=F+OffPercent;
    Serial.print(C);
}


//BlynkTimer timer;


void setup()
{ pinMode(4,INPUT);
  pinMode(5,OUTPUT);
  Serial.begin(9600);
  delay(100);

  BlynkEdgent.begin();
  timer.setInterval(200L, sensorDataSend); //timer will run every sec


}

void loop() {
  BlynkEdgent.run();
  timer.run();        // run timer every second

}

void sensorDataSend()
{
  if (Serial.available()>0)
    {
    TankPercent=Serial.parseInt();
    Blynk.virtualWrite(V1,TankPercent);
     }
}
All that your receiving hardware setup is doing is moving the problem from one device to another, and adding to the complexity in the process.
Your Arduino has to listen for data from the LoRa Rx device and send it to the NodeMCU. The NodeMCU has to listen for that data from the NodeMCU. Eliminating the Arduino, so that the NodeMCU listens for data directly from the NodeMCU makes more sense to me.
If you’re using a LoRa I2C device with a NodeMCU then its perfectly possible to get a NodeMCU to act as a LoRa bridge.
This topic is rather painful to read, but towards the end you see some working code…
Thanks for your valuable suggestion and the post @PeteKnight
I’m trying to setup everything with NodeMCU avoiding Arduino completely. I’ll post once I checked total functionality with LoRa+NodeMCU.
I’ve a doubt regarding the keeping void loop clean. Here is the code of NodeMCU_LoRa-Rx.
In order to check the receive signal MCU should keep checking for LoRa availability in Rx mode. How this is not going to interfere with Clean void loop, suggested by Blynk?
Kindly help me to understand this.
#include <LoRa.h>
#include<String.h>
#include<SPI.h>
#include<ESP8266WiFi.h>
#include <BlynkSimpleEsp8266.h>

#define ss 15
#define rst 16
#define dio0 2
WidgetLCD lcd(V1);

char auth[] = "AuthorizationCode";
char ssid[]="WiFi Username";
char password[]="WiFi Password";

void setup()
{
  Serial.begin(9600);
  Blynk.begin(auth,ssid,password);
  Serial.println("LoRa Sender");
  LoRa.setPins(ss, rst, dio0);
  if (!LoRa.begin(433E6))
  {
    Serial.println("Starting LoRa failed!");
    delay(100);
    while (1);
  }
  Serial.println("LoRa Started");
  lcd.clear();
  lcd.print(1,0,"Waiting");
}

void loop()
{
  Blynk.run();
  String str1="",str2="";
  int packetSize = LoRa.parsePacket(),i=0,len;
  if (packetSize)
  {
    Serial.print("Received packet ");
    while (LoRa.available())
    {
      str1=str1+((char)LoRa.read());
    }
    Serial.println(str1);
    len=str1.length();
    //We can print only 15 characters in a single line.
    //If there are more than 15 characters, we print them on next line.
    if(len-15 > 0)
    {
      str2=str1.substring(15,len);
      str1=str1.substring(0,14);
    }
    lcd.clear();
    lcd.print(0,0,str1);
    lcd.print(0,1,str2);
   }
}