Blynk+uno+ESP8266 90% working Just a few question PLEASE

Hi there,

i’m doing this project to control a coffee machine with arduino uno+esp8266+Blynk and most of it i could do by my self, now let’s go to the questions, as you can see i’m not a profesional programmer, i’m learning, so i have this DS18B20 which i could connect to the arduino and send temp’s to Blynk easily following some posts on this forum.

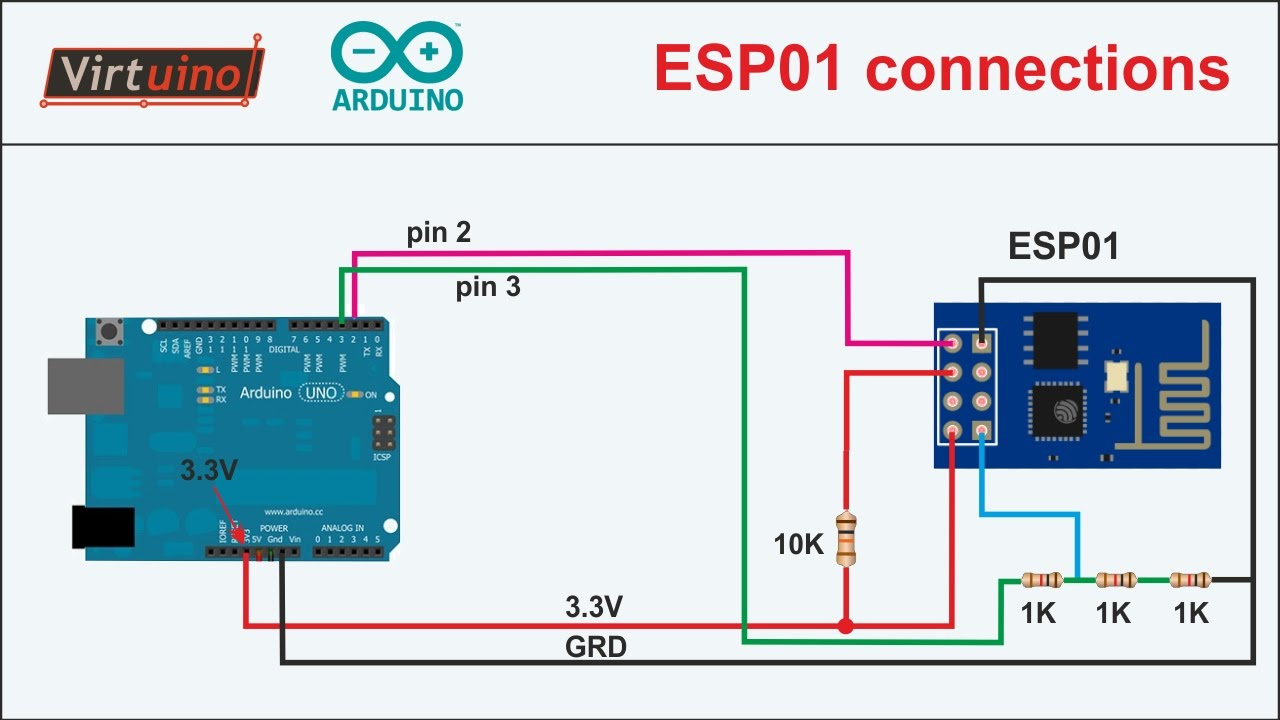
1- But now i’m having some trouble, i can connect to the esp8266 with the app but connection just starts after i start serial monitor on ArDUINO IDE if i don’t start serial monitor it looks like the ESP8266 does not connect to the WIFI any reason why?

2- I have 2 relays one connected to pin 5 which will power the machine on/off and that is very easy to do without code, just using widgets on the app i could even add a temperature condition to prevent the coffee machine from overheating.
And the second relçay is connected to pin 4 which will take the coffee, if i press Virtual button 1 on the app it will take a short coffee (16 seconds long) if i press Virtual button 2 it will take a long coffee (32 seconds long)
this is a 4 relays module that change their state when you give GND on their pins so when is HIGH relays are not energized and when is LOW they change state, the thing is everytime i restart arduino power pin 4 (or arduino) stays low for a while and just changes state to HIGH after i login on Blynk app and start playing with the buttons, after this it works perfectly fine… any tips about this??

My code in here:


/*************************************************************
  Download latest Blynk library here:
    https://github.com/blynkkk/blynk-library/releases/latest

  Blynk is a platform with iOS and Android apps to control
  Arduino, Raspberry Pi and the likes over the Internet.
  You can easily build graphic interfaces for all your
  projects by simply dragging and dropping widgets.

    Downloads, docs, tutorials: http://www.blynk.cc
    Sketch generator:           http://examples.blynk.cc
    Blynk community:            http://community.blynk.cc
    Follow us:                  http://www.fb.com/blynkapp
                                http://twitter.com/blynk_app

  Blynk library is licensed under MIT license
  This example code is in public domain.

 *************************************************************
  WARNING!
    It's very tricky to get it working. Please read this article:
    http://help.blynk.cc/hardware-and-libraries/arduino/esp8266-with-at-firmware

  You’ll need:
   - Blynk App (download from AppStore or Google Play)
   - Arduino Uno board
   - Decide how to connect to Blynk
     (USB, Ethernet, Wi-Fi, Bluetooth, ...)

  There is a bunch of great example sketches included to show you how to get
  started. Think of them as LEGO bricks  and combine them as you wish.
  For example, take the Ethernet Shield sketch and combine it with the
  Servo example, or choose a USB sketch and add a code from SendData
  example.
 *************************************************************/

/* Comment this out to disable prints and save space */
#define BLYNK_PRINT Serial
#include <SimpleTimer.h>
#include <OneWire.h> 
#include <DallasTemperature.h>
#include <ESP8266_Lib.h>
#include <BlynkSimpleShieldEsp8266.h>

// You should get Auth Token in the Blynk App.
// Go to the Project Settings (nut icon).
char auth[] = "70bafab20f6f48d58b22223d6fe9cf27";

// Your WiFi credentials.
// Set password to "" for open networks.
char ssid[] = "MatosDurkinhousehold";
char pass[] = "MatosDurkin2017";

// Hardware Serial on Mega, Leonardo, Micro...
#define EspSerial Serial
SimpleTimer timer;

#define Pin 2//  pin DATA ds18b20

// or Software Serial on Uno, Nano...
//#include <SoftwareSerial.h>
//SoftwareSerial EspSerial(2, 3); // RX, TX

// Your ESP8266 baud rate:
#define ESP8266_BAUD 115200

ESP8266 wifi(&EspSerial);
OneWire ourWire(Pin); 
DallasTemperature sensors(&ourWire);
////////////////////////////////////////////////////////////////////////////////////////////////relay 1 Short coffee

BLYNK_WRITE(V1)  // Virtual button on Vx to activate action
{
  int BTN = param.asInt();
     if (BTN == 1) {
     digitalWrite(4, LOW);  // Set pin high
     timer.setTimeout(16000, ActionOFF);  // Run ActionOFF function in 16 seconds
     }
}

void ActionOFF()
{
  digitalWrite(4, HIGH);  // Set pin Low
}
///////////////////////////////////////////////////////////////////////////////////////////////////////////////////////Relay 1 Long Coffee
BLYNK_WRITE(V2)  // Virtual button on Vx to activate action
{
  int BTN = param.asInt();
     if (BTN == 1) {
     digitalWrite(4, LOW);  // Set pin high
     timer.setTimeout(32000, ActionOFF2);  // Run ActionOFF function in 32 seconds
     }
}

void ActionOFF2()
{
  digitalWrite(4, HIGH);  // Set pin Low
}

////////////////////////////////////////////////////////////////////////////////////////////////////////////// 
void setup()
{
  // Debug console
  Serial.begin(115200);

 // Set ESP8266 baud rate
  EspSerial.begin(ESP8266_BAUD);
  delay(10);
  sensors.begin();
  delay(10);

  //pinmodes
  pinMode(4, OUTPUT);
  pinMode(5, OUTPUT);
  

  Blynk.begin(auth, wifi, ssid, pass);
  // You can also specify server:
  //Blynk.begin(auth, wifi, ssid, pass, "blynk-cloud.com", 8442);
  //Blynk.begin(auth, wifi, ssid, pass, IPAddress(192,168,1,100), 8442);
}

void loop()
{
  sensors.requestTemperatures(); 
  Serial.println("");
   
  Serial.print(sensors.getTempCByIndex(0)); 
  
  Blynk.virtualWrite(0, sensors.getTempCByIndex(0));
  
  Blynk.run();
  timer.run();
}


Look at PUSH DATA example to see how you build a Blynk compatible loop()?

Are you using an ESP-01?

Did you buy the Uno and ESP for this basic project?

Did you think about buying an ESP that doesn’t need an Uno?

Hi there,

yes i bought the boards for this project but on the beginning i was not thinking about using Blynk i jut decided recently.

Yes i’m using esp-01

I would like to use this equipment that i already have but what’s your sugestion?

did you saw my code?

Yes that’s why I wrote this:

Don’t buy any more $1.70 ESP8266-01’s when a plug and play board ESP8266 with loads of pins is available for $2.50. Means most projects don’t need an Arduino so win:win situation.

@Rafa_bmx I wouldn’t worry about what you already purchased… that fact that you got them to link together with Blynk is 99.9% of the issues with a combo like that.

But next time, save some effort (and forum guilt trips :stuck_out_tongue_winking_eye: ) and just get a fuller ESP8266 dev board like a Wemos D1 Mini or even NodeMCU.

With Arduino, all digital pins tend to default LOW (for ESP this is not quite the same, but another story for another dev board :wink: )

So, with Blynk, the best way to make sure your boards pins return to whatever last state the App button was in, is to add this function into your script. Just don’t put it INTO an existing function() or loop()… like those, this is a stand-alone function of it’s own and will get called as soon as Blynk connects, and will update all virtual pins to last know state.

BLYNK_CONNECTED() {
Blynk.syncAll();
}

You should also look into how BlynkTimer works and put all this stuff into a timed loop() of it’s own… with Blynk, it is best to keep the void loop() as clear as possible for beginner programmers.

Gunner, thanks for your help, i’m gonna take a look into that, now that i’m so close to have everything working i don’t think i want to give up and buy another board!

any tips about the fact connection just starts when i start serial monitor???

Only thing I can think of is that you are somehow sharing the same primary USB/Serial port for both the ESP connection and the Debug (serial monitor). That you are even connecting to Blynk with the serial monitor open is amazing. Usually you would have to disconnect the serial monitor for that configuration to work.

You should really be connecting the ESP to a couple of SoftwareSerial designated pins and reducing your BAUD rate for both the ESP (use AT command) and in your sketch…

for example

// or Software Serial on Uno, Nano…
#include <SoftwareSerial.h>
SoftwareSerial EspSerial(2, 3); // RX, TX
#define ESP8266_BAUD 9600

Read here… same principle for the UNO, but using Softserial and NOT the Hardware TX/RX pins on the board (they are shared with the USB port)

http://help.blynk.cc/how-to-connect-different-hardware-with-blynk/arduino/esp8266-with-at-firmware

ONE way of connecting… but best to give ESP it’s own 3.3v supply.

I’m a bit confused by this comment.
With the UNO + ESP combination, the ESP simply acts as a Wi-Fi modem for the UNO. The ESP has simple ‘AT’ firmware on it, and your UNO has your own code that you’ve written to provide the Blynk functionality.

I’m guessing that this isn’t how you’ve set things up, which is probably why you’re seeing the serial monitor issues.

Pete.

Technically the ESP-01 is the device doing the connection… just not the “thinking & I/O”.

Since the OP is connecting and can control the UNO’s digital pins, it is working… but just not ideal if wanting to use BOTH the Blynk connection AND the Serial Monitor. For that, separate pins and SoftSerial is required.

Gunner, the thing is that i’ve tried really hard to make it work on the sofserial pins but it didn’t worked and when i used the hardserial it started working straight away!! But i will give it a try again! Thanks for your help,

as i said i can connect and everything works 90% ok the only 2 problems i’m facing are those ones!

another question, i have esp baudrate at 115200 and debug console at the same baudrate, it needs to be like that or this is why i’m having this problem?

I don’t think it is a good idea to use the same serial interface for both: communication and debug console. Either disable debug console (comment it out), or redefine comm port to another, where on UNO you are left with SoftSerial.

(personally I’m not using SoftSerial. To be gentle - I don’t like it.)

Yes, it will, that is the “best” way, as long ar you don’t want to use that same port for anything else, like programming or IDE serial monitor.

SoftwareSerial does take a bit of config, but once setup to works just fine (particularly at lower BAUD rates)

Still amazed… using both Blynk connection and IDE serial monitor over the same port is like having two separate conversations at the same time.

Once you base setup is running 100% it is easier to determine if your other issues are unrelated.

Just a quick update, i bought a wemos d1 mini on amazon (fast shipping) and i just finished testing my project, it works very good, the problem i was having of the outputs going low and turning on the relay when arduino/wemos was restarted i just solved writing digitalWrite(pin, HIGH) for the pins i wanted to be HIGH on restart under void setup() and every time the board restarts it sets my outputs as HIGH straight away!!

Now i have a full remote control espresso coffe machine with temperature control ahahahaha

i will do an inscrutables for this soon

Great development boards, Blynk should hand them out when you buy their widgets :slight_smile:

2 Likes