I’m trying to update the firmware “over the air” using Blynk.Air, but the process doesn’t start.
I followed all steps on guide Firmware Over-The-Air - Blynk Documentation
Do you know if there are some well-knows problems in this moment?
At the moment there are no known issues. Do you see some progress in the shipment? Are you able to view the device serial output? What hardware do you use?
Hi Dmitry,
Blynk.Air is one of the most interesting feature in Blynk 2, I’m trying to use it for first time and I have some questions:
- Under preferred time I don’t see any option to ship immediately.
- Under apply update if the device version is xxx (who decides the actual version and the new version, is it in the name of the bin file that I must change to accomodate the version name?)
- Under HOST, what should we use as a HOST?
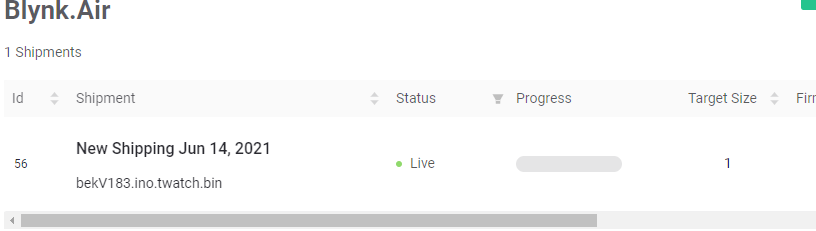
I tried to do a shipment but the progress is not going on, I see under status “Live blinking” but progress is not moving…
I’m using ESP32, on the serial monitor nothing happen …
Thanks
1 Like
Hi @Dmytro,
same problem as described by @bek. I tried to do a shipment but the progress is not going on, I see under status “Live blinking” but progress is not moving.
I’m using an ESP8266 (WeMos D1 mini Pro V2.0.0)
On the Serial monitor nothing is showed (only Connected to WiFi, Connecting to blynk.cloud:80 and Ready (ping: 30ms).
The device is ON LINE and run properly (I’m simpling switching on/off the built in led on device.
I leave field “HOST” empty.
I also tried to add #define BLYNK_FIRMWARE_VERSION "0.2.2" in order to differentiate a new firmware version, but the problem still face
@lollo71 @bek please be sure to use the Blynk.Edgent example.
Blynk.Edgent is connecting to port 443, but you log shows 80, so I assume you’re using simple examples, which do not include OTA.
3 Likes
You must increase the version number inside the code, it is usually written 0.1.0, change the number 1 to 2, for example, there is no reason other than that, I think
It is the default option when you create the shipment and it’s called “Any”.
The version is parsed from the binary file you upload during the shipment creation.
Every Blynk.Edgent firmware has 2 versions:
- Firmware version - in edgent it’s defined by BLYNK_FIRMWARE_VERSION (“fw”)
- Generic version - in edgent it’s defined by BLYNK_VERSION (“ver”)
When hardware connects to the server it’s always sends both these versions.
So server always knows what version this device has.
You should leave that field empty. It used for debugging purposes.
2 Likes
Dear @vshymanskyy,
You have right, using Blynk.Edgent it run properly and is great to see my device updated via OTA!

I had to change hardware! With LOLIN D1 Mini Pro V2.0.0, BlynkEdgent doesn’t start! The device was unable to “generate” own wifi network for auto-configuration on my home wifi network. I don’t know why…
Thank you
This was flagged-up early in the beta testing…
I see some changes to the C++ library on GitHub in the past few days from @vshymanskyy in connection with this issue, so hopefully the new library version will fix this.
Pete.
1 Like
Thanks Dmitriy for the explaination, I think the docs should be updated with your indications.
I’m really confused because the documentations are not clear, here are the steps to follow as per documentaions:
- Launch Arduino IDE. ok
- Open your sketch file which is working with Blynk application.
Here it says that I must open my working sketch and I agree because I want to ship my sketch OTA.
But it show a screen shot to open the Edgent esp32
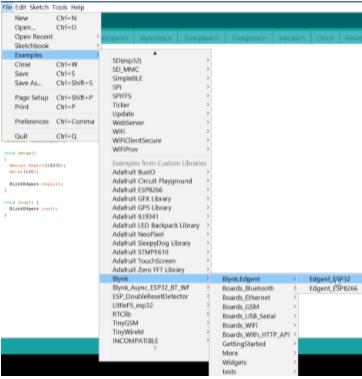
Confusion!!!
But ok, I open the Edgent esp32 and I add the two famous lines with my ID.
Here the next step should be 3 but it is 1 again:
1.Make sure you have Template ID specified in the sketch. You can find it in Template → Info in Blynk.Console…
OK added the 2 lines.
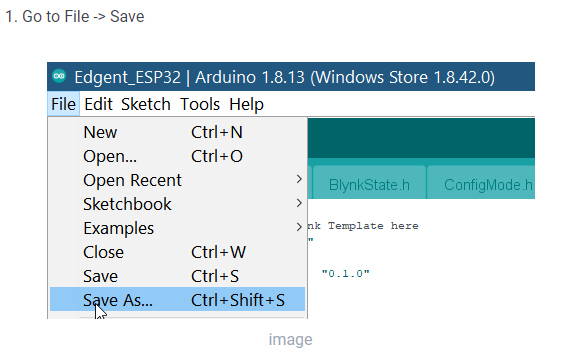
then next step still1 and asks to Save but in the screan shot is Save as
Again step still 1:
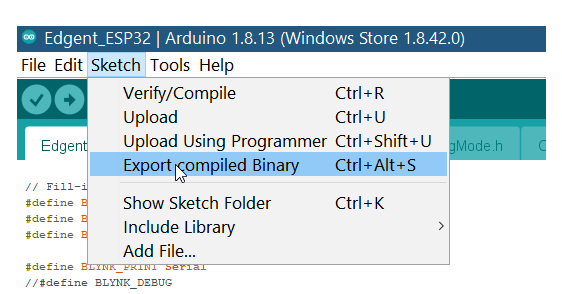
- Now go to Sketch → Export compiled Binary
But I don’t want to upload this sketck, I want to upload my sketch …
Very confusing, in my understanding if I upload the edgent sketch in my board it will work as a AP WIFI and cann’t connect to internet to be updated from blynk.air.
If I export the bin of edgent which doesn’t contain any wifi settings with my Wifi credential data, if I upload from Blynk air my board will not work… it will work as AP not ST mode.
Lollo71, how did you succeed to upload your sketch from Blynk.air? or you uploaded only the Edgent sketch?
Any clarification will be appreciated…
thanks
1 Like
Hi @bek ,
I also had to try a lot before solve.
After specified my Template ID in the Blynk.Edgent example, I uploaded it (via USB) in my device.
The device now works in AP mode. After that I proceed using the new Blynk App (on Android). Tap on “Add new device” and the provisionig process will starts. During this process, you will able to choose the wifi network where you want the device attach to. Select it an input the own password. At the end of the process, magically your device will appear in the web dashboard.
Now that the device is recognized by Blynk Cloud, you can easily start the OTA firmware update. In my case I’ve modified the Edgent Sketch in order to switch on a led connected on pin D5. To obtain the updated firmware I’ve selected “Export compiled Binary” from Arduino IDE.
Hope this could be usefull for you.
@bek i agree that the screenshots are slightly confusing, but the basic description is correct.
You need to start with the sketch that is already running on your device - uploaded via USB and provisioned via the app or the captive portal.
You then edit this sketch to make any necessary changes, and don’t forget to increment the version number in the sketch.
Export the compiled binary and open the sketch folder to find the .bin file.
When you upload it via Blynk.Air the WiFi credentials won’t be overwritten, because these are stored in NVR, which isn’t changed by the Blynk.Air upload process.
Pete.
1 Like
Thanks Lollo71 and Pete…
Now I start to see the light in the tunnel but still in the middle 
In my understanding:
- Before using the OTA or WIFI provisioning, the Device in the App must be paired with the physical board (Something like Bluetooth pairing between any app and device)… this is a must otherwise nothing will work and this is not mentioned in the documentation.
- Once paired you have to migrate all your working application into the Edgent sketch, I understand if you want to move one digital pin to test or migrating a small ino file is easy, but how if one like me who has a very huge working application with several files Cpp and h .Its is really unbelievable.
- When I compile my project this is the result:
“Sketch uses 1275482 bytes (19%) of program storage space,”
“leaving 4465056 bytes for local variables. Maximum is 4521984 bytes.”
When I compile the Edgent Standalone I get:
"Sketch uses 1029110 bytes (15%) of program storage space. "
“Global variables use 41940 bytes (0%) of dynamic memory, leaving 4480044 bytes for local variables. Maximum is 4521984 bytes.”
This means after migration I’ll not have any variable available, it is very huge…
- In my case I’m using Esp32 and I’m not able to pair, I followed the documentations and the indications of Lollo71 without success.
- I uploaded to the ESP32 the Edgent sketch after madding the 2 lines for ID.
- I see the new SSID blynk and I connect with my mobile
- When I open the App can’t do anything because the app searches for the server, and I can’t reach the option to add new device…
At the end I get this massage:
“Sorry the app could not initialize connection with the server.”
On the serial monitor I have:
282] AP SSID: Blynk bekTemplate-E4BB3
[4282] AP IP: 192.168.4.1
[4283] AP URL: blynk.setup
[20646] WAIT_CONFIG => CONFIGURING
dhcps: send_offer>>udp_sendto result 0 (This line comes once the mobile is connected to the Edgent SSID.
I tried to connect to the server from the web 192.168.4.1 with and without port 443 or 80 but nada 
Please advice what could be the reason, where is the issue in my board or somewhere else?
Regards
Of course, just like using Arduino OTA. The board must be running the OTA code already, for it to be visible to the OTA process.
I’m not sure how you work that out, I think you should study the numbers again.
From memory, that’s not how yoire supposed to be doing the provisioning, unless you have to use the workaround I described in the GitHub issue, in which case you need to open a browser and go to 192.168.4.1 and enter the SSID/Password/Auth token in the captive portal.
Yes, the OTA code in the Edgent example sketches complex, and not easily dropped-in to an existing sketch. I had a look at trying to separate it out and gave-up after a while.
Personally, if I were in your shoes I’d stick with the Arduino OTA process anyway, as it’s much easier to do directly from the IDE and the code is much simpler.
Pete.
Please send us a app logs if possible.
Where can I find the app logs? do you mean under notifications? there it says only “All is good now. List of latest important events will be logged here”. on the Web platform nothing, the problem is the the APP is not able to connect with the Server 192.168.4.1 (my Esp32)
In the serial monitor I have an infinite loop between WAIT_CONFIG and CONFIGURING:
[4279] AP SSID: Blynk bekTemplate-E4BB3
[4279] AP IP: 192.168.4.1
[4280] AP URL: blynk.setup
[14463] WAIT_CONFIG => CONFIGURING
dhcps: send_offer>>udp_sendto result 0
[63176] CONFIGURING => WAIT_CONFIG
[175166] WAIT_CONFIG => CONFIGURING
dhcps: send_offer>>udp_sendto result 0
[253245] CONFIGURING => WAIT_CONFIG
[283695] WAIT_CONFIG => CONFIGURING
dhcps: send_offer>>udp_sendto result 0
[300965] CONFIGURING => WAIT_CONFIG
Pete,
I want to use this Shipment OTA because with Arduino OTA and IDE I must be in the same WIFI network or I have to do a port forwarding which is not possible since I use 4G. Also because the Edgent code is very nice and interesting
Can you send me a link to your github comment regarding the access to the server with IP 192.168.4.1 in case of impossibility to access through the APP as in my case… Thanks
I provided the link above.
Pete.
One issue that i’m experiencing is that when the shipment successfully uploads it doesn’t move to the “finished” list and just stays in the 'Live" list. This is problematic a little because when you want to upload another shipment to the same device then you need to cancel the previous (successful) shipment to enable to new shipment to commence uploading. My device is an esp8266.
That’s correct flow in case you selected template, not specific device list. Because devices could be added to the product continuously.
If you wan the shipment to stop, you need to select specifci device you want to apply update to and not the template.
