Hello,
I am new in IoT. I want to preapre a simple project with blinking a Led.
So I copy the example code:
// Template ID, Device Name and Auth Token are provided by the Blynk.Cloud
// See the Device Info tab, or Template settings
#define BLYNK_TEMPLATE_ID "TMPLXRDm56jw"
#define BLYNK_DEVICE_NAME "Quickstart Template"
#define BLYNK_AUTH_TOKEN "hzW6yG3mlTkLFPZyVBTG_siyvSe3ttdl"


// Comment this out to disable prints and save space
#define BLYNK_PRINT Serial


#include <ESP8266WiFi.h>
#include <BlynkSimpleEsp8266_SSL.h>

char auth[] = BLYNK_AUTH_TOKEN;

// Your WiFi credentials.
// Set password to "" for open networks.
char ssid[] = "NETGEAR13";
char pass[] = "redteapot391";

WidgetLED led1(V1);

BlynkTimer timer;

// V1 LED Widget is blinking
void blinkLedWidget()
{
  if (led1.getValue()) {
    led1.off();
    Serial.println("LED on V1: off");
  } else {
    led1.on();
    Serial.println("LED on V1: on");
  }
}

void setup()
{
  // Debug console
  Serial.begin(115200);

  //Blynk.begin(auth, ssid, pass);
  // You can also specify server:
  Blynk.begin(auth, ssid, pass, "blynk.cloud", 443);
  //Blynk.begin(auth, ssid, pass, IPAddress(192,168,1,100), 8080);

  timer.setInterval(1000L, blinkLedWidget);
}

void loop()
{
  Blynk.run();
  timer.run();
}
upload to my ESP8266 device. Device connected to my WiFi but in the cloud device is offline.
@Maciej please edit your post, using the pencil icon at the bottom, and add triple backticks at the beginning and end of your code so that it displays correctly.
Triple backticks look like this:
```
The sketch you are using is for a stand-alone ESP8266 or NodeMCU board, not an Arduino board that uses the ESP8266 as a wireless modem.
Is the ESP8266 an ESP-01 and if so, is it running the factory AT firmware?
If you’ve uploaded a sketch to the ESP-01 then the AT firmware will have been overwritten.
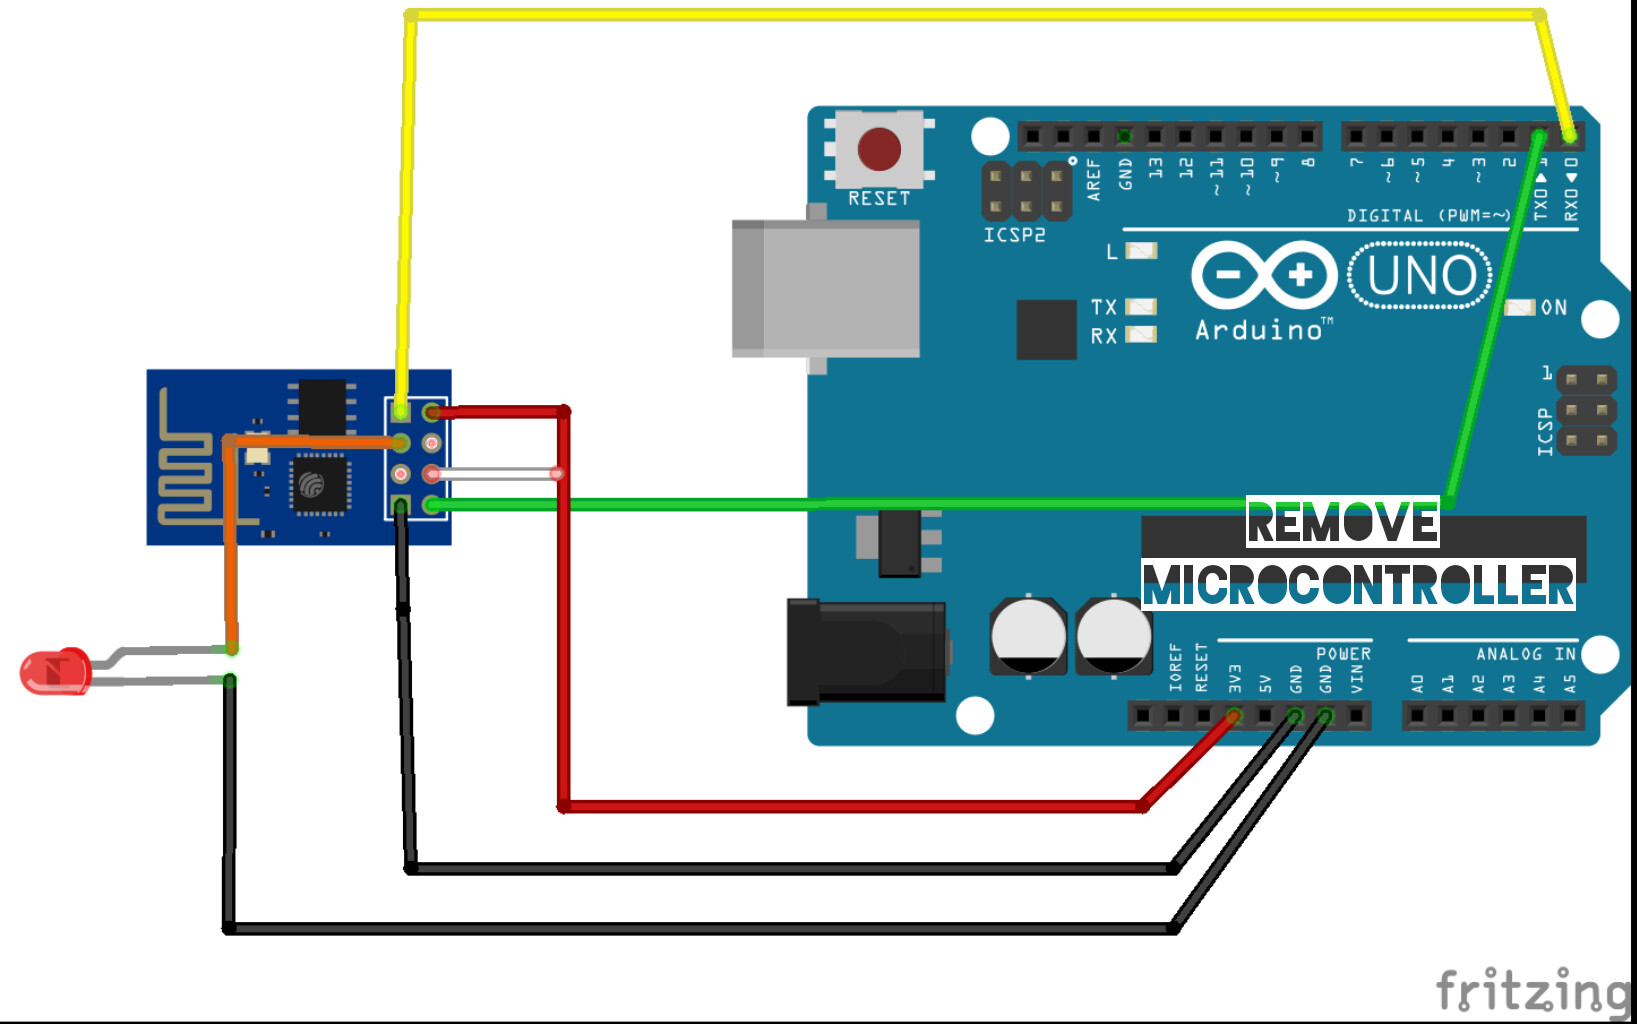
Yes. I am using ESP8266 ESP01. I have uploaded a sketch to the ESP01. Arduino works only as a serial connection.
For Blynk 1.0 it works for the following code:
/* Comment this out to disable prints and save space */
#define BLYNK_PRINT Serial
#include <ESP8266WiFi.h>
#include <BlynkSimpleEsp8266.h>
// You should get Auth Token in the Blynk App.
// Go to the Project Settings (nut icon).
char auth[] = "YourAuthToken";
// Your WiFi credentials.
// Set password to "" for open networks.
char ssid[] = "YourNetworkName";
char pass[] = "YourPassword";
void setup()
{
 // Debug console
 Serial.begin(9600);
 Blynk.begin(auth, ssid, pass);
}
void loop()
{
 Blynk.run();
}
The sketch that you are using is designed to flash an LED widget in the app, but it appears that you are trying to flash a physical LED attached to GPIO0
If you attach a widget LED to the V0 datastream (which you’ve called “Switch Control”) then it should turn on and off, assuming that you’ve managed to upload the code successfully using this crippled Uno as an FTDI adapter.
In the longer term, you’d be better using a NodeMCU or ESP32 board rather than the ESP-01
Thank you.
But the main problem is that I can successfully upload the sketch to ESP01. ESP01 can connect to wireless router. ESP01 got the IP. But In Blynk cloud the ESP01 is offline.
I think than in the next step I will try to add widgets. Or widgets are necessary to make device online?