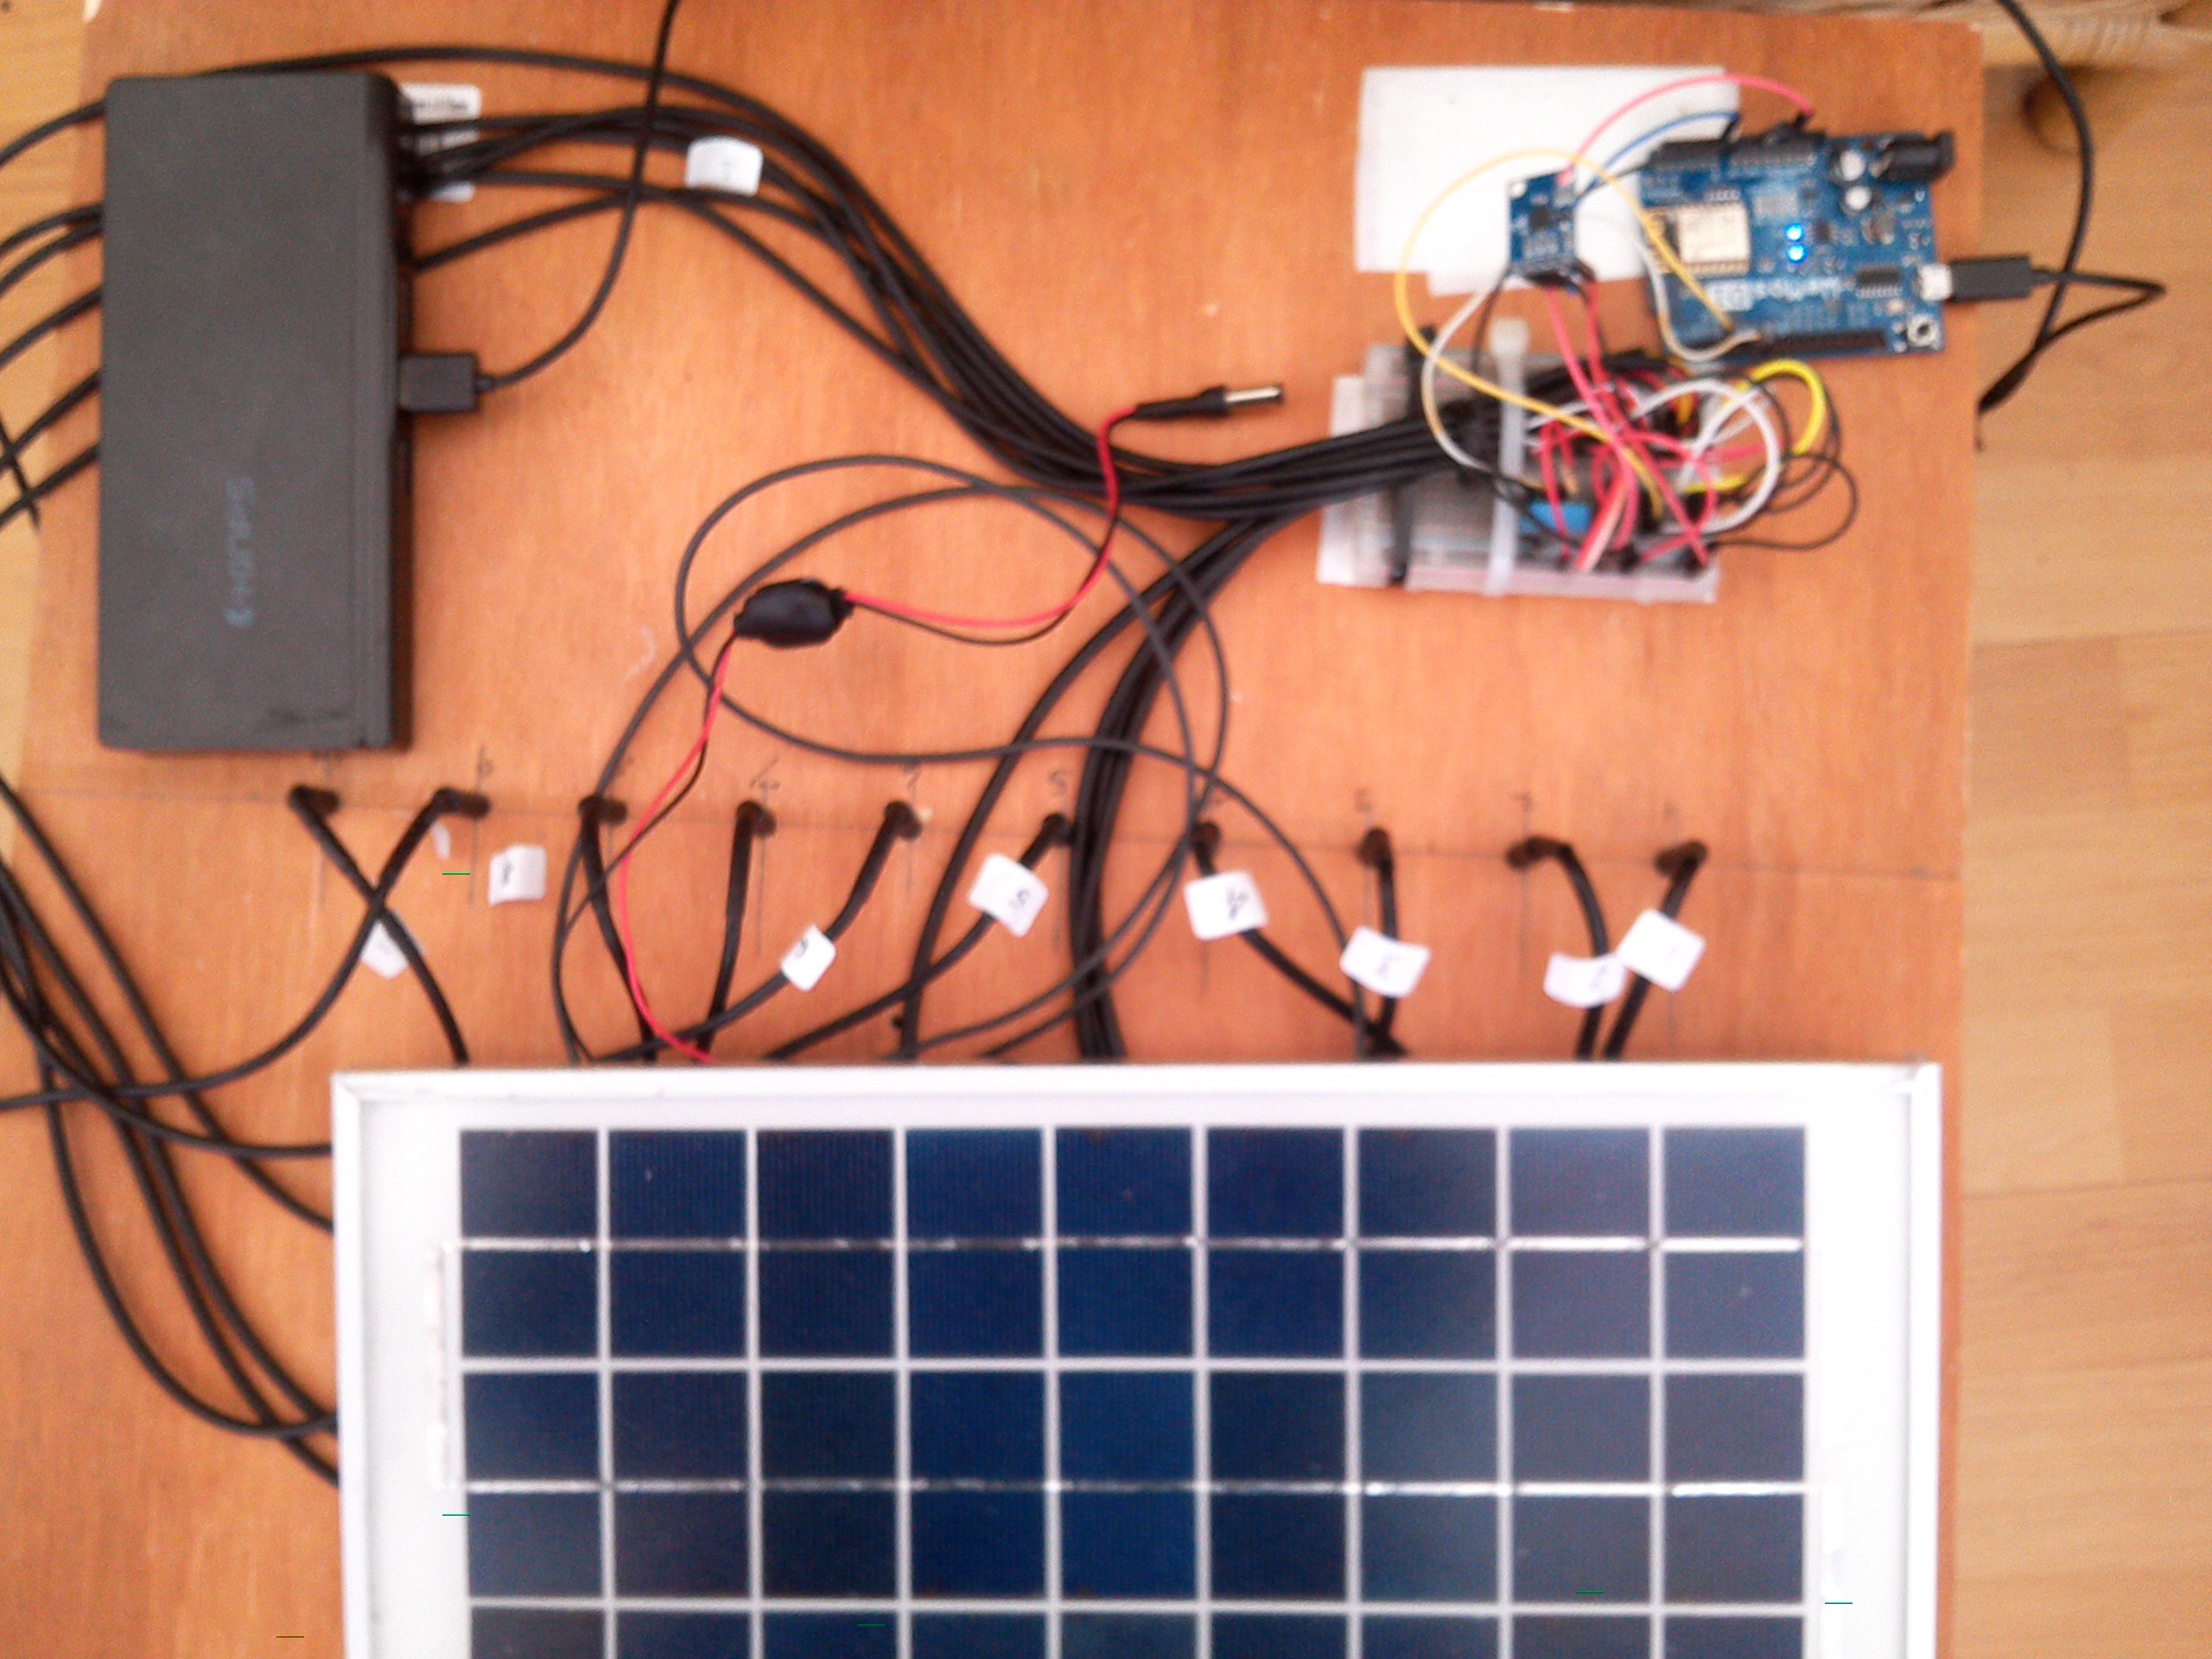
This is a photo of my hive monitoring project
There are 10 temperature sensors DS18B20
They slot down between the frames in the hive
There is a humidity sensor DHT11 buried in the wires at the moment(blue)
The board is the Wemos D1 which is simple to use for WIFi
The Solar panel is for recharging the Li powerpack
The power pack is a KINPS 20000mAh one
(some power packs turn themselves off after a while this one wont)
The DS1820 sensors are 3 wire devices Ground /power/signal
you connect all of the grounds all the power and all the signal wires
A 470R resistor goes between the signal and power connectors
The DHT11 is similar except there are 4 pins so looking at the front its power ,data,blank, and ground. This time you need a 10K resistor between power and data
The thing floating in the air between the Wemos board and the breadboard is an adxl335 accelerometer this gives information on if the hive is moving leaning fallen over etc
Again it needs a connection to power and ground and outputs X,Y,Z we only connect a wire to the Z output
Once thats done on a little breadboard for example you take the power from the 3.3 v output on the Wemos board and the ground from there that will power all the sensors NOTE 3.3V not 5
The data from the temperature sensors are brought back to pin D2 digital on the WeMos
The humidity data pin comes back to D4 digital on the WeMos
And the Z output of the accelerometer comes back to A0 on the Wemos thats Analogue 0 and its worth mentioning there is only one analogue pin on a Wemos so stick to that (there are no others)
In the Arduino IDE you need to bring in the libraries for the WeMos and then select that board to upload to
This is the code I chopped about to get it working and it really does need someone to sort it out I am no programmer however it does work 
        const int ap1 = A0;

        int tilt = 0;
        int sv1 = 0;
        int ov1 = 0;
        int sv2 = 0;
        int ov2= 0;
        int sv3 = 0;
        int ov3= 0;

        #define BLYNK_PRINT Serial    // Comment this out to disable prints and save space
        #include <ESP8266WiFi.h>
        #include <BlynkSimpleEsp8266.h>
        #include <OneWire.h>
        #include "DHT.h"
        // OneWire DS18S20, DS18B20, DS1822 Temperature Example
        //
        // http://www.pjrc.com/teensy/td_libs_OneWire.html
        //
        // The DallasTemperature library can do all this work for you!
        // http://milesburton.com/Dallas_Temperature_Control_Library

        OneWire  ds(D2);  // on pin D2 (a 4.7K resistor is necessary)

        // You should get Auth Token in the Blynk App.
        // Go to the Project Settings (nut icon).

        char auth[] = "blynk_very_longcode";
        // Use Virtual pin 5 for uptime display
        #define PIN_UPTIME V5
        #define DHTPIN D4     // what pin we're connected to
        #define DHTTYPE DHT11   // DHT 11

        DHT dht(DHTPIN, DHTTYPE);


        void setup()
        {
          Serial.begin(9600);
          Serial.println("DHTxx test!");

          dht.begin();

          Blynk.begin(auth, "XXX-SSID", "Password",IPAddress(XXX,XXXX,X,X));
        }
        // This function tells Arduino what to do if there is a Widget
        // which is requesting data for Virtual Pin (5)
        BLYNK_READ(PIN_UPTIME)

        {
          // This command writes Arduino's uptime in seconds to Virtual Pin (5)
          Blynk.virtualWrite(PIN_UPTIME, millis() / 1000);
          Blynk.run();
        }
        void loop(){

          Blynk.run();


          //Blynk.run();
          byte i;
          byte present = 0;
          byte type_s;
          byte data[12];
          byte addr[8];
          float celsius, fahrenheit;

          if ( !ds.search(addr)) {
            Serial.println("No more addresses.");
            Serial.println();
            ds.reset_search();
            delay(250);
            return;
          }

          Serial.print("ROM =");
          for( i = 0; i < 8; i++) {
            Serial.write(' ');
            Serial.print(addr[i], HEX);
          }

          if (OneWire::crc8(addr, 7) != addr[7]) {
              Serial.println("CRC is not valid!");
              return;
          }
          Serial.println();

          // the first ROM byte indicates which chip
          switch (addr[0]) {
            case 0x10:
              Serial.println("  Chip = DS18S20");  // or old DS1820
              type_s = 1;
              break;
            case 0x28:
              Serial.println("  Chip = DS18B20");
              type_s = 0;
              break;
            case 0x22:
              Serial.println("  Chip = DS1822");
              type_s = 0;
              break;
            default:
              Serial.println("Device is not a DS18x20 family device.");
              return;
          }

          ds.reset();
          ds.select(addr);
          ds.write(0x44, 1);        // start conversion, with parasite power on at the end

          delay(1000);     // maybe 750ms is enough, maybe not
          // we might do a ds.depower() here, but the reset will take care of it.

          present = ds.reset();
          ds.select(addr);
          ds.write(0xBE);         // Read Scratchpad

          Serial.print("  Data = ");
          Serial.print(present, HEX);
          Serial.print(" ");
          for ( i = 0; i < 9; i++) {           // we need 9 bytes
            data[i] = ds.read();
            Serial.print(data[i], HEX);
            Serial.print(" ");
          }
          Serial.print(" CRC=");
          Serial.print(OneWire::crc8(data, 8), HEX);
          Serial.println();

          // Convert the data to actual temperature
          // because the result is a 16 bit signed integer, it should
          // be stored to an "int16_t" type, which is always 16 bits
          // even when compiled on a 32 bit processor.
          int16_t raw = (data[1] << 8) | data[0];
          if (type_s) {
            raw = raw << 3; // 9 bit resolution default
            if (data[7] == 0x10) {
              // "count remain" gives full 12 bit resolution
              raw = (raw & 0xFFF0) + 12 - data[6];
            }
          } else {
            byte cfg = (data[4] & 0x60);
            // at lower res, the low bits are undefined, so let's zero them
            if (cfg == 0x00) raw = raw & ~7;  // 9 bit resolution, 93.75 ms
            else if (cfg == 0x20) raw = raw & ~3; // 10 bit res, 187.5 ms
            else if (cfg == 0x40) raw = raw & ~1; // 11 bit res, 375 ms
            //// default is 12 bit resolution, 750 ms conversion time
          }
          celsius = (float)raw / 16.0;
          fahrenheit = celsius * 1.8 + 32.0;
          Serial.print("  Temperature = ");
          Serial.print(celsius);
          Serial.print(" Celsius, ");
          Serial.print(fahrenheit);
          Serial.println(" Fahrenheit");

        // here we ouput the sensor values to a virtual pin

        switch (addr[7]) {

            case 0x1A:
              Blynk.run();
              Blynk.virtualWrite(V0,celsius); // Virtual 0
                break;

              case 0xCF:
              //Blynk.run();
              Blynk.virtualWrite(V1,celsius); // Virtual 1
              break;

              case 0xAC:
              Blynk.run();
              Blynk.virtualWrite(V2,celsius); // Virtual 2
              break;

              case 0xC8:
              //Blynk.run();
              Blynk.virtualWrite(V3,celsius); // Virtual 3
              break;

              case 0x43:
              //Blynk.run;
              Blynk.virtualWrite(V4,celsius); // Virtual 4
                break;

              case 0x14:
              Blynk.run();
              Blynk.virtualWrite(V15,celsius); // Virtual 15
              break;

              case 0xA8:
              //Blynk.run();
              Blynk.virtualWrite(V6,celsius); // Virtual 6
              break;

              case 0xBB:
              //Blynk.run();
              Blynk.virtualWrite(V7,celsius); // Virtual 7
              break;

              case 0xCC:
              Blynk.run();
              Blynk.virtualWrite(V8,celsius); // Virtual 8

              break;

              case 0x61:
              Blynk.run();
              Blynk.virtualWrite(V9,celsius); // Virtual 9
              //break;
             //return;


              // Wait a few seconds between measurements.
          //delay(3000);
          // Reading temperature or humidity takes about 250 milliseconds!
          // Sensor readings may also be up to 2 seconds 'old' (its a very slow sensor)
          float h = dht.readHumidity();
          //Read temperature as Celsius (the default)
          float t = dht.readTemperature();
          // Read temperature as Fahrenheit (isFahrenheit = true)
          //float f = dht.readTemperature(true);
          // Check if any reads failed and exit early (to try again).
          if (isnan(h) || isnan(t))
          {
            Serial.println("Failed to read from DHT sensor!");
            delay(120);
            return;
            }


          // Compute heat index in Fahrenheit (the default)
          //float hif = dht.computeHeatIndex(f, h);
          // Compute heat index in Celsius (isFahreheit = false)
          //float hic = dht.computeHeatIndex(t, h, false);

          Serial.println(" ");
          Serial.print("Humidity: ");
          Serial.print(h);
          //Serial.print(" %\t");
          //Serial.print("Temperature: ");
          //Serial.print(t);
          //Serial.print(" *C ");
          //Serial.print(f);
          //Serial.print(" *F\t");
          //Serial.print("Heat index: ");
          //Serial.print(hic);
          //Serial.print(" *C ");
          //Serial.print(hif);
          //Serial.println(" *F");
               Blynk.virtualWrite(V10,h); // Virtual 10
               //Blynk.run;

        //took bits out of here all the sensors go to wemos 3.3V output

         //analogReference(EXTERNAL);    //connect 3.3v to AREF
          // read the analog in value:
          sv1 = analogRead(ap1);
          // map it to the range of the analog out:
          ov1 = map(sv1, 0, 1023, 0, 1023);
          // change the analog out value:
          delay(10);
           sv2 = analogRead(ap1);
          // map it to the range of the analog out:
          ov2 = map(sv2, 0, 1023, 0, 1023);
          // change the analog out value:
          delay(3);
          Serial.println(" ");
          Serial.println(sv1);
          delay(10);
          Serial.println(sv2);
          Serial.println("   ");
          delay(10);
          if ((((ov1-ov2)>1)||((ov1-ov2)<-1))&&(ov1>570)){
          delay(10);
          Serial.println(" ");
          Serial.println( "Moving");
          //Blynk.run();
          //Blynk.virtualWrite(V11,"Hive"); // Virtual 11
          //delay(500);
         // Blynk.virtualWrite(V11,"Move"); // Virtual 11
          delay(50);
          Blynk.virtualWrite(V11,"{~}"); // Virtual 11

          return;
         }
          if((ov1<570)){
          Serial.println(" ");
          //Blynk.virtualWrite(V11,"WARN"); // Virtual 11
         // Blynk.run();
         // delay(500);
          //Blynk.virtualWrite(V11,"ING"); // Virtual 11
          //delay(500);
          //Blynk.virtualWrite(V11,"HIVE"); // Virtual 11
          //delay(500);
          //Blynk.virtualWrite(V11,"DOWN"); // Virtual 11
          //Blynk.run();
          delay(50);
          Blynk.virtualWrite(V11,"]_/]"); // Virtual 11
          Blynk.run();

          Serial.println("WARNING_HIVE_DOWN");
          return;}

         if ((ov1>570)&&(ov1<590)){
          delay(10);
          Serial.println(" ");
          Serial.println("Lean");
          //Blynk.virtualWrite(V11,"Lean"); // Virtual 11
          delay(50);
          Blynk.virtualWrite(V11,"_//"); // Virtual 11
          Blynk.run();

          return;


          }else{

          Serial.println(" ");
          Serial.println("OK");
          Blynk.virtualWrite(V11,"[=]"); // Virtual 11}
          Blynk.run();
             return;
           //break;

              }

          }
        }
Once you run the code you click on the serial monitor in the Arduino IDE hopefully you will see the temp sensors scrolling by giving their data
The DHT11 will miss a few times till it gets going
It wont work with Blynk yet
As you see the sensors scroll make a note of the last two hex numbers identifying each one They are all unique
Arrange them on your board in the order they appear and using your list go into the code find the switch statement and substitute your hex numbers for the ones assigned to the virtual pins
The humidity should work as is
The accelerometers are all different so you need to get the thing level and see what value comes up for that state in the Arduino serial window
Nip into the code and make adjustments for the values for, [=] upright, {~} moving, _// leaning
and ]//] hive fell over
Now the Blynk app is going to look like this when finished
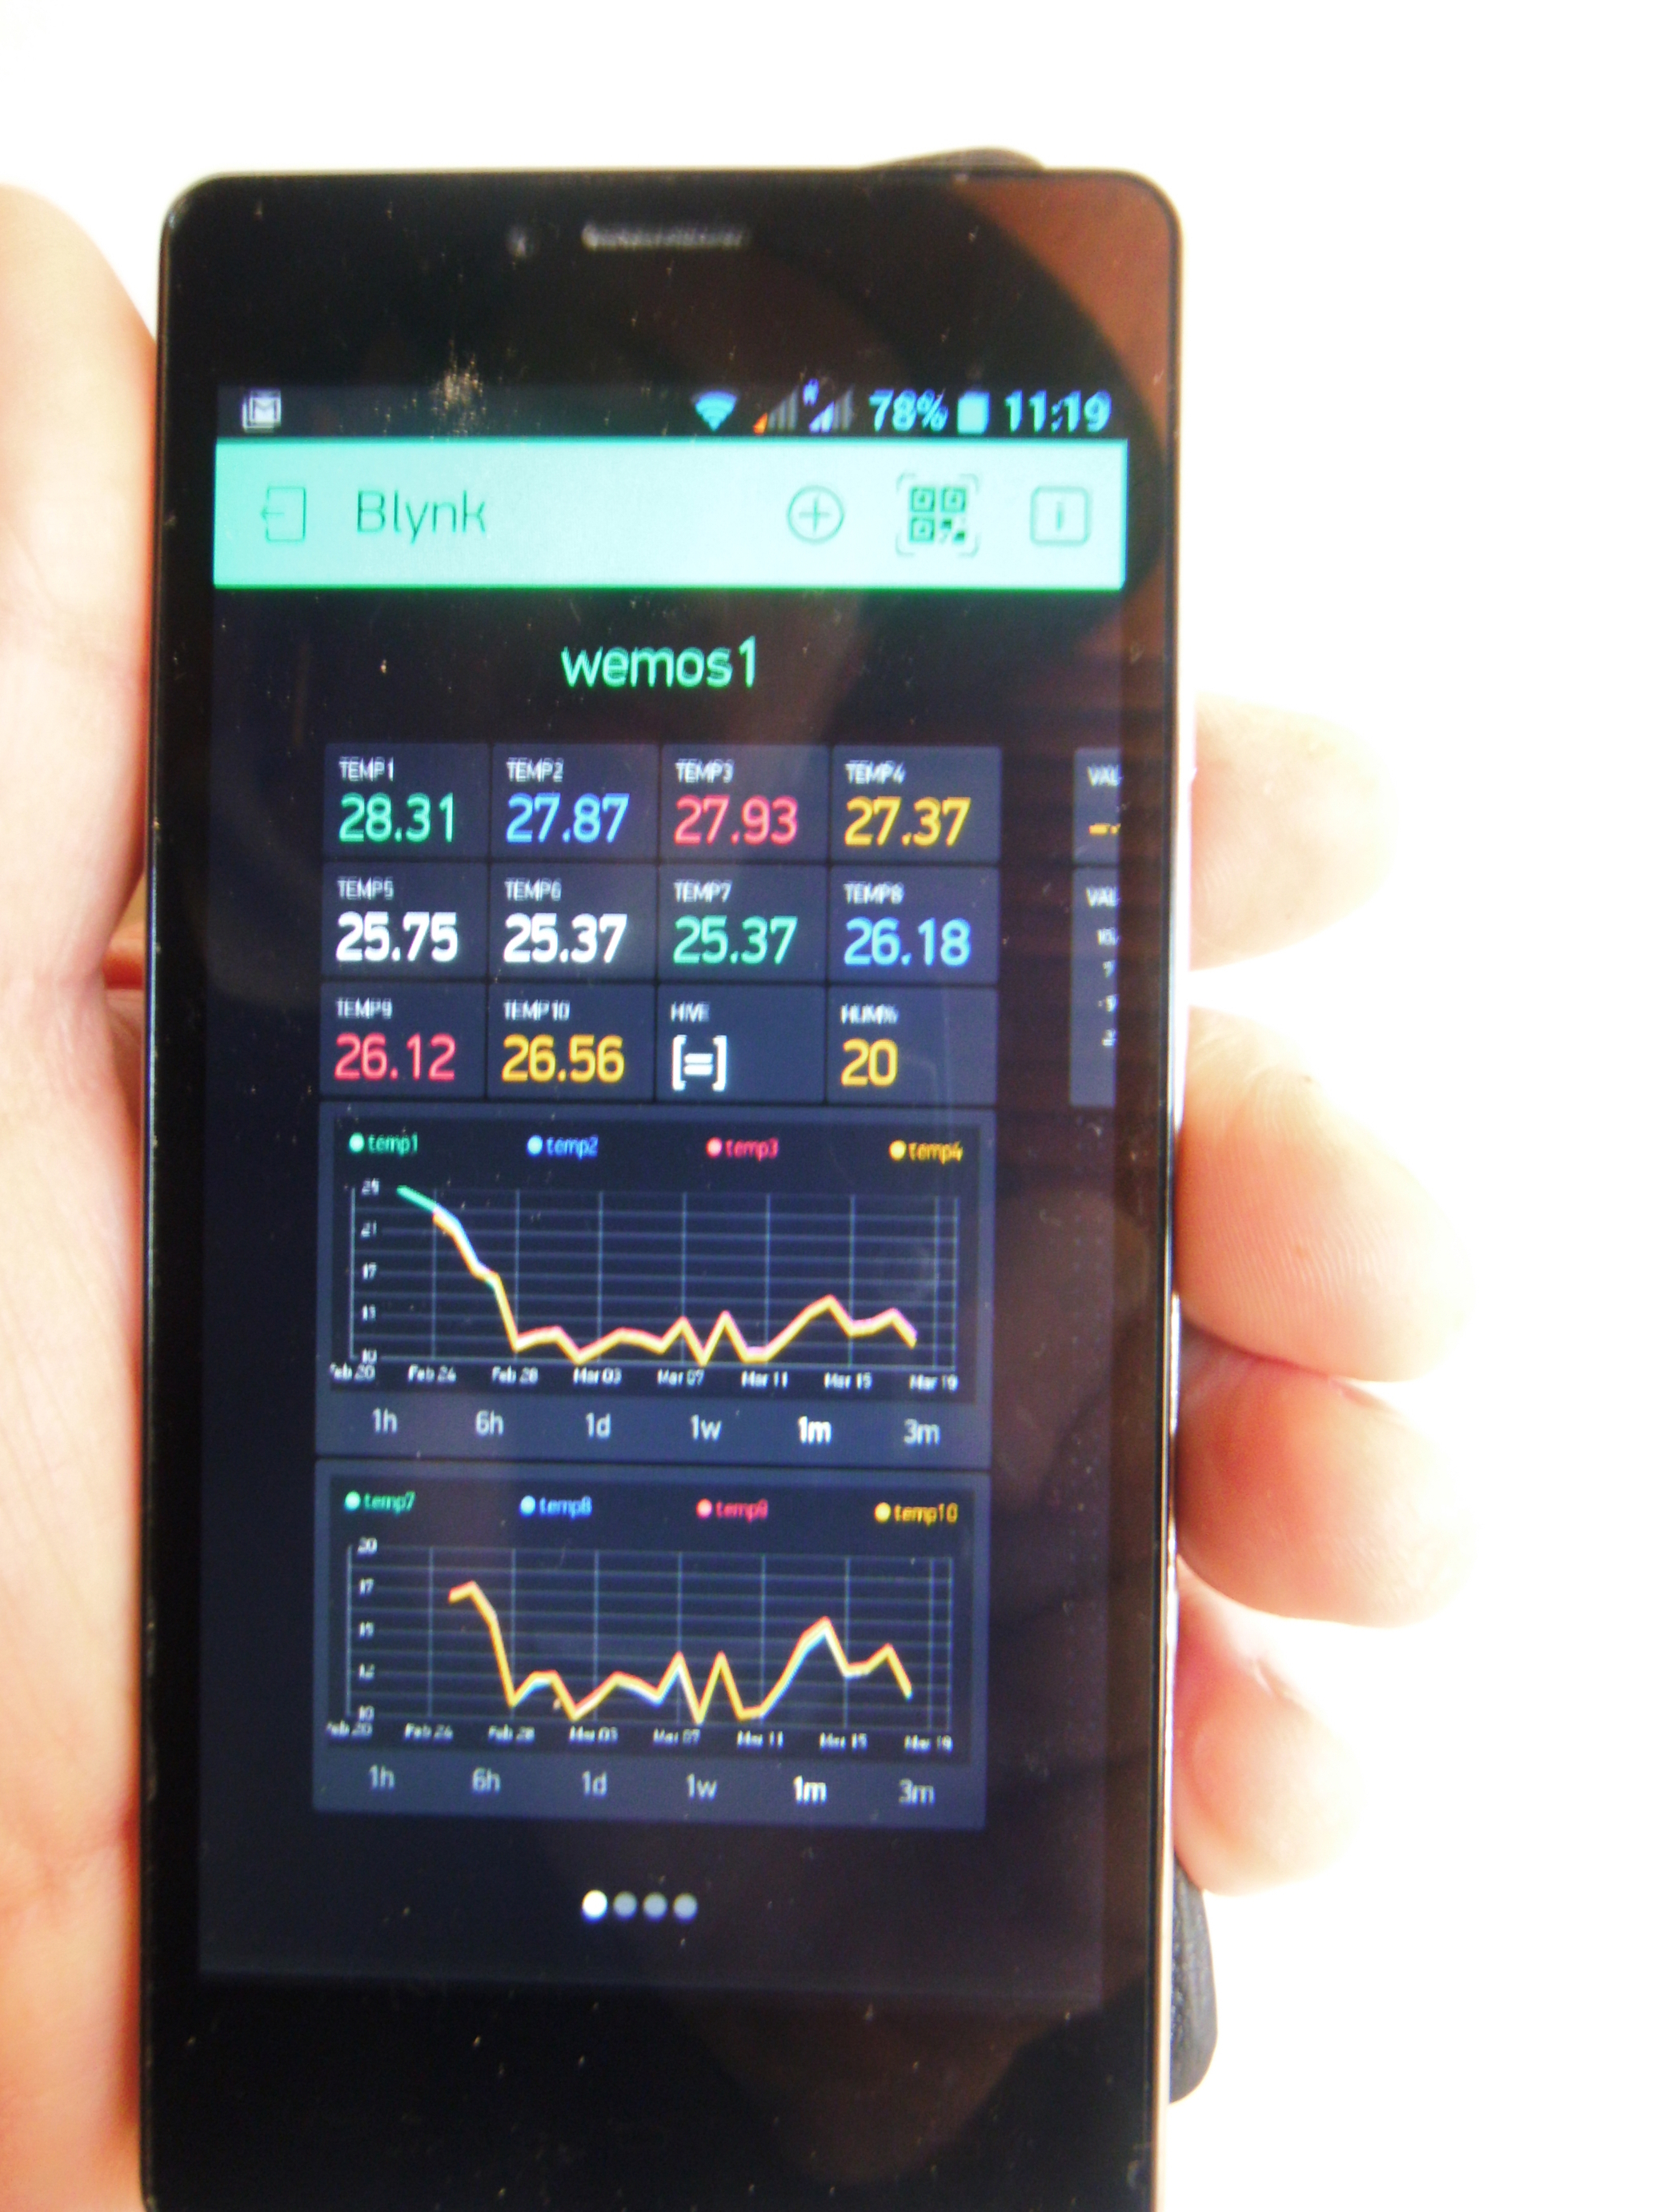
Thats 10 value buttons one for each temperature sensor
One value button for hive state/position
And one value button for humidity
The two history graphs track the temperature changes to 8 of the sensors
*** removed the QR code which was for cloning the project ?****
The virtual outputs are assigned to individual value buttons
This means temperature sensor 1 is output to V0 etc
The odd one out is V5 which is already assigned to Millis which is handy for testing
So the output of temp sensor 4 is on V15 instead
Sorry I can’t put up a shared QR code because that would require energy and the project pre dates energy