Beehive connected

Hello everyone,
I’m coming back to my evolution of my connected hive project. The main problem I had, was having a wifi connection available around my house, and I moved to a LORA connection. I first made a gateway with a Raspberry PI with a dragon module connected to the TTN server. Then with a nano ESP32 TTGO and a Lora modulre RFM 95 I made a transmitter module called LoraNode. This module sends the weight, temperature, pressure, humidity, connection number and Lora parameters every X minutes (With a deep sleep function). This data is then sent to TTN, retrieved by Node-red (installed in the raspberry) and sent back to the Blynk server.

My LoraNode :grinning:

Next for me is to creat a outdoor lora gateway, test the maximun distance range I can have and install my new Loranode under a hive! and if all work creat a PCB!

7 Likes

Wow! I love the way that you’ve developed your skills so much in the last year or so.

Keep us posted on how this works out.

Pete.

4 Likes

Hi Guys
Im new to Arduino and Blynk ive just started bee keeping aswell, im trying to recreate this project as its exactly what i want to do with my hives, however i seem to be falling at the first hurdle i keep getting error messages around the libraries required. multiple libraries found when i try to compile the code
are the libraries specific ones if so is there a link ?
any help or pointers would be great
thanks.

Presumably you have already installed the Blynk library?
With the others, its best to install them via the Arduino IDE - Sketch>Include Library>Manage Libraries or if they aren’t available there then google them.

Pete.

HI Pete
yes i think so ive also installed several other libraries as well. if i search for say hx711 several libraries come up im thinking they are all different? so how do i know which one i need? ill start again from scratch tonight and re install them

Hi @Spanker. the point you make is a very valid one, and I think its something we could all learn from when we’re developing code that uses libraries that are outside the standard “out of the box” Arduino IDE install.

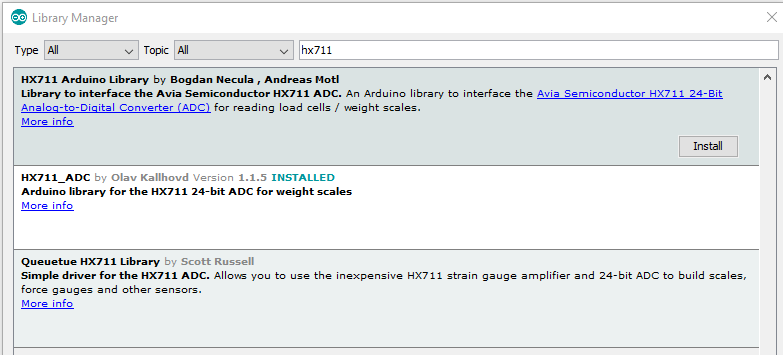
If I search the Arduino IDE library manager for “hx711” I get three results (one of these may be because I’ve installed a library myself, but you should probably see at least two results anyway)…

Here’s how I would go about trying to work-out which is the correct library to use. It’s not a foolproof system, and to a degree it depends on the authors of the libraries using the keywords file correctly, but it’s a good starting place.

@christophebl’s latest code (the ESP32 version) contains these two calls to the HX711 library:

scale.set_scale(calibration_factor)
scale.get_units()

If we click the “more info” link in the Arduino Library Manager for each of the HX711 libraries it will open the GitHub page for each library.
In each library you’ll see a keywords.txt file. This is used to tell the Arduino IDE which commands to highlight in a different colour on the screen, but it’s a handy way to quickly view the available function calls (probably ‘methods’ we’re being picky, but I’ll call them functions here) that are available in the library (assuming it’s been populated correctly by the developer).

The first library in my screenshot contain a keywords file that looks like this (I’ve removed some irrelevant parts):


is_ready	            KEYWORD2
set_gain	            KEYWORD2
read_average	        KEYWORD2
get_value	            KEYWORD2
get_units	            KEYWORD2 <--------
tare	                KEYWORD2
set_scale	            KEYWORD2 <--------
get_scale	            KEYWORD2
set_offset	            KEYWORD2
get_offset	            KEYWORD2
power_down	            KEYWORD2
power_up	            KEYWORD2

You’ll see that both set_scale and get_units exist in this list.

The next library in my screenshot has these keywords:

begin	                KEYWORD2
start	                KEYWORD2
startMultiple	        KEYWORD2
setGain	                KEYWORD2
tare	                KEYWORD2
tareNoDelay	            KEYWORD2
setCalFactor	        KEYWORD2
getCalFactor	        KEYWORD2
getData	                KEYWORD2
getSingleConversion	    KEYWORD2
getSingleConversionRaw	KEYWORD2
getReadIndex	        KEYWORD2
getConversionTime	    KEYWORD2
getSPS	                KEYWORD2
getTareTimeoutFlag	    KEYWORD2
disableTareTimeout	    KEYWORD2
getSettlingTime	        KEYWORD2
powerDown	            KEYWORD2
powerUp	                KEYWORD2
getTareOffset	        KEYWORD2
getTareStatus	        KEYWORD2
setTareOffset	        KEYWORD2
setSamplesInUse	        KEYWORD2
getSamplesInUse	        KEYWORD2

You’ll see that although there are more available functions in this library, and there are some duplications such as tare, neither set_scale and get_units exist in this list.

The last library’s keywords file look like this:

readyToSend	            KEYWORD2
read	                KEYWORD2

Which is very different to either of the other two and doesn’t contain the set_scale orget_units functions.

This means that it’s a fairly good bet that the library that @christophebl has used is the first one in the screenshot above, or it’s a 3rd party library that he’s fond from somewhere (fingers crossed that it’s the first).

So, the lesson is that it’s good practice to add a comment with the URL of the library alongside each of the libraries that you include. It’s also good practice to record which version of the library was used when you wrote/tested/compiled the code, as its not unheard of for new versions to drop retired commands, or for a newly added command top only be available from a certain version onwards.

If the keywords file doesn’t exist (it is optional), or you want to be more certain about the whole range of functions available, it’s possible to view the .cpp file (usually located in the src folder) and pick your way through it looking for functions that are a available within the library.

I also take a copy of every zip file library that I install and keep them in a separate folder, just in case I want to re-install the Arduino IDE with exactly the same libraries that I originally used.

Pete.

2 Likes

Thanks for the info pete that will be usefull, ive reloaded the ide and put fresh libraries in im trying to comile christophebl first code for the esp8266, which is the board i have
im still getting the error multiple libraries found, and an error saying SSD1306.h could not be found, i commented out wire.h and ssd1306.h as i think these are for an oled display?

and now get error

no matching function for call to ‘HX711::HX711(const int&, const int&)’

ive installed all 3 libraries out of the manager for the hx711 and looked at the example code that comes with them as a ref but they all seem to ref loadcell instead of scale

// Capteur de poids setting
const int SCALE_DOUT_PIN = D5;
const int SCALE_SCK_PIN = D6;
HX711 scale(SCALE_DOUT_PIN, SCALE_SCK_PIN);

H i Pete ive managed to get it to compile:grinning: im not 100 % sure how. I worked through a couple in error messages with google and it verified. ill upload it and see if it works:crossed_fingers:

1 Like

This isn’t really an error, it’s a warning message to tell you that the compiler may not be using the library that you expected.

This isn’t really the best approach. The compiler will only use one of the libraries, and giving it three to choose from will give you a 33% chance of it choosing the correct one.

This is the type of error message that you’d expect to get if the compiler is using the wrong library. As I explained in my earlier post, the code is trying to call functions called set_scale and get_units and if these aren’t in the library the you’ll get the “no matching function” message.
The best approach is to un-install the incorrect HX711 libraries so that the compiler is forced to use the correct one.

Anyway, glad you’ve managed to get it to compile, but you need to do some tidying-up of your libraries so that you have repeatable results every time you compile the code in future.

Pete.

1 Like

Thanks Pete is there an uninstall for libraries or is it just a case of deleting them out of the libraries folder?
or can you create a project folder and just add the libraries that are needed?

so for future libraries as long as they have the functions that are listed in the key words or somewhere in the code they should work?

sorry for all the questions im just trying to get my head around how this all works.

I loaded it last night which seemed to go ok but i didn’t see any readings i tried shortening the deep sleep time but it didn’t like that.
is there a way to disable this bit while im testing?

Thanks

Hey how did this turn out? I’m looking to do a project just like this.

Jim

Hello everyone,
I want just to give you some news of my Beehive project. I made my PCB with only an ESP32 module and all the sensors I need plus solar panel. I measured the depth sleep current it’s less that 100µA so give me 1 year without solar.


5 Likes

Hi,
why you not chose single esp/lora board like https://heltec.org/project/wifi-lora-32/. Low power( without LCD and LEDs), onboard SH1.25-2 battery interface,integrated lithium battery management system (charge and discharge management, overcharge protection, battery power detection, USB / battery power automatic switching) and sleep current ≤800uA. and price is under 19$
best regards
Boban

Hi Banbo,
I try first this Heltec board and it’s working fin but there on input that I used for my load sensor that is used already for the Lora part… So it’s the reason I was design my PCB board :).
christophe

Hi
Why is it that I can’t compile the program? Discard this error:‘blynk_server’ was not declared in this scope

Un-comment this line if you’re using the Blynk cloud server.

Pete.

Thanks for the quick response. I still want to ask what kind of motherboard do you need to set up?

The code in post #17 is written for an ESP32 MCU, like this…

Pete.

Thanks for the help, but you always write something wrong … :frowning_face: :frowning_face:

Always!

Pete.