Thanks Pete for your repply.
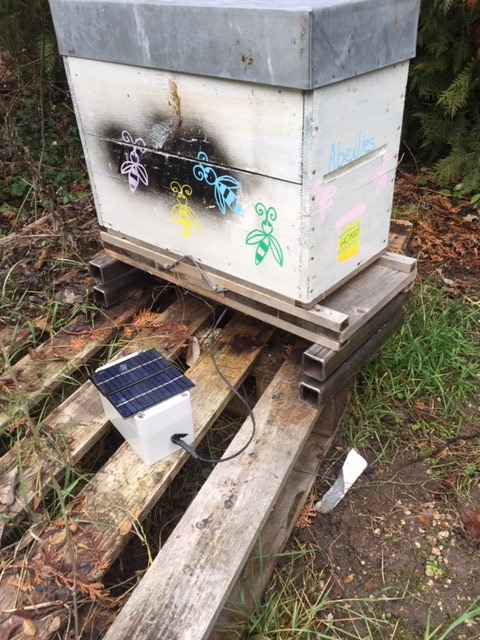
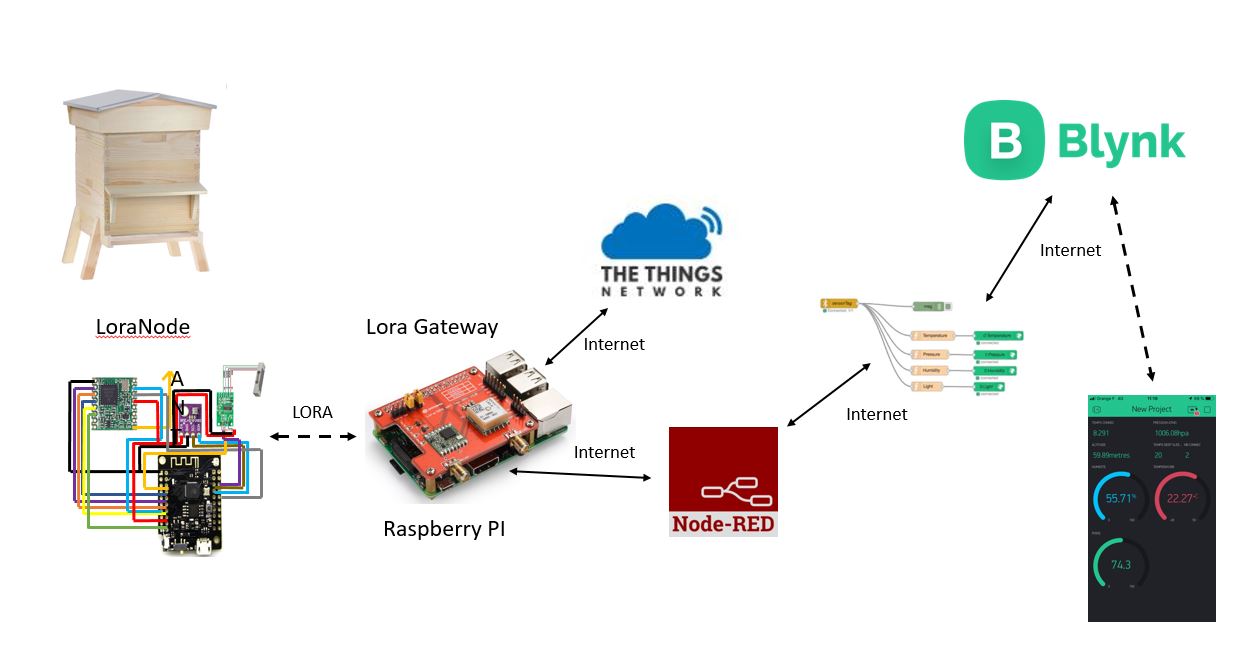
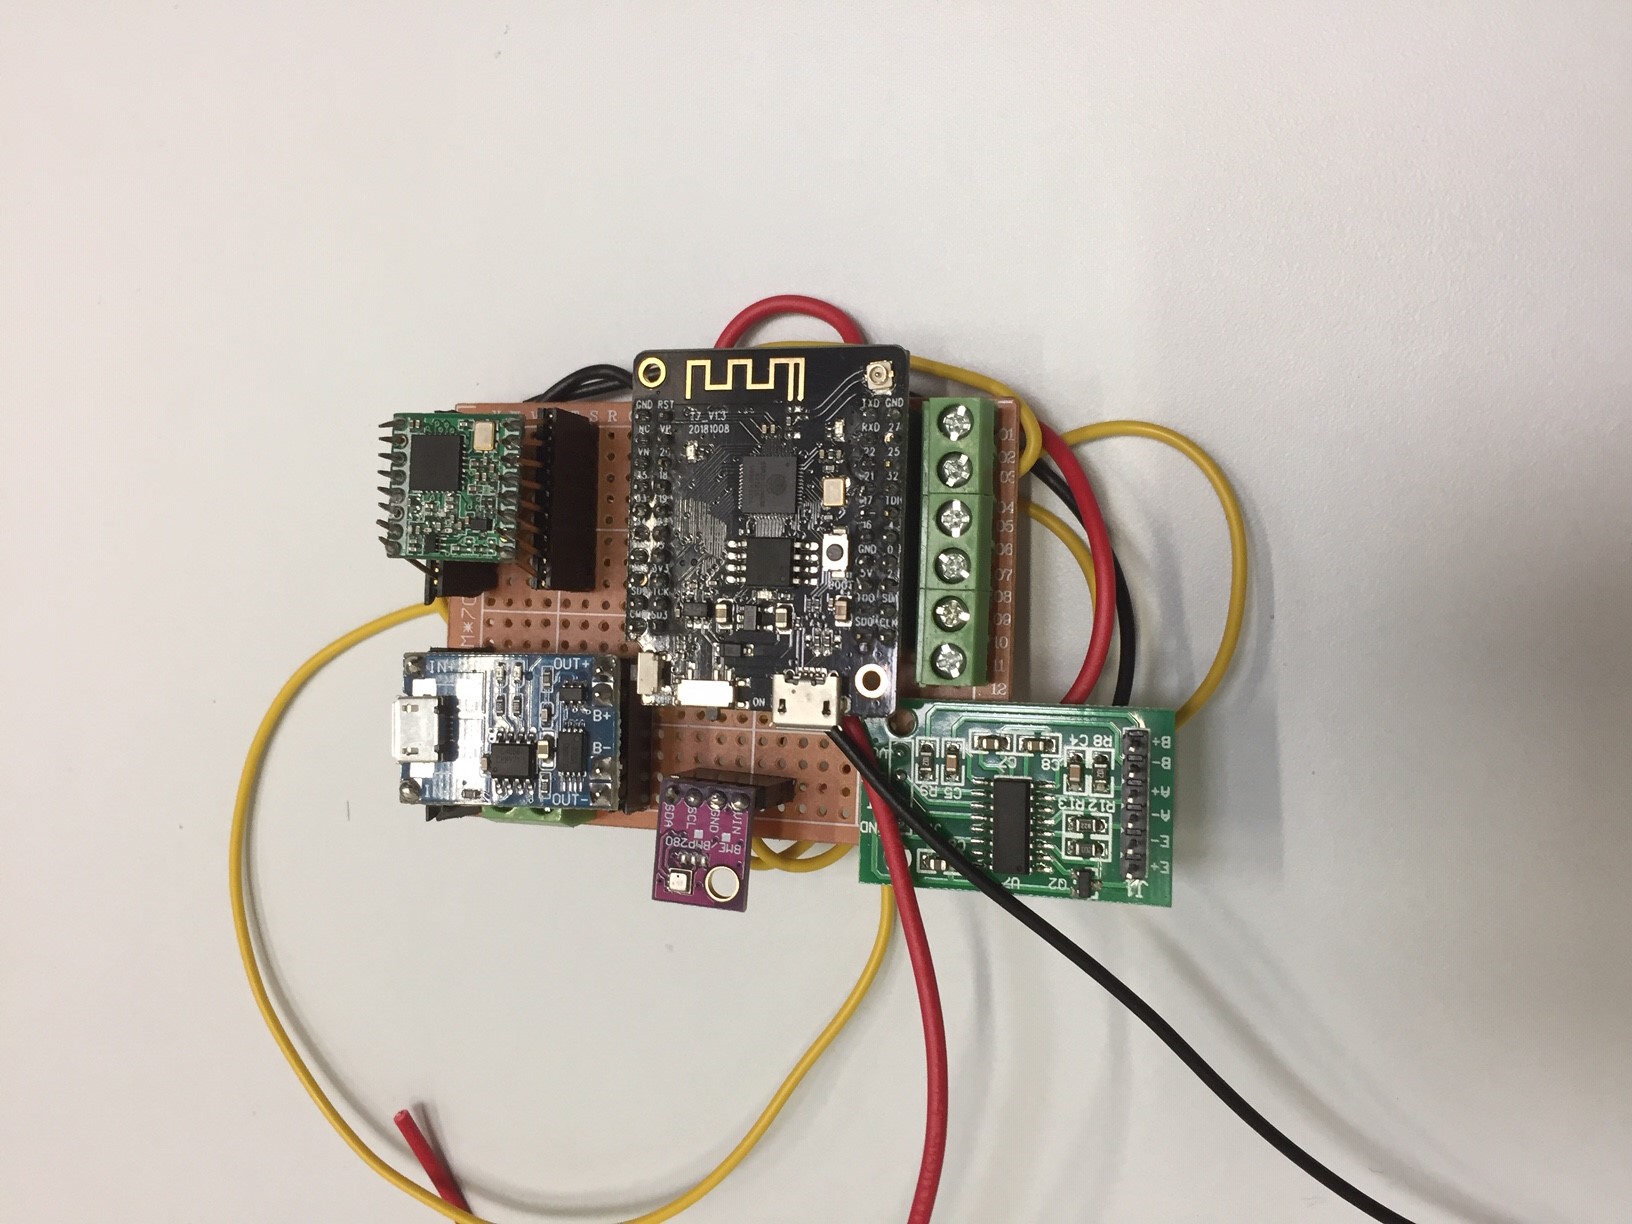
All now it’s working perfectly. My new project is to get data access when my beehives are in a forest… GSM can be one solution but if a have many beehive to connect it will cost a lot!!! so one solution is to use Lora. So I will try to make a Gateway with The Things Network and after try to connect my ESP32 with a Lora module. Some of you have experience with Lora?
Here my new code:
Again without the help of Pete, this code will be not working propely. Many thanks again Pete! 
#include <WiFi.h>
#include <WiFiClient.h>
#include <BlynkSimpleEsp32.h>
#include "max6675.h"
#include <OneWire.h>
#include <DallasTemperature.h>
#include <Wire.h>  // Only needed for Arduino 1.6.5 and earlier
#include <Adafruit_Sensor.h>
#include <Adafruit_BME280.h>
#include "HX711.h"


#define uS_TO_S_FACTOR 1000000  /* Conversion factor for micro seconds to seconds */
#define TIME_TO_SLEEP 7200      /* Time ESP32 will go to sleep (in seconds) */
#define BLYNK_PRINT Serial

//capteur de poids
#define DOUT  17
#define CLK  16
//void getWeight(void);
float weight = 0;
//HX711 scale(DOUT, CLK);
float calibration_factor = - 19800;  //You must change this factor depends on your scale,sensors and etc.


// Data wire is plugged into port 4 on the Arduino or ESP32
#define ONE_WIRE_BUS 15
#define TEMPERATURE_PRECISION 100

// Setup a oneWire instance to communicate with any OneWire devices (not just Maxim/Dallas temperature ICs)
OneWire oneWire(ONE_WIRE_BUS);

// Pass our oneWire reference to Dallas Temperature.
DallasTemperature DS18B20(&oneWire);
float tempruche;

//BME sensor
#define SEALEVELPRESSURE_HPA (1013.25)
Adafruit_BME280 bme; // I2C
unsigned long delayTime;


RTC_DATA_ATTR int bootCount = 0;

// You should get Auth Token in the Blynk App.
// Go to the Project Settings (nut icon).
const char auth[] =            "################";
//const char blynk_server [] =   "blynk-cloud.com"; // new variable to hold the name of the Blynk server
//const int blynk_port =         8080;              // new variable to hold the port used by the Blynk server

// Your WiFi credentials.
// Set password to "" for open networks.
char ssid[] = "#######";
char pass[] = "#######";

int wifi_connect_count = 0;          // New variable to keep track of how manty times we've tried to connect to the Wi-Fi
int wifi_connect_max_retries = 50;   // New variable to specify how many attempts we will have at connecting to the Wi-Fi

float sleep_time_minutes =     1;   // New variable - how long (in minutes) we sleep for. As this is a float variable then it can be 0.5 for a 30 second test

//thermocouple
int thermoDO = 18;
int thermoCS = 19;
int thermoCLK = 5;
MAX6675 thermo(thermoCLK, thermoCS, thermoDO);

// supply control
const int transistorPin = 14;

// Voltage batterie
#define ANALOG_PIN_0 32
int analog_value = 0;
float volt=0.00;
float volt1=0.00;


void getBatterie()
{
   analog_value = analogRead(ANALOG_PIN_0);
   Serial.println(analog_value);
   volt = analog_value;
   volt1=volt/794;
   Serial.print("Voltage = ");
   Serial.println(volt1);
}
void getBme()
 {

  Wire.begin(); //just added
  float t = bme.readTemperature();
  float p  = (bme.readPressure() / 100.0F);
  float h =  bme.readHumidity();
  float a =  bme.readAltitude(SEALEVELPRESSURE_HPA);
  if (isnan(t) || isnan(p) || isnan(h) || isnan(a)) {
    Serial.println("Failed to read from BME sensor!");
    return;
  }
    Serial.print("Temperature = ");
    Serial.print(t);
    //Serial.print(bme.readTemperature());
    Serial.println(" *C");

    Serial.print("Pressure = ");

    //Serial.print(bme.readPressure() / 100.0F);
    Serial.print(p);
    Serial.println(" hPa");

    Serial.print("Approx. Altitude = ");
    //Serial.print(bme.readAltitude(SEALEVELPRESSURE_HPA));
    Serial.print(a);
    Serial.println(" m");

    Serial.print("Humidity = ");
    //Serial.print(bme.readHumidity());
    Serial.print(h);
    Serial.println(" %");

    Serial.println();
}


void getWeight()
{
  HX711 scale(DOUT, CLK);
  scale.set_scale(calibration_factor); //Adjust to this calibration factor
  Serial.print("Reading: ");
  weight = scale.get_units();
  Serial.print(weight, 1);
  Serial.print(" kg"); // You can change this to other type of weighing value and re-adjust the calibration factor.
  Serial.print(" calibration_factor: ");
  Serial.print(calibration_factor);
  Serial.println();

}

void getSendData()
{
 DS18B20.requestTemperatures();
 tempruche = DS18B20.getTempCByIndex(0); // Sensor 0 will capture Temp in Celcius
 Serial.print("tempruche: ");
 Serial.println(tempruche);

}


void thermoTemp()
{
float tempThermo = thermo.readCelsius();         // reading sensor from analog pin
  Serial.print("tempThermo = ");
  Serial.println(tempThermo);
}

void WiFi_Connect() // New functon to handle the connectuon to the Wi-Fi network
{
  Serial.println(F("Connecting to Wi-Fi"));
  //WiFi.config(device_ip, dns, gateway, subnet); // Not needed if you just want to have a DHCP assigned IP address. If you diont use this then delete the device_ip, dns, gateway & subnet declarations

  if (WiFi.status() != WL_CONNECTED)
  {
      WiFi.begin(ssid, pass); // connect to the network
  }
  while (WiFi.status() != WL_CONNECTED  && wifi_connect_count < wifi_connect_max_retries) // Loop until we've connected, or reached the maximum number of attemps allowed
  {
    delay(500);
    wifi_connect_count++;
    Serial.print(F("Wi-Fi connection - attempt number "));
    Serial.println(wifi_connect_count);
  }

  if (WiFi.status() == WL_CONNECTED)
  {
    WiFi.mode(WIFI_STA);
    Serial.println(F("Wi-Fi CONNECTED"));
    Serial.println();
  }
} // End of void WiFi_Connect

void setup()
{
  Serial.begin(115200);
  pinMode (transistorPin, OUTPUT);

  // New section of code - stop using Blynk.begin, which is a blocking function, and instead do the following:
  //
  // 1) Attempt to connect to Wi-Fi a few times (how many times we try is specified by the 'wifi_connect_max_retries' variable)
  // 2) If we successfully connected to Wi-Fi then attempt to connect to Blynk in a non-blocking way. If we aren't connected to Wi-Fi then go to sleep
  // 3) If we connected to Blynk then run the rest of the code as normal. If we aren't connected to Blynk then go to sleep

  //  Blynk.begin(auth, ssid, pass);//starts wifi and Blynk - Not used in the new code as it's a blocking function
  WiFi_Connect(); // Attempt to connect to Wi-Fi

  if (WiFi.status() == WL_CONNECTED)               // If we managed to connect to Wi-Fi then try to connect to Blynk, else go to sleep
  {
    Blynk.config(auth, blynk_server, blynk_port);  // Initialise the Blynk connection settings
    Blynk.connect();                               // Attempt to connect to Blynk
  }
  else
  {
    Serial.println ("Wi-Fi connection failed - going to sleep");
    //sleep_time_minutes = sleep_time_minutes * 2; // If you enable this line of code the it will make the device go to sleep for twice as long before trying again. Changing to 0.5 would make it try again sooner than normal
    Deep_Sleep_Now();
  }

  if (Blynk.connected())                          // If we manages to connect to Blynk then carry-on as normal, else go to sleep
  {
    Serial.println ("Connected to Blynk");
  }
  else
  {
    //sleep_time_minutes = sleep_time_minutes * 2; // If you enable this line of code the it will make the device go to sleep for twice as long before trying again. Changing to 0.5 would make it try again sooner than normal
    Serial.println("Blynk connection failed - going to sleep");
    Deep_Sleep_Now();
  }
  ++bootCount;
  Serial.println("Boot number: " + String(bootCount));
  digitalWrite (transistorPin, HIGH);  // turn on the supply
  delay(2000);
   bme.begin(0x76);
  // scale.set_scale();
   DS18B20.begin();
 // scale.tare(); //Reset the scale to 0
  //long zero_factor = scale.read_average();


}

void loop()
{
  delay(2000);
  float tempThermo = thermo.readCelsius();
  float t = bme.readTemperature();
  float p  = (bme.readPressure() / 100.0F);
  float h =  bme.readHumidity();
  float a =  bme.readAltitude(SEALEVELPRESSURE_HPA);
  thermoTemp();
  getBme();
  getWeight();
  getSendData();
  getBatterie();
  delay(2000);
  Blynk.virtualWrite(V0, bootCount);
  Blynk.virtualWrite(V1, volt1);
  Blynk.virtualWrite(V4, tempThermo);
  Blynk.virtualWrite(V5,t);
  Blynk.virtualWrite(V6, p);
  Blynk.virtualWrite(V7, h);
  Blynk.virtualWrite(V8, a);
  Blynk.virtualWrite(V9, weight);
  Blynk.virtualWrite(V10, tempruche);
  Blynk.virtualWrite(V11, TIME_TO_SLEEP);
  float wake_time = (float)millis()/float(1000); // Find out how long since the ESP rebooted
  Blynk.virtualWrite(V2, wake_time);  // Wake time
  Serial.print("Wake Time = ");
  Serial.print(wake_time);
  Serial.println(" seconds");
  Blynk.run(); // Needed to ensure that the Wake Time value is always uploaded to Blynk before going to sleep
  delay(100);
  digitalWrite (transistorPin, LOW);  // turn off the supply
  Deep_Sleep_Now();
}

void Deep_Sleep_Now() // New function - moded code out of void loop so that the sleep function can be called if we fail to connect to Wi-Fi or Blynk
{
  esp_sleep_enable_timer_wakeup((uint64_t)(TIME_TO_SLEEP) * uS_TO_S_FACTOR);
  Serial.println("Setup ESP32 to sleep for every " + String(TIME_TO_SLEEP) +
  " Seconds");
  Serial.println("Going to sleep now");
  Serial.flush();
  esp_deep_sleep_start();

  delay(2000);
}